

In this section, you will learn how easy it is to get your workstation up and running using the Chef Development Kit. First, you will download ChefDK. Next, you will install ChefDK; and finally, you will validate the installation with some quick version checks.
You are going to download Chef Development Kit by opening your favorite browser and visiting the Chef.io ChefDK downloads page found at this URL: https://downloads.chef.io/chef-dk/.
Select the platform you are going to install the Chef Development Kit on and then click on the download button that corresponds to the OS Version you are using. In my case, I am selecting the Mac OS X 10.10 version of the ChefDK installer.
As expected, clicking on the download button will transfer the ChefDK installer to your local workstation.
Expand the
Downloadsfolder and click on the ChefDK disk image file to mount the image on your desktop.
To initiate the installer for the Chef Development Kit, double-click on the mounted ChefDK image icon.
The ChefDK image will open, exposing the chefdk package. Double-click on the package icon to begin the installation process.
You will see the Chef Development Kit installer introduction screen. Click on the Continue button to advance the installation.
You will be presented with license information for the Chef Development Kit, which is the commonly used Apache License. I would suggest that you read through the entire license document and perhaps even consult with your lawyer to make sure that you are able to accept this license agreement. Then, click on the Continue button to advance the installation.
Once you've carefully read and understood the license agreement, click on the Agree button to advance the installation.
At this point, you can begin to customize the installation. The options available here are to install for all users or only the currently logged in user. In the example, I am installing for all users of this computer (even though I am the only user).
Next, you can choose the install location. For consistency with regard to the examples in this book, I have left the install location at the default. Click on the Install button when you are ready to begin the actual installation.
As always, you will have to provide credentials to allow the system to install new software. Enter your username and password and click on the Install Software button to continue.
The installer will now go about its business of installing the super fantastic Chef Development Kit, including the corresponding versions of community tools such as Test Kitchen, Food Critic, and Rubocup.
Finally, you will get the installation summary screen congratulating you on your successful installation and keen DevOps Kung-Fu.
The captain has turned off the seat-belt sign, so it is now OK to unmount the ChefDK image, and move about the installation.
Tip
Installing ChefDK on Ubuntu
It is even easier to install the ChefDK on an Ubuntu system. Once you have downloaded the installer, you simply issue a dpkg command as follows:
sudo dpkg -i ~/Downloads/chefdk_0.12.0-1_amd64.deb
That's it. You should see the "Thank you for installing Chef Development Kit" message.
The ChefDK installer is a superhero for DevOps aficionados, saving them time and energy by installing the major necessities for a Chef workstation. Still, let's double-check the work done by the installer to make sure that we are really ready to go.
First, let's just try a simple command to see if things look right. Open a terminal window and issue the command chef --help. If the install was successful, you should see information about using Chef.
Next, let's use the new Chef tool to do a deeper validation of the install. Issue the following command in your terminal session:
chef verify
You should see the Chef tool validate each of the major packages installed during the ChefDK installation. Note that, depending on the state of your (OS X) workstation at the time you run this command, you may receive an error message regarding the need to install the command-line tools for gcc. It may look something like this:
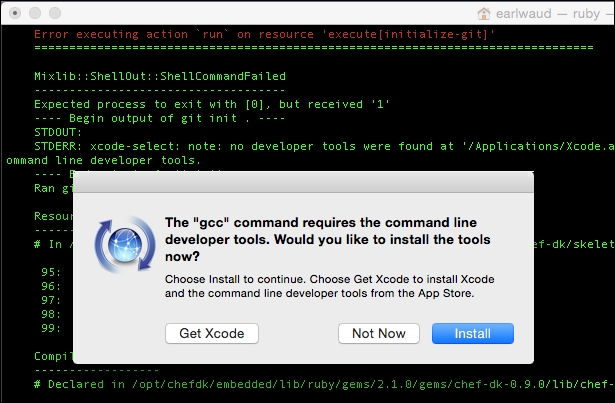
If you get a message such as the preceding one, go ahead and install the command-line tools and then run the chef verify command again. This time, you should get a clean run of the command, and the output should be very similar to that shown in the preceding screenshot.
Now, at this point, things are looking pretty good, and you should be feeling fine. So, let's do one last validation check just to be 100% certain. Let's check the versions of some of the expected tools installed via the ChefDK installer.
Issue the following commands:
chef --version
ohai --version
foodcritic --version
rubocop --version
rspec --version
Your results should look something like this:
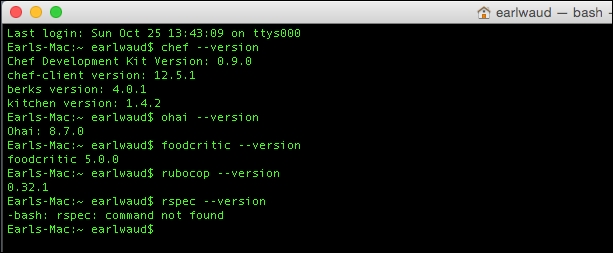
Hey wait… what happened to rspec? The Version 0.12 ChefDK installer does not seem to have successfully installed rspec, which is a requirement for the Chef-specific tool ChefSpec. That's not good. What went wrong? Everything seemed to have been installed based on the verify command we just used. What gives?
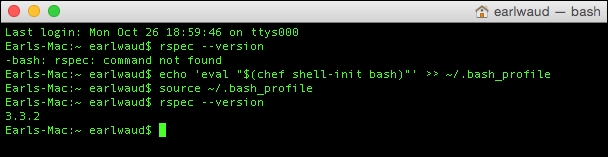
Well, rspec is installed, there is just one more step that we need to do. By the way, I think this is something that should be done by the ChefDK installer, but for whatever reason it's not, and it falls on our shoulders to handle it.
So what do we have to do? We need to set up the environment used in our terminal window for our Chef workstation development. How do we do that?
Fortunately, Chef has a command for that. It is the chef shell-init command. You can run this command interactively every time you open a new terminal window, or you can update your profile so that it is run automatically. I would recommend updating your profile, but let me show you both ways so you can make the call.
To make the interactive change, you would issue a command in the following format:
eval "$(chef shell-init SHELL_NAME)"
The actual call will be the following for the bash shell:
eval "$(chef shell-init bash)"
If you want to make the change more permanent, then you need to issue a command in the following format:
echo 'eval "$(chef shell-init SHELL_NAME)"' >> ~/.YOUR_SHELL_RC_FILE
If you are using Mac, the commands will be:
echo 'eval "$(chef shell-init bash)"' >> ~/.bash_profile
source ~/.bash_profile
If you are using Ubuntu, the commands will be:
echo 'eval "$(chef shell-init bash)"' >> ~/.bashrc
source ~/.bashrc
This echo command will add the eval command to your bash startup so that each run of your bash session will already have the desired environment ready to go for your Chef development work.
It should look something like this:
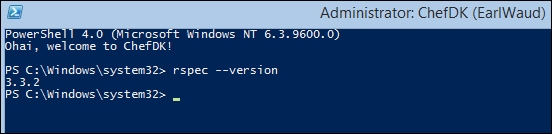
By the way, when you install the ChefDK onto a Windows system, the installation creates a Chef Development Kit icon on your desktop. When you execute from icon, a Chef-specific PowerShell session is launched. It will automatically run the chef shell-init command and set up the full environment needed for Chef. So there is no need to do this last step on a Windows workstation.
Tip
Chef Development Kit on a Windows workstation
When you launch Chef Development Kit from your Windows workstation, remember to right-click the icon and choose "Run as administrator." This allows PowerShell to use the correct permissions to set up the Chef environment.
Well, there you have it: the successful installation of the ChefDK. Your workstation is ready to do some real Chef work now. You should feel pretty awesome!
Visit this link to download the installer for the ChefDK or Chef server at https://www.chef.io/chef/get-chef/.
Here is Chef.io's information on installing the Chef Development Kit: https://docs.chef.io/install_dk.html. The Chef DK change log can be found at https://github.com/chef/chef-dk/blob/master/CHANGELOG.md.