

Once you've defined new IP interfaces, the next step is to configure routing. In most cases, Linux host routing configuration is limited solely to specifying a host's default gateway. While that's typically as far as most need to go, a Linux host is capable of being a full-fledged router. In this recipe, we'll learn how to interrogate a Linux hosts routing table as well as manually configure routes.
In order to view and manipulate networking settings, you'll want to ensure that you have the iproute2 toolset installed. If not present on the system, it can be installed by using the following command:
sudo apt-get install iproute2
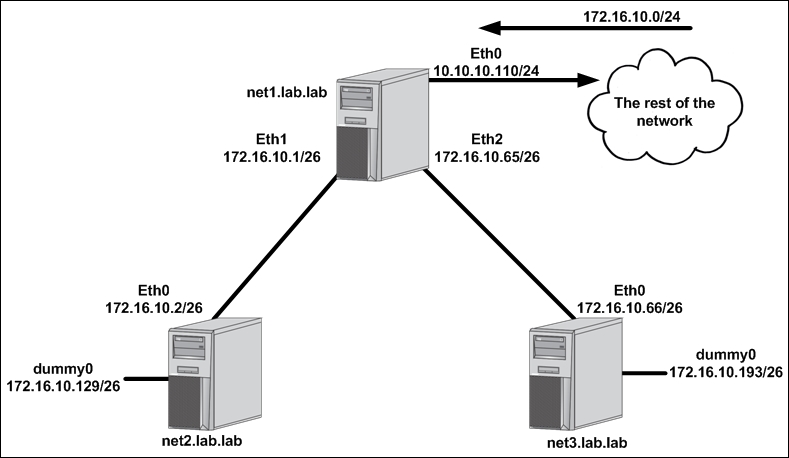
In order to make network changes to the host, you'll also need root-level access. This recipe will continue the lab topology from the previous recipe. We left the topology looking like this after the previous recipe:
Despite Linux hosts being capable of routing, they do not do so by default. In order for routing to occur, we need to modify a kernel-level parameter to enable IP forwarding. We can check the current state of the setting a couple of different ways:
By using the
sysctlcommand:sysctl net.ipv4.ip_forward
By querying the
/proc/filesystem directly:more /proc/sys/net/ipv4/ip_forward
In either case, if the returned value is 1, IP forwarding is enabled. If you do not receive a 1, you'll need to enable IP forwarding in order for the Linux host to route packets through the system. You can manually enable IP forwarding by using the sysctl command or again by directly interacting with the /proc/ filesystem:
sudo sysctl -w net.ipv4.ip_forward=1
echo 1 | sudo tee /proc/sys/net/ipv4/ip_forward
While this enables IP forwarding on the fly, this setting does not persist through a reboot. To make the setting persistent, you need to modify /etc/sysctl.conf, uncomment the line for IP forwarding, and ensure it's set to 1:
…<Additional output removed for brevity>…
# Uncomment the next line to enable packet forwarding for IPv4
net.ipv4.ip_forward=1
…<Additional output removed for brevity>…
Note
You may note that we're only modifying settings related to IPv4 at this time. Don't worry; we'll cover IPv6 and Docker networking later on in Chapter 10, Leveraging IPv6.
Once we've verified forwarding is configured, let's look at the routing table on all three lab hosts by using the ip route show command:
user@net1:~$ ip route show
default via 10.10.10.1 dev eth0
10.10.10.0/24 dev eth0  proto kernel  scope link  src 10.10.10.110
172.16.10.0/26 dev eth1  proto kernel  scope link  src 172.16.10.1
172.16.10.64/26 dev eth2  proto kernel  scope link  src 172.16.10.65

user@net2:~$ ip route show
172.16.10.0/26 dev eth0  proto kernel  scope link  src 172.16.10.2
172.16.10.128/26 dev dummy0  proto kernel  scope link  src 172.16.10.129

user@net3:~$ ip route show
172.16.10.64/26 dev eth0  proto kernel  scope link  src 172.16.10.66
172.16.10.192/26 dev dummy0  proto kernel  scope link  src 172.16.10.193
There are a couple of interesting items to note here. First off, we notice that the hosts have routes listed that are associated with each of their IP interfaces. Based on the subnet mask associated with the interface, the host can determine the network the interface is associated with. This route is inherent and would be said to be directly connected. Directly connected routes are how the system knows what IP destinations are directly connected versus which ones need to be forwarded to a next hop to reach a remote destination.
Second, in the last recipe, we added two additional interfaces to the host net1 to provide connectivity to hosts net2 and net3. However, this alone only allows net1 to talk to net2 and net3. If we want net2 and net3 to be reachable via the rest of the network, they'll need a default route pointing at their respective interfaces on net1. Once again, let's do this in two separate manners. On net2, we'll update the network configuration file and reload the interface, and on net3, we'll add the default route directly through the command line.
On host net2, update the file /etc/network/interfaces and add a gateway on the eth0 interface pointing at the connected interface on the host net1:
# The primary network interface
auto eth0
iface eth0 inet static
        address 172.16.10.2
        netmask 255.255.255.192
        gateway 172.16.10.1
To activate the new configuration, we'll reload the interface:
user@net2:~$ sudo ifdown eth0 && sudo ifup eth0
Now we should be able to see the default route in the net2 host's routing table pointing out of eth0 at the net1 host's directly connected interface (172.16.10.1):
user@net2:~$ ip route show
default via 172.16.10.1 dev eth0
172.16.10.0/26 dev eth0  proto kernel  scope link  src 172.16.10.2
172.16.10.128/26 dev dummy0  proto kernel  scope link  src 172.16.10.129
user@net2:~$
On the host net3, we'll use the iproute2 toolset to modify the hosts routing table dynamically. To do this, we'll execute the following command:
user@net3:~$ sudo ip route add default via 172.16.10.65
Note
Note that we use the keyword default. This represents the default gateway or the destination of 0.0.0.0/0 in Classless Inter-domain Routing (CIDR) notation. We could have executed the command using the 0.0.0.0/0 syntax as well.
After executing the command, we'll check the routing table to make sure that we now have a default route pointing at net1 (172.16.10.65):
user@net3:~$ ip route show
default via 172.16.10.65 dev eth0
172.16.10.64/26 dev eth0  proto kernel  scope link  src 172.16.10.66
172.16.10.192/26 dev dummy0  proto kernel  scope link  src 172.16.10.193
user@net3:~$
At this point, the hosts and the rest of the network should have full network reachability to all of their physical interfaces. However, the dummy interfaces created in the previous recipe are not reachable by any other hosts than the ones they are defined on. In order to make those reachable, we're going to need to add some static routes.
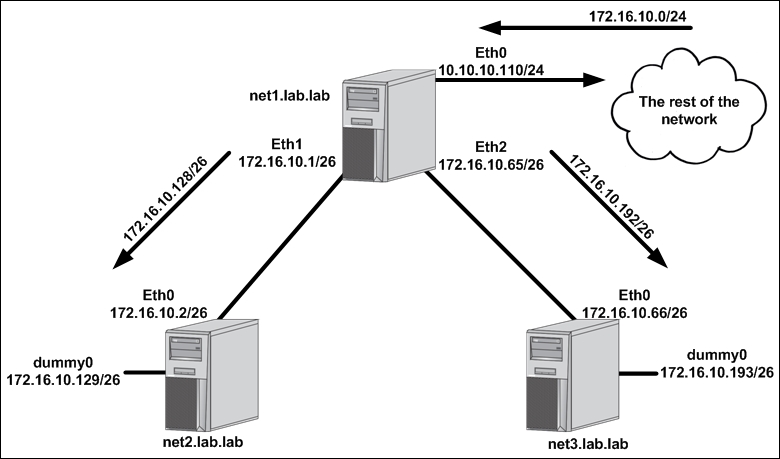
The dummy interface networks are 172.16.10.128/26 and 172.16.10.192/26. Because these networks are part of the larger 172.16.10.0/24 summary, the rest of the network already knows to route to the net1 host's 10.10.10.110 interface to get to these prefixes. However, net1 currently doesn't know where those prefixes live and will, in turn, loop the traffic right back to where it came from following its default route. To solve this, we need to add two static routes on net1:
We can add these routes ad hoc through the iproute2 command-line tools or we can add them in a more persistent fashion as part of the host's network script. Let's do one of each:
To add the 172.16.10.128/26 route pointing at net2, we'll use the command-line tool:
user@net1:~$ sudo ip route add 172.16.10.128/26 via 172.16.10.2
As you can see, adding manual routes is done through the ip route add command syntax. The subnet that needs to be reached is specified along with the associated next hop address. The command takes effect immediately as the host populates the routing table instantly to reflect the change:
user@net1:~$ ip route
default via 10.10.10.1 dev eth0
10.10.10.0/24 dev eth0  proto kernel  scope link  src 10.10.10.110
172.16.10.0/26 dev eth1  proto kernel  scope link  src 172.16.10.1
172.16.10.64/26 dev eth2  proto kernel  scope link  src 172.16.10.65
172.16.10.128/26 via 172.16.10.2 dev eth1
user@net1:~$
If we wish to make a route persistent, we can allocate it as a post-up interface configuration. The post-up interface configurations take place directly after an interface is loaded. If we want the route 172.16.10.192/26 to be added to the hosts routing table the instant eth2 comes online, we can edit the /etc/network/interfaces configuration script as follows:
auto eth2
iface eth2 inet static
        address 172.16.10.65
        netmask 255.255.255.192
        post-up ip route add 172.16.10.192/26 via 172.16.10.66
After adding the configuration, we can reload the interface to force the configuration file to reprocess:
user@net1:~$ sudo ifdown eth2 && sudo ifup eth2
Note
In some cases, the host may not process the post-up command because we defined the address on the interface manually in an earlier recipe. Deleting the IP address before reloading the interface would resolve this issue; however, in these cases, rebooting the host is the easiest (and cleanest) course of action.
And our routing table will now show both routes:
user@net1:~$ ip route
default via 10.10.10.1 dev eth0
10.10.10.0/24 dev eth0  proto kernel  scope link  src 10.10.10.110
172.16.10.0/26 dev eth1  proto kernel  scope link  src 172.16.10.1
172.16.10.64/26 dev eth2  proto kernel  scope link  src 172.16.10.65
172.16.10.128/26 via 172.16.10.2 dev eth1
172.16.10.192/26 via 172.16.10.66 dev eth2
user@net1:~$
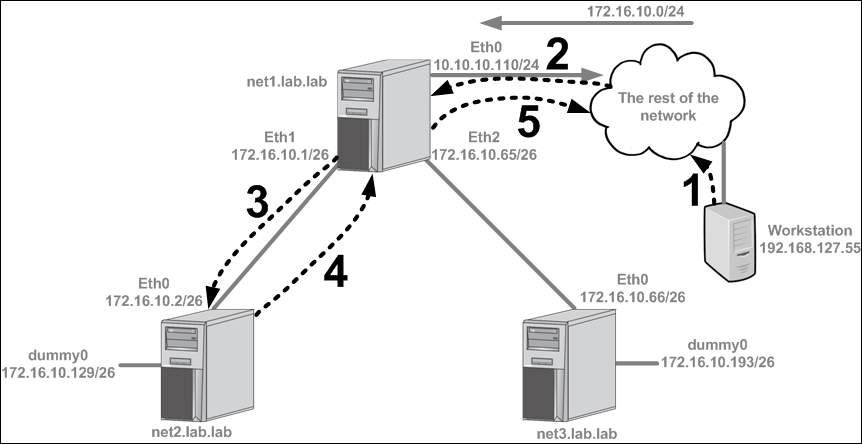
To verify this is working as expected, let's do some testing from a remote workstation that's attempting to ping the dummy interface on the host net2 (172.16.10.129). Assuming the workstation is connected to an interface that's not on the external network, the flow might look like this:
A workstation with an IP address of
192.168.127.55is attempting to reach the dummy interface connected tonet2at its IP address of172.16.10.129. The workstation sends the traffic towards its default gateway since the destination it's looking for is not directly connected.The network has a route for
172.16.10.0/24pointing atnet1's eth0interface (10.10.10.110). The destination IP address (172.16.10.129) is a member of that larger prefix, so the network forwards the workstation's traffic on to the hostnet1.The
net1host examines the traffic, interrogates its routing table, and determines that it has a route for that prefix pointing towards thenet2with a next hop of172.16.10.2.The
net2receives the request, realizes that the dummy interface is directly connected, and attempts to send a reply back to the workstation. Not having a specific route for the destination of192.168.127.55, the hostnet2sends its reply to its default gateway, which isnet1(172.16.10.1).Similarly,
net1does not have a specific route for the destination of192.168.127.55, so it forwards the traffic back to the network via its default gateway. It is assumed that the network has reachability to return the traffic to the workstation.
In the case that we'd like to remove statically defined routes, we can do so with the ip route delete subcommand. For instance, here's an example of adding a route and then deleting it:
user@net1:~$ sudo ip route add 172.16.10.128/26 via 172.16.10.2
user@net1:~$ sudo ip route delete 172.16.10.128/26
Notice how we only need to specify the destination prefix when deleting the route, not the next hop.