

You're now going to install Cacti from source on a CentOS 7 system. You'll use CentOS 7 as it's 100% binary compatible with Red Hat Enterprise Linux 7, but in fact you can follow most of the installation process on other Linux distributions like Ubuntu or SUSE Linux as well. By installing from source you'll get some insight into the inner workings of Cacti, and it will also provide you with a system that most Cacti and plugin developers are used to. There are differences between a source installation and a yum/apt installation, but they will be described later on. Let's get started.
Assume that the CentOS system has been installed with only the "Server" package selected and there is no graphical user interface installed.
This is the default installation for a CentOS system with no manual package selection.
The default CentOS installation is missing several important packages. This section will show you how to install all required packages on your CentOS 7 system as well as the latest MariaDB 10.x version:
- Set up the MariaDB repository for installing the latest MariaDB version. You can get the latest repository from https://downloads.mariadb.org/mariadb/repositories/:
echo "# MariaDB 10.1 CentOS repository list - created 2017-02-08 16:11 UTC
# http://downloads.mariadb.org/mariadb/repositories/
[mariadb]
name = MariaDB
baseurl = http://yum.mariadb.org/10.1/centos7-amd64
gpgkey=https://yum.mariadb.org/RPM-GPG-KEY-MariaDB
gpgcheck=1" > /etc/yum.repos.d/MariaDB.repo
- Now we can install all required packages for Cacti:
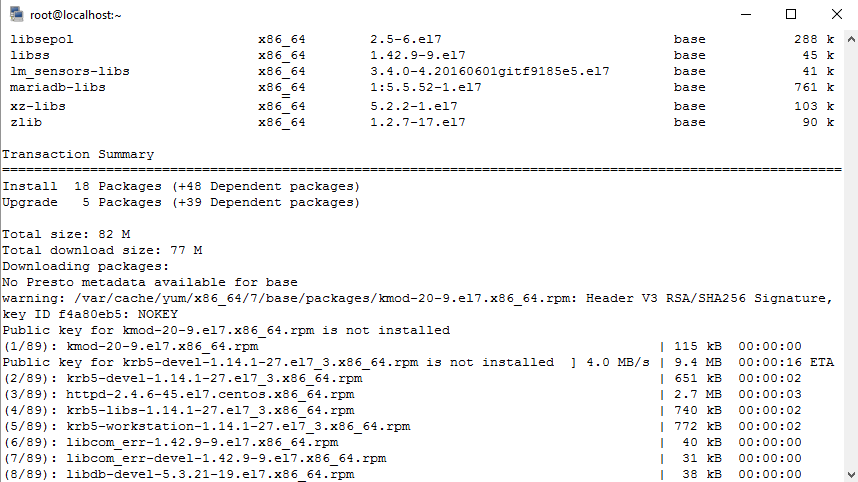
yum -y install mariadb-server php php-cli php-mysql net-snmp-utils rrdtool
php-snmp gcc mariadb-devel net-snmp-devel autoconf automake libtool dos2unix wget help2man
php-posix php-ldap php-mbstring php-gd
- At this point you should also take care of updating your packages to the latest version. The following command will do this for you:
yum -y upgrade- The next step will start the required MySQL/MariaDB server:
systemctl restart mariadb.service- Cacti 1.x requires the
timezonetables within MySQL to be populated. The following commands allow you to do so:
mysql_tzinfo_to_sql /usr/share/zoneinfo > /tmp/mysql_timezone.sql
mysql -u root mysql < /tmp/mysql_timezone.sql- The
timezonesettings for Cacti are very important, so you will need to set your currenttimezone. The following command will help you to do so:
timedatectl set-timezone Europe/Berlin- Now that you have set your
timezone, installed the MySQL/MariaDB server, and upgraded your system, you will have to set some special configuration parameters for MySQL/MariaDB. Edit the/etc/my.cnffile:
vi /etc/my.cnf- Change your
[mysqld]section. Make sure to change the time zone setting to your actualtimezone:
[mysqld]
datadir=/var/lib/mysql
socket=/var/lib/mysql/mysql.sock
symbolic-links=0
max_heap_table_size=90M
max_allowed_packet=16M
tmp_table_size=64M
join_buffer_size=64M
innodb_file_per_table=ON
innodb_buffer_pool_size=450M
innodb_doublewrite=OFF
innodb_additional_mem_pool_size=80M
innodb_lock_wait_timeout=50
innodb_flush_log_at_trx_commit=2
collation_server=utf8_general_ci
character_set_client=utf8
default-time-zone='Europe/Berlin'
innodb_flush_log_at_timeout=3
innodb_read_io_threads=32
innodb_write_io_threads=16
- As you have already learned, the
timezonesetting is very important in Cacti. You already changed it for the database server and your system, but PHP also needs to be aware of yourtimezone. Therefore, you will now edit the/etc/php.inifile. While doing so you will also enable error logging for the syslog system, which will help you find issues with custom plugins. Now edit the/etc/php.inifile and set the following lines:
; Log errors to syslog (Event Log on NT, not valid in Windows 95).
error_log = syslog
...
[Date]
; Defines the default timezone used by the date functions
; http://php.net/date.timezone
date.timezone = Europe/Berlin
- The next step will enable the web server as well as restart the required MySQL/MariaDB server. Use the following commands to start these:
systemctl start httpd.service
systemctl restart mariadb.service- Now that the web server is up and running, you should enable the
http/httpsports on the CentOS firewall. Thefirewall-cmdcommand will help you with this task:
firewall-cmd --permanent --zone=public --add-service=https
firewall-cmd --permanent --zone=public --add-service=http
firewall-cmd --reload- As you want to have both services started automatically after a reboot of the system, you should also enable both services during boot time. This final step will allow you to do so:
systemctl enable httpd.service
systemctl enable mariadb.service- As a final step you should set the SELinux system to permissive. On a CentOS/RHEL system this can be done by editing the file
/etc/selinux/configand setting the SELINUX variable to permissive, which will become active after the next restart:
SELINUX=permissive
- Before continuing it is now a good time to restart the system.
You just gave the system a location to find the remaining packages needed for the Cacti installation and then installed them. You also enabled the web server and database server to start at boot time. In addition, you have also set some very important system settings and disabled the SELinux setting. You are now ready to start the next installation phase.
Go to http://www.cacti.net and download the latest version of Cacti. In the top-left corner, under Downloads, click on the Cacti link. You can download the Cacti files from there. Please also make a note of the latest stable version. You will need this information in the following steps. For simplicity, we're assuming that your server has an internet connection.
Note
Cacti version variable CACTIVERSION: As the Cacti version may be different, we will use the CACTIVERSION or NEWCACTIVERSION variables during the different installation and upgrade steps to refer to the Cacti version. Check the current version on the Cacti website and change these variables accordingly.
It's now time to download the latest Cacti version to your server. You will need your system username and password to login to your CentOS installation. If you have installed your CentOS system with the default settings, you should already have an SSH server running. If you're already logged in on the machine, you can ignore the first step:
- From a Windows machine, log on to your system using an SSH client such as Putty. If this is the first time you are connecting to the server, Putty will display a security alert and ask you to accept the RSA key. After doing so, Putty will display a logon prompt where you can log on to the system.
- Maximizing the window so long text lines do not break at the end of the line might make things easier.
- You'll need to become the root user in order to be able to set up Cacti properly. Should that not be an option, performing these steps with
sudoshould achieve the same results. - Change to
/var/www/html. This is the document root for Apache. - Create the
CACTIVERSIONvariable and set it to the current Cacti version
export CACTIVERSION=1.1.28- To download Cacti, you can use the
wgetcommand. Enter the following command to download Cacti:
wget https://www.cacti.net/downloads/cacti-$CACTIVERSION.tar.gz- You should see the following output on your screen:
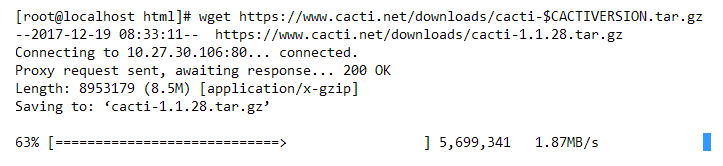
- You now have the
tar.gzfile on your system, so let's move on and extract it. The following command will extract the files and directories contained in the archive to the current directory:
tar -xzvf cacti-$CACTIVERSION.tar.gz- Finally, you are going to create a symbolic link to this new Cacti directory. This will allow you to easily switch between different Cacti versions later, for example, when upgrading Cacti. To create a symbolic link, enter the following command to create a link named
cactiwhich points to thecacti-1.1.28directory:
ln -s cacti-$CACTIVERSION cacti
The database isn't automatically created during the installation of Cacti. Therefore, you are now going to create it here. At the same time, a database user for Cacti should be created to allow it to access the database. It's also a good idea to secure the MySQL database server by using one of the included CentOS tools or the commands provided.
For simplicity, let's assume that you're going to host the database on the same server as Cacti:
- Execute the following command to log on to the MySQL/MariaDB CLI:
mysql -u root mysql- The default MySQL root account does not have a password set, so you can do it now:
SET PASSWORD FOR root@localhost = PASSWORD('MyN3wpassw0rd');- You can remove the example database, as it is not needed:
DROP DATABASE test;- Together with the example database, some example users may have been created. You can remove these with the following command:
DELETE FROM user WHERE NOT (host = "localhost" AND user = "root");- On a CentOS distribution you can use the following command to guide you through the preceding steps:
/usr/bin/mysql_secure_installation - Now that MySQL is secured, let's create the Cacti database. Enter the following command. This will ask for the MySQL root password which you provided in setup step 1 or step 5. When finished, you'll have an empty database called
cacti:
mysqladmin -u root -p create cacti - As the database is still empty, you need to create the tables and fill them with the initial data that comes with Cacti. The following command will do just that. Once the command finishes you'll have a working
cactidatabase:
mysql -u root -p cacti < /var/www/html/cacti/cacti.sql- Unfortunately, Cacti is still unable to access it, therefore you're now going to create a database user for Cacti. Enter the following command:
mysql -u root -p mysql- You'll see the following on the screen:
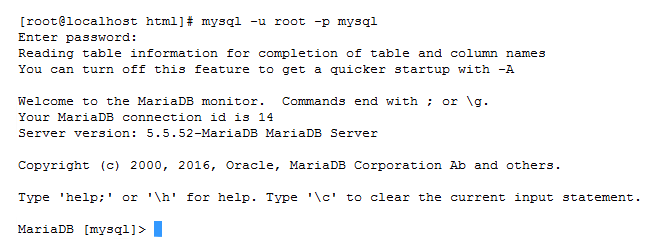
- Type the next few lines in the MySQL prompt to create the Cacti user and allow him to use the
time_zone_nametable of MySQL. Make sure to choose a strong password:
GRANT SELECT ON mysql.time_zone_name TO cactiuser@localhost IDENTIFIED BY 'MyV3ryStr0ngPassword';
GRANT ALL ON cacti.* TO cactiuser@localhost IDENTIFIED BY 'MyV3ryStr0ngPassword';
flush privileges;
exitYou used some tools to secure the MySQL server and created a database. You also filled the Cacti database with the initial Cacti data and created a MySQL user for Cacti. However, Cacti still needs to know how to access the database, so let's move on to the next step.
If you are not using CentOS to install Cacti, you can use some MySQL internal functions to secure your installation.
You need to tell Cacti where to find the database and which credentials it should use to access it. This is done by editing the config.php file in the include directory.
The database and some other special configuration tasks are done by editing the information in the config.php file:
- Change to the
cactidirectory:
cd /var/www/html/cacti/include- Edit
config.phpwithvi:
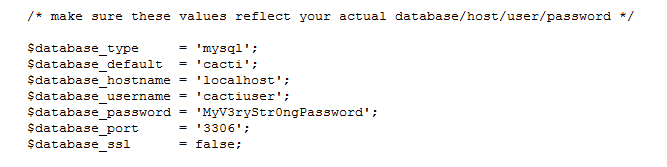
vi config.php- Change the
$database_usernameand$database_passwordfields to the previously created username and password. The content of the file should now look like the following:
There are many other settings within this file that we will explain in later chapters, so leave them alone for now.
For the poller to work correctly, Cacti also requires a system user account. You are going to create one now and also set up the poller's cron entry. We are going for a one-minute-based poller interval to prepare for the one-minute polling in a later chapter.
Let's create the cron entry so the poller runs frequently:
- To create a user called
cactiuser, issue the following command as root. It will also add the user to theapachegroup:
adduser --groups apache cactiuser - Change to the
cactidirectory:
cd /var/www/html/cacti- Change the ownership of the
cactidirectory, the newly created user, andapache. You will also change the permissions of some special directories as well as enable theapacheuser group to write to therraandlogdirectory. Thesetfaclcommand is important for some internal Cacti processes to work properly and makes sure that theapacheuser is able to write to these directories:
chown -R cactiuser.apache /var/www/html/cacti/
chmod -R 775 rra/ log/ resource/ scripts/ cache/
setfacl -d -m group:apache:rw /var/www/html/cacti/rra
setfacl -d -m group:apache:rw /var/www/html/cacti/log- Add the poller cron entry. Edit the
cactifile in/etc/cron.d:
vi /etc/cron.d/cacti- Add the following line to the file:
*/1 * * * * cactiuser /usr/bin/php /var/www/html/cacti/poller.php > /dev/null 2>&1
- Save the file.
You just created a system user that runs the Cacti poller, and scheduled the poller to run every one-minute. Cacti, by default, is still configured for a five-minute-based polling interval, but it can be changed to one minute if needed. The poller itself can run at different intervals. You are going to configure a one minute polling interval in a later chapter.
By default, Cacti comes with a poller written in PHP. For small to medium installations this poller does its job just fine, but for large installations an alternative poller needs to be used, and Spine is it. It's written in C and is much faster than the original poller because it uses the multi-tasking capabilities of modern operating systems and hardware.
Here we will take a deep dive into installing and configuring the Spine poller:
- As with the Cacti main files, go to http://www.cacti.net and click on
Spineunder theDownloadsection. Make a note of the latest stable version. - If not already done, create the
CACTIVERSIONvariable and set it to the current Cacti version:
export CACTIVERSION=1.1.28- Change directories to
/tmp/and issue the following command:
cd /tmpwget https://www.cacti.net/downloads/spine/cacti-spine-$CACTIVERSION.tar.gz
- Extract the file:
tar -xzvf cacti-spine-$CACTIVERSION.tar.gz- Change to the newly created directory:
cd cacti-spine-$CACTIVERSION- Prepare the directory for compilation. Please note that this step may not work on other distributions, and additional steps may be needed:
./bootstrap- Configure the compiling environment:
./configure - Compile Spine:
make- Once the
makecommand finishes, install Spine:
make install- Now change the owner of the spine binary to root and set the sticky bit so you can use ICMP pings:
chown root:root /usr/local/spine/bin/spinechmod +s /usr/local/spine/bin/spine
- You now have Spine installed, but it needs to be configured. Therefore, copy the sample configuration file to a location where Spine will find it:
cp /usr/local/spine/etc/spine.conf.dist /etc/spine.conf- Edit the file in
vi:
vi /etc/spine.conf- Change the database configuration to match the settings from earlier:
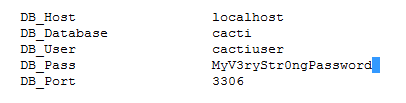
- Create a symbolic link in
/sbinto thespinebinary:
ln -s /usr/local/spine/bin/spine /sbin/spineYou just set up a basic development environment for compiling Spine, compiled it, and then installed it. You also configured Spine to use the correct database information.
Note
Compiling Spine on other Linux distributions: When compiling Spine on other Linux distributions, such as Ubuntu, you will have to go through some additional steps. For more information, refer to http://docs.cacti.net/manual:100:1_installation.1_install_unix.6_install_and_configure_spine.
The main difference between installing Cacti from source and using apt/yum-based installations is the location of the configuration files and availability of patches. Cacti, by default, does not follow the Filesystem Hierarchy Standard (FHS) defined for Linux operating systems. The FHS defines directories where applications should add their configuration or log files. The apt/yum-based installations usually follow this standard. Due to this, add-ons such as the plugin architecture may not be available on all platforms using apt/yum.
The main advantage of using apt/yum based installations is the ease of installation, but as we've just seen, installing Cacti isn't very difficult.
However, the disadvantage of using apt or yum is the availability of newer Cacti versions. Source-based Cacti installations can be upgraded to the latest version as soon as they are available on the Cacti website, while apt/yum-based installs might need to wait until the package maintainers update their repositories.
Here is a little challenge for you. It's not difficult, but it will allow you to alter the installation to suit your needs. What if you want to use a remote database server? Maybe you want to use an existing, dedicated MySQL server instead of hosting the database on the same system as Cacti, or you want to separate the roles to allow more growth. Can you figure out what to change?
Solution: Create the MySQL database on the remote system using the same command as if installed locally but this time use the -h <hostname> option to specify the remote server. When creating the user and granting it permissions, use the following command, assuming the Cacti server has the IP, 192.168.0.10:
GRANT ALL ON cacti.* TO cactiuser@'192.168.0.10' IDENTIFIED BY 'MyV3ryStr0ngPassword';
flush privileges;
exit
This will allow the Cacti user access to the database from the Cacti server. Now change $database_hostname in config.php and DB_Host in spine.conf on the Cacti server to point to your remote database server. On the database server, you will also have to allow traffic to the 3306 database port using the following firewall commands:
firewall-cmd --permanent --zone=public --add-port=3306/tcpfirewall-cmd --reload