Book Image

Manage Partitions with GParted How-to

By : Curtis Gedak
Book Image

Manage Partitions with GParted How-to

By: Curtis Gedak

Overview of this book

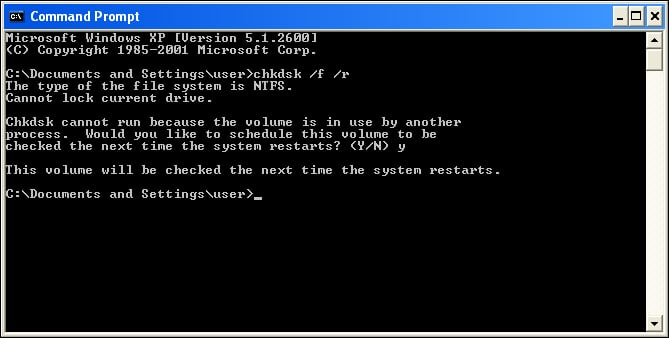
Modern disk drives can store vast amounts of information. To effectively use all of this space, you can partition disk drives into separate storage areas. These separate storage areas enable you to organize your data, improve system performance, and install and use many operating systems"Manage Partitions with GParted" is a practical, hands-on guide providing you with step-by-step instructions to effectively organize your hard drive. You start with simple tasks that help you identify drives and partitions and progress to advanced tasks such as preparing for new operating systemsThis book provides ample screen shots to help you effectively use your hard drive. You start with simple tasks that help you to identify drives and partitions. Next you progress to tasks covering the basics of how to grow, shrink, move, and copy partitions without data loss. You finish with advanced tasks that use the basics to prepare for new operating systems, migrate space between partitions, and share data among Windows, Linux, and Mac OS X. By following through the tasks, from basic to advanced, this book will empower you with the knowledge and tools to Manage Partitions with GParted.
Table of Contents (7 chapters)

Checking and repairing a partition (Should know)


Sometimes problems arise with the file systems in partitions. In the following section you will learn how to identify and address problems with file systems.

How to do it...

You can identify possible file system problems by following these steps:

  1. GParted indicates possible file system problems by placing an exclamation mark triangle icon beside the partition entry. If GParted displays the exclamation mark triangle icon, as shown in the following screenshot, select the partition:

  2. Choose the Partition | Information menu option.

  3. View the problem in the Warning section at the bottom of the window.

  4. Click on Close to close the Information window.

You can attempt repair of file system problems by following these steps:

  1. Choose the Partition | Check menu option to queue the check operation. The queued check operation is shown in the operations pane at the bottom of the window. The operations pane appears when at least one operation is queued.

  2. Choose the Edit | Apply All Operations menu option to apply the queued operations to disk.

  3. Click on Apply to apply operations to disk.

  4. Click on Close to close the apply operations to disk window.

How it works...

When GParted reads information from the device partitions and file systems, it makes notes of any problems encountered. The presence of these problems is indicated by an exclamation mark triangle icon beside the partition entry.

Examples of problems that occur are as follows:

  • The file system contains inconsistencies and requires repair

  • The file system is smaller than the containing partition and could be grown to use space more effectively

  • Some required software is missing from the Linux installation so GParted is unable to determine space usage in a file system

Note that the GParted Live image contains all of the required software

There's more...

While GParted operations are in the process of being applied, you can click on Details to open a details pane. Inside this pane you can click on each of the hierarchy of operations to expand and view more detailed information.

Checking and fixing NTFS file systems

An NTFS file system can become inconsistent if Windows is not cleanly shut down, for example, if the computer was powered off while it was running. To repair the NTFS file system, the preferred practice is to boot into Windows, open a command prompt (press Windows logo + R and enter cmd.exe) and use the check disk program by entering the following command:

chkdsk /f /r

Where the parameters indicate the following:

  • /f: Fixes errors on the disk. The disk must be locked.

  • /r: Locates bad sectors and recovers readable information. The disk must be locked.

Note that if chkdsk cannot lock the drive, a message appears that asks you if you want to check the drive the next time you restart the computer. Answer y to this question, as shown in the following screenshot:

After entering the chkdsk command, go through two reboot cycles to ensure that Windows has completely repaired the file system. A screen similar to the following is shown while chkdsk is running: