

In order to be effective at working with SQL Server and PowerShell, knowing how to explore and discover cmdlets, snap-ins, and modules is in order.
Log in to your SQL Server instance, and launch PowerShell ISE. If you prefer the console, you can also launch that instead.
In this recipe we will list the SQL-Server related commands and cmdlets.
To discover SQL-related cmdlets, type the following in your PowerShell editor and run:
#how many commands from modules that
#have SQL in the name
Get-Command -Module "*SQL*" | Measure-Object

#list all the SQL-related commands
Get-Command -Module "*SQL*" |
Select CommandType, Name, ModuleName |
Sort -Property ModuleName, CommandType, Name |
Format-Table -AutoSize
After you execute the line, your output window should look similar to the following screenshot:

To see which of these modules are loaded, type the following in your editor and run:
Get-Module -Name "*SQL*"
If you have already used any of the cmdlets in the previous step, then you should see both SQLPS and SQLASCMDLETS. Otherwise, you will need to load these modules before you can use them.
To explicitly load these modules, type the following and run:
Import-Module -Name "SQLPS"
Note that SQLASCMDLETS will be loaded when you load SQLPS.
At the core of PowerShell are cmdlets. A cmdlet (pronounced commandlet) can be a compiled, reusable .NET code, or an advanced function, or a workflow that typically performs a very specific task. All cmdlets follow the verb-noun naming notation.
PowerShell ships with many cmdlets and can be further extended if the shipped cmdlets are not sufficient for your purposes.
A legacy way of extending PowerShell is by registering additional snap-ins. A snap-in is a binary, or a DLL, that contains cmdlets. You can create your own by building your own .NET source, compiling, and registering the snap-in. You will always need to register snap-ins before you can use them. Snap-ins are a popular way of extending PowerShell.
The following table summarizes common tasks with snap-ins:
|
Task |
Syntax |
|---|---|
|
| |
|
| |
|
| |
|
|
When starting, PowerShell V2, modules are available as the improved and preferred method of extending PowerShell.
A module is a package that can contain cmdlets, providers, functions, variables, and aliases. In PowerShell V2, modules are not loaded by default, so required modules need to be explicitly imported.
Common tasks with modules are summarized in the following table:
|
Task |
Syntax |
|---|---|
|
| |
|
| |
|
| |
|
|
One of the improved features with PowerShell V3 is that it supports autoloading modules. You do not need to always explicitly load modules before using the contained cmdlets. Using the cmdlet in your script is enough to trigger PowerShell to load the module that contains it.
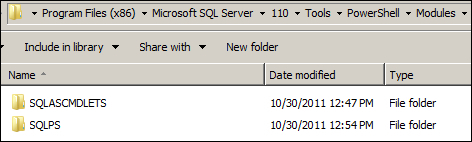
The SQL Server 2012 modules are located in the PowerShell/Modules folder of the Install directory:
The following table shows the list of the SQLPS and SQLASCMDLETS cmdlets of this version:
|
CommandType Name |
ModuleName |
|---|---|
|
|
|
|
|
|
|
|
|
|
|
|
|
|
|
|
|
|
|
|
|
|
|
|
|
|
|
|
|
|
|
|
|
|
|
|
|
|
|
|
|
|
|
|
|
|
|
|
|
|
|
|
|
|
|
|
|
|
|
|
|
|
|
|
|
|
|
|
|
|
|
|
|
|
|
|
|
|
|
|
|
|
|
|
|
|
|
|
|
|
|
|
|
|
|
|
|
|
|
|
|
|
|
|
|
|
|
|
|
|
|
|
|
|
|
|
|
|
|
|
To learn more about these cmdlets, use the Get-Help cmdlet. For example:
Get-Help "Invoke-Sqlcmd"
Get-Help "Invoke-Sqlcmd" -Detailed
Get-Help "Invoke-Sqlcmd" -Examples
Get-Help "Invoke-Sqlcmd" -Full
You can also check out the MSDN article on SQL Server database engine cmdlets:
http://msdn.microsoft.com/en-us/library/cc281847.aspx
When you load the SQLPS module, several assemblies are loaded into your host.
To get a list of SQL Server-related assemblies loaded with the SQLPS module, use the following script, which will work in both PowerShell V2 and V3:
Import-Module SQLPS –DisableNameChecking

[appdomain]::CurrentDomain.GetAssemblies() |
Where {$_.FullName -match "SqlServer" } |
Select FullName
If you want to run on a strictly V3 environment, you can take advantage of the simplified syntax:
Import-Module SQLPS –DisableNameChecking

[appdomain]::CurrentDomain.GetAssemblies() |
Where FullName -match "SqlServer" |
Select FullName
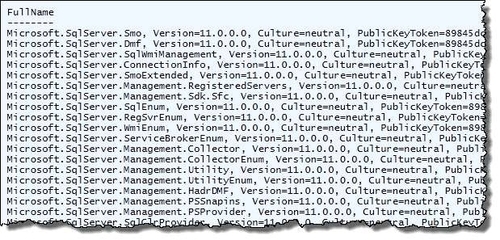
This will show you all the loaded assemblies, including their public key tokens:
By default, PowerShell is running in restricted mode, in other words, it does not run scripts. To run our scripts from the book, we will set the execution policy to RemoteSigned as follows:
Set-ExecutionPolicy RemoteSigned
Note
See the Execution policy section in Appendix B, PowerShell Primer, for further explanation of different execution policies.
If you save your PowerShell code in a file, you need to ensure it has a .ps1 extension otherwise PowerShell will not run it. Ideally the filename you give your script does not have spaces. You can run this script from the PowerShell console simply by calling the name. For example if you have a script called myscript.ps1 located in the C:\ directory, this is how you would invoke it:
PS C:\> .\myscript.ps1
If the file or path to the file has spaces, then you will need to enclose the full path and file name in single or double quotes, and use the call (&) operator:
PS C:\>&'.\my script.ps1'
If you want to retain the variables and functions included in the script, in memory, thus making them available globally in your session, then you will need to dot source the script. To dot source is literally to prefix the filename, or the path to the file, with a dot and a space:
PS C:\> . .\myscript.ps1
PS C:\> . '.\my script.ps1'
You may encounter an error when running some commands that are built using older .NET versions. Interestingly, you may see this while running your script in the PowerShell ISE, but not necessarily in the shell.
Invoke-Sqlcmd: Mixed mode assembly is built against version 'V2.0.50727' of the runtime and cannot be loaded in the 4.0 runtime without additional configuration information.
A few steps are required to solve this issue:
Open Windows Explorer.
Identify the Windows PowerShell ISE install folder path. You can find this out by going to Start | All Programs | Accessories | Windows | PowerShell, and then right-clicking on the Windows PowerShell ISE menu item and choosing Properties.
For the 32-bit ISE, this is the default path:
%windir%\sysWOW64\WindowsPowerShell\v1.0\PowerShell_ISE.exeFor the 64-bit ISE, this is the default path:
%windir%\system32\WindowsPowerShell\v1.0\PowerShell_ISE.exeGo to the PowerShell ISE Install folder.
Create an empty file called
powershell_ise.exe.config.Add the following snippet to the content and save the file:
<?xml version="1.0" encoding="utf-8" ?>
<configuration>
<startup useLegacyV2RuntimeActivationPolicy="true">
<supportedRuntime version="v4.0" />
</startup>

<runtime>
<generatePublisherEvidence enabled="false" />
</runtime>
</configuration>