
Once the Oracle binaries are obtained the administrator is ready to begin the installation process. The first step is to read the supplied installation guide and to ensure that all prerequisites are met. OER can be installed in 32 or 64 bit environments but generally, we would recommend 64-bit since 32-bit architecture is limited to addressing less than 4 GB of RAM. With a 64-bit architecture, all system memory can be addressed and there are therefore more options available for JVM tuning.
Note
Oracle provides a OER sizing guide that can be used as a guide for sizing environments and is located at the following URL: http://www.oracle.com/technetwork/middleware/repository/overview/oer11gsizingguidelines-130307.pdf
Before installing the middleware components, the installer must create a database that will be used by the installer to create the Oracle schemas necessary to support the SOA Governance Suite of products. This book assumes installation into an Oracle 11g database, although other vendors are supported. Once a database is created, the first step is ensure that the Database Adminstrator (DBA) has created the necessary tablespaces for the OER database schemas. The general recommendation is to create three tablespaces, one supporting the tables, one to store indexing data for the aforementioned tables, and one to hold binary large objects (LOBS).
Tip
The Oracle installer does not support installation directly into Real Application Cluster (RAC) environments, though OER can run on a RAC environment
The naming of these tablespaces will be based on companywide standards but for illustration purposes we will call these OER_DATA, OER_INDEX, and OER_LOB. Oracle recommends that each should be at least 300 MB in size.
The following code snippet can be used to create the user and tablespace:
CREATE TABLESPACE OER_DATA
DATAFILE '<path>/oer_data.dbf' SIZE 300M
AUTOEXTEND ON NEXT 10240K MAXSIZE UNLIMITED
EXTENT MANAGEMENT LOCAL AUTOALLOCATE
LOGGING
ONLINE
SEGMENT SPACE MANAGEMENT AUTO;

CREATE TABLESPACE OER_LOB
DATAFILE '<path>/oer_lob.dbf' SIZE 300M
AUTOEXTEND ON NEXT 10240K MAXSIZE UNLIMITED
EXTENT MANAGEMENT LOCAL AUTOALLOCATE
LOGGING
ONLINE
SEGMENT SPACE MANAGEMENT AUTO;

CREATE TABLESPACE OER_INDEX
DATAFILE '<path>/oer_index.dbf' SIZE 300M
AUTOEXTEND ON NEXT 10240K MAXSIZE UNLIMITED
EXTENT MANAGEMENT LOCAL AUTOALLOCATE
LOGGING
ONLINE
SEGMENT SPACE MANAGEMENT AUTO;

CREATE USER OER IDENTIFIED BY <password>
DEFAULT TABLESPACE OER_DATA
TEMPORARY TABLESPACE TEMP;

GRANT CREATE MATERIALIZED VIEW TO OER;
GRANT CREATE SEQUENCE TO OER;
GRANT CREATE SESSION TO OER;
GRANT CREATE SYNONYM TO OER;
GRANT CREATE TABLE TO OER;
GRANT CREATE TRIGGER TO OER;
GRANT CREATE VIEW TO OER;
GRANT UNLIMITED TABLESPACE TO OER;
Tip
Note that the above database sizing is for a typical production environment. For non-production environments, tablespaces can be smaller in size. An Oracle recommended rule of thumb for database drive size is to allow for approximately ten times the physical table and index size. Thus for a table of 100 KB and index tablespace of 1.1 GB allow a disk of at least 11 GB.
The Oracle installer uses temporary disk space during software installation. A temporary directory should be allocated by the server administrator. During the installation process, the temporary space must be sufficiently large to hold the compressed JRE bundle and the uncompressed JRE. The default temporary directory is dependent on the platform; for Windows, it is the directory pointed to by the
TMP (temporary) environment variable, whereas for Unix it will vary dependent on the flavor of Unix. We would recommend allocating a temporary directory of suitable size and specifying this as part of the command line for the installer program using the –D command line switch.
Note
For further details, please refer to the OER installation guide at http://docs.oracle.com/cd/E28280_01/doc.1111/e15745/toc.htm.
The OER software will execute in a Java runtime environment. This book assumes Oracle WebLogic will be used to host OER. Thus, prior to installing OER, the administrator must first obtain the WebLogic binaries and install WebLogic. WebLogic installation requires a JDK1.6 install or above. To install WebLogic log on a Unix Shell Console with the Oracle user, change directory to the directory into which the WebLogic download has been installed. Following are the steps.
The following command will execute the Oracle Installer for WebLogic:
PATH=<JAVA_HOME>/bin:$PATH
export PATH
java -jar wls1036_generic.jar -log=$HOME/logs/WLS1036_install.log
When installing WebLogic in a new environment, choose to create a new Middleware Home Directory:

This directory will act as a repository for all installed middleware products for a given machine. When prompted select a Typical installation.
When prompted choose a suitable Java Development Kit install and click on Next.
Then you will choose a directory for the installation. Finally, click on Next and complete the installation.
Log on to a shell console using the Oracle user and change directory to the location where the installation binaries are located. Following are the steps to start the Oracle installer program:
The following command will execute the Oracle Installer for WebLogic:
PATH=<JAVA_HOME>/bin:$PATH
export PATH
java -jar OER111170_generic.jar -log=$HOME/logs/OER_install.log
When running the installer program, the user will be initially asked to specify a Middleware Home Directory. The user should opt to use the existing Middleware home into which the WebLogic Server was installed.
Click on Next and the user will be prompted to specify a product installation directory for OER. Choose the default option and click on Next.
Now, choose the Application Server that will host the OER application. For this install, the user should select WebLogic Server 11 as installed previously:

Now, the user will be asked to specify the OER properties such as listener port and application name. Enter suitable values and click on Next.
Then, the user chooses the database into which the schemas that support OER will be installed. Here the installer will select the database that was created in the previous section. When prompted enter the tablespace information and click on Next.
Finally, enter the connection details for the Oracle 11g database that contains the above tablespaces. The installer will use the server details and credentials to connect to the database when creating the database schemas:

Once the OER binaries have been installed and the schemas created, the next step is to create a new WebLogic domain for OER. To do this, start a Unix Shell console, log in with the Oracle user, and from the WebLogic 10.3.6 home directory execute the following command:
<MIDDLEWARE HOME>/wlserver_10.3/common/bin/config.shWhen the WebLogic Configuration Wizard opens select Create a new WebLogic domain and then click on Next.
On the next screen, select Oracle Enterprise Repository 11.1.1.7 and click on Next:

Now enter the name of the OER domain—typically
oer_domainand click on Next.On the next screen, enter the desired username and password for the WebLogic Domain Administrator. Select Next when completed.
Then configure the server JDK. As in this sample we are installing a development environment, select Development Mode with the Sun JDK. Then click on Next. For Test and Production systems it is recommended to use JRocket and Production Mode:

On the next screen, select Administration Server; this is very important and must be done otherwise the domain will be installed without an Admin server. Also select the Managed Servers, Clusters and Machines link to create the OER managed server as shown in the following screenshot:

On the following screen, enter the Administrator Server listener port.
On the next screen, review the details for the OER managed server and click on Next. The following screen appears that is used to configure the managed server that will host OER:

Enter the name of the managed server and the required listener port and click on Next. The next couple of screens allow the user to configure cluster details.
Note
For more information on installing OER in a clustered environment please refer the OER installation Guide at http://docs.oracle.com/cd/E28280_01/doc.1111/e15745/toc.htm
Once the cluster details are configured, click on Next and configure the machine details similar to those shown in the following screenshot:

In our case we have created a machine called soa_machine1. Click on Next, and then add the servers to the machine created in the previous step as illustrated in the following screenshot:

Finally review the required installation using the summary screen and click on the Create button.
Review the creation details to make sure that the domain is created properly. Should any errors be encountered, then check the log files, correct any problems, and repeat the preceding process.
Verify that the installation was successful by starting the Admin and OER managed servers and accessing the OER console.
The next step is to install the OER Solution Packs. Details of how to do this are provided in Chapter 5, Harvesting.
The installation of OSR is similar to the OER installation.
First create a database user and tablespace to hold schema objects for OSR. The following SQL script can be used to create the database schema objects:
CREATE TABLESPACE OSR_TABLESPACE
DATAFILE '<path>/osr_data.dbf' SIZE 50M
AUTOEXTEND ON NEXT 10M MAXSIZE UNLIMITED
EXTENT MANAGEMENT LOCAL AUTOALLOCATE
DEFAULT STORAGE (
  INITIAL 5M
  NEXT 5M
  MINEXTENTS 1
  MAXEXTENTS UNLIMITED
  PCTINCREASE 50);

CREATE USER OSR
PROFILE "DEFAULT"
IDENTIFIED BY <password>
DEFAULT TABLESPACE OSR_TABLESPACE
TEMPORARY TABLESPACE TEMP
ACCOUNT UNLOCK;

GRANT CONNECT TO OSR;
GRANT RESOURCE TO OSR;
GRANT UNLIMITED TABLESPACE TO OSR;
GRANT CREATE ANY SYNONYM TO OSR;
GRANT DROP ANY SYNONYM TO OSR;
The next step of the process is to download the OSR software binaries from e-Delivery.
Note
Ensure that you have reviewed and satisfied the system requirements prior to installing the software. These can be found in the Service Registry Guide http://www.oracle.com/technetwork/middleware/registry/osr111productdocumentation-159992.pdf.
To execute the installer, log on to a shell console using the Oracle user and locate the OSR binaries. Ensure the PATH environment variable includes the Java binaries and execute the installer as follows:
PATH=<JAVA_HOME>/bin:$PATH
export PATH
java -jar OSR111160_generic.jar
On the first screen, click on the Next button to begin the installation process. On the next screen select the Installation Type required. In this case, we will install a Standalone Registry; click on Next.
On the next screen choose the same Middleware home as was previously created for the WebLogic and OER installations:

Click on the Next button and configure notification setting as required.
Once done, click on the Next button to configure the administrator account for OSR. We would recommend using the same credentials as used for the OER administration account.
Click on the Next button. This takes you to a set of screens for configuring the OSR database. Enter the details for the database and schemas created as part of the initial setup, as described previously.
On the Deployment screen, enter the port details.
On the next screen, review the summary installation details and once happy click on Next to begin the installation process. Review the installation details and check the log files for any errors. Repeat the preceding steps should any errors be encountered during the installation.
Once the OSR binaries are installed you will need to extend the existing SOA WebLogic domain to include the OSR managed server. To do this, log into a Shell console using the Oracle user and from the existing WebLogic home execute the following command:
<MIDDLEWARE HOME>/wlserver_10.3/common/bin/config.shTip
In the Weir & Bell installation we extend the existing SOA domain to include the OSR managed server. You may choose to deploy a different topology depending on the needs of your particular environment. Also consider the different patches available for OSR as these might have an impact in the SOA domains.
This starts the Fusion Middleware Configuration Wizard. Select Extend an existing WebLogic domain from the screenshot that follows:

Click on Next and then locate the SOA WebLogic domain.
On the subsequent screen, select the option to extend the existing domain with Oracle Service Registry as shown in the following screenshot:

On the next screen, configure the OSR schema Username and Password as created in the first part of this installation:

The next screen allows you to test the connection to the database. Ensure that the connection establishes itself correctly and click on Next.
Select the checkbox to configure Managed server, Clusters and Machines. Once done, the next set of screens allow you to create a WebLogic managed server for the OSR application and associate this with a machine as follows.
Click on Next and then click on Extend to extend the existing domain. Review the installation details and logs and ensure that there were no errors. Should errors be encountered, correct the source of the problem and repeat the preceding steps.
Verify that the installation was successful by starting the Admin and manage servers and accessing the OSR console. Finally, Access the OSR Registry Control Console home page (http://<SERVER NAME>:7201/ registry/uddi/web) and try to log on using the Admin account.
Download the OBPM binaries and review the installation guide for any important prerequisites. Then log in to a Shell Console using the Oracle user and locate the directory holding the downloaded binaries. Execute the installer as follows:
From from the shell console, execute the following commands:
chmod ug-rwx OracleBPMEnterpriseWL103200_lin.bin
./OracleBPMEnterpriseWL103200_lin.bin
This will invoke the OBPM installer software.
On the first screen, review and hit the Next button. This will display a screen prompting the installer to enter a new Middleware Home directory for the OBPM installation as displayed as follows:
Tip
Oracle's recommended installation path is
<Middleware Home>/obpm/enterprise/. Our installation deviated slightly from this; however, we recommend using Oracle's recommendation for simplicity.
Hit the Next button and select an appropriate Java SDK (must be 1.5.x or above).
Follow the prompts on the next two screens and choose to perform the installation, exiting the installer when prompted to do so.
Perform the following steps to install the Asset workflows into OBPM:
Locate the file
OBPM 11.1.1.7.0-OBPM-Workflow-Management-Scripts.zip. This can be found in the<Middleware Home>/repository111/core/tools/solutionsdirectory. Extract the zip file into the<Oracle Home>/obpmdirectory on the server where Oracle BPM is installed. Two directories are created from this zip file, namelyOBPM_SetupScriptsandworkflow. A file calledbuild.txtis also created. The following code snippet shows how to unzip the file from the command line:unzip 11.1.1.7.0-OBPM-Workflow-Management-Scripts.zip -d /u02/app/oracle/obpm/The next step involves configuring the
build.propertiesfile that was created during the unzip process above in theOBPM_SetupScriptsdirectory.Ensure that you backup the
build.propertiesfile when you have performed the required configuration.Tip
Refer to section 9.3.4 of the Configuration Guide for OER for defining the required settings in the
build.propertiesfile http://docs.oracle.com/cd/E28280_01/admin.1111/e16580/oerwf.htm#CACGJDHDNext, enter the correct settings for your environment into the
OBPM_SetupScripts/setenv.shfile.More details can be found in section 9.3.5 of the Configuration Guide for OER http://docs.oracle.com/cd/E28280_01/admin.1111/e16580/oerwf.htm#CACGJDHD
The next step is to generate a
workflow.xmlfile using the Generate Workflow configuration tool (config_gen.sh). This tool connects to OER and creates a bootstrapping file that can be customized.From
<MW Home>/repository111/core/workflow-toolsexecute:./config_gen.sh http://<oer host>:<port>/oer/services/FlashlineRegistry <oer admin user> <oer password> <output directory>Once executed, copy the newly generated
workflow.xmlfile to the<OBPM>/enterprise/server/aler_engine directory.The next step is to update the
workflow.xmlfile. First, generate an encrypted password for the OER Admin user (either as described in Chapter 5, Harvesting or from the URLhttp://<oer server>:7101/oer/diag/encryptstrings.jsp)Then from
obpm/OBPM_SetupScripts and opbm/workflow/aler_workflowmodifyworkflow.xmlas highlighted:<alerConnection> <uri>http://<oer server>:7101/oer/services/FlashlineRegistry</uri> <registrar> <user>admin</user> <password>encrypted password</password> </registrar> </alerConnection>
Locate the assetType settings for the Service Asset Type, add the autoAccept attribute, and set the value to true.
Copy the Oracle JDBC drivers from an Oracle DB installation (folder
<ORACLE HOME>/jdbc/lib) to the<Oracle Home>/obpm/OBPM_SetupScripts/extdirectory.
The next step is to execute the setup script. Prior to doing this, install the dos2unix package as root. From the
/obpm/OBPM_SetupScriptsdirectory execute the following command:dos2unix setenv.shOnce done execute
setenv.shfrom the shell console.Execute
ant create-fdito initialize the OBPM database and then executeant install-workflowto initialize the OBPM workflow engine (namedaler_engine) as follows:ant create-fdi ant install-workflow
Finally, you need to verify whether the setup script ran successfully. To do this, from the
obpm/bindirectory, run the following command:./obpmadmcenterThis will open the Oracle BPM Admin Center application. Click on the Start BPM Web Applications link and then on the Launch Process Administrator link:

In the administrator screen, enter the obpm credentials as defined in
boot.propertiesin the variablesfuego.fdi.admin.idandfuego.fdi.admin.password.Select the Engines link in the left-hand side menu. The aler_engine engine is displayed with a status of Not running. Start the engine by clicking on the left-most icon in the Engine Actions column as follows:

Ensure that the OBPM Endpoints are listening correctly by pointing a browser to http://<oer server>:9000/albpmServices/aler_engine/ws.
Two services are then listed: StatusChangeEndpointServiceListener and RefreshConfigServiceListener as shown in the following screenshot:

If OBPM is installed in a machine other than OER, modify the element
<sub:host>to point the OBPM server to the following file:<MW HOME>/user_projects/applications/soa_domain/applications/oer_11.1.1.7.0/oer-app/WEB-INF/classes/EndPointEventSubscription.xmlOER workflows are now deployed. To run the workflows successfully, you must encrypt passwords in the XML file and then restart the OER server. Use of clear text passwords will prevent events from being delivered to OBPM.
The next important step required is to configure the OER-OBPM workflows. As explained earlier in this book, OER uses the OBPM workflows to automate many of the Governance processes. OBPM processes are triggered by the OER Event Manager.
The Event Manager is a component embedded within OER that manages event delivery and subscriptions. Web service endpoints can subscribe to the Event Manager's Subscription Manager and once subscribed, the asset registration events that are generated within OER are delivered to that endpoint.
The OER bundles prebuilt BPM asset registration flows that automate the registration and governance processes. By default, you can use the predefined Oracle BPM endpoint or create bespoke web service endpoints to subscribe to OER events.
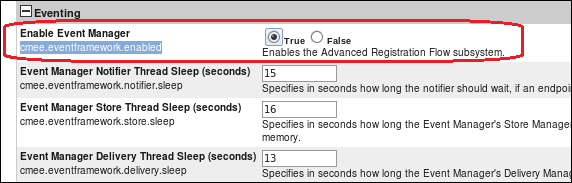
The Event Manager must be enabled in OER to allow the Event Manager to send events to external web service endpoints. To do this, enable the cmee.eventframework.enabled property by setting its value to true (cmee.eventframework.enabled=true) in the eventing.properties file in the <OER Domain>\WEB-INF\classes directory:
Tip
The event framework can also be enabled from the OER console under the Admin | System Settings link as shown in the following screenshot:
The next step is to enable logging in the Event Manager. By default, logging is enabled to go to a file, but you can direct the debug statements to go to the console by appending the following categories to the log4fl.properties file in the <OER Domain>\WEB-INF\classes directory:
# eventing subsystem
log4j.category.com.bea.infra.event.core= debug,eventingLog,stdout
log4j.category.com.bea.infra.event.dm= debug,eventingLog,stdout
log4j.category.com.bea.infra.event.facade= debug,eventingLog,stdout
log4j.category.com.bea.infra.event.notifier= debug,eventingLog,stdout
log4j.category.com.bea.infra.event.store= debug,eventingLog,stdout
log4j.category.com.bea.infra.event.sub= debug,eventingLog,stdout
Once this is done, you may need to configure the web service subscriptions with the Event Manager's Subscription Manager. The following table shows the values that need to be set within the EndPointEventSubscription.xml file under <OER Domain>\WEB-INF\classes directory, depending on your requirements:
|
Setting |
Value |
|---|---|
|
Host |
Set this to the web service endpoint. By default, this will be the OER server. |
|
Port |
Specify the port of the web service endpoint. Leave this value set to the defaulted value if OBPM is used as the Process Engine. |
|
URI |
Specify the URI of the web service. Leave this value set to the defaulted value if OBPM is used as the Process Engine. |
|
Operation name |
Leave this value set to the defaulted value, if OBPM is used as the Process Engine. |
|
Username and password |
The default username and password for OBPM is |
|
Expression |
Default is empty. Leave as default. |
Once these settings are configured, you must restart OER in order for them to take effect.
To test that the Event Manager is configured and working correctly, you can trigger an event by creating an Asset from Asset Editor. Create an asset of type Service and an Initial state of Submitted: Pending Review.
Check the following log files to see whether an event was triggered: <MW_HOME>/user_projects/domains/<OER Domain>/eventing.log
The Event Manager uses an embedded version of Apache ActiveMQ JMS Server. This is enabled by default and configured to run out-of-the-box without any additional configuration. Should the enterprise require the use of an external JMS server such as Oracle's WebLogic Server JMS, then a number of OER system settings must be configured.
Tip
Details of how to do this can be found in section 9.7 of the OER Configuration Guide at http://docs.oracle.com/cd/E28280_01/admin.1111/e16580/oerwf.htm#autoId88.
OER uses Oracle Business Intelligence (BI) Publisher to generate reports. Before reports can be produced, OER and BI publisher must be configured to work together. This section provides an overview of the steps required to install and configure Oracle BI Publisher.
Tip
Before starting this installation, ensure that you shut down the WebLogic domain running OSR and OER.
The first step is to install the schemas required for the BI Publisher by executing the Repository Creation Tool 11.1.1.7 (
RCU.sh). Follow the steps in the wizard and when prompted select to install the schemas for the Business Intelligence.Make a note of the username and password for the BI schema.
Next, download the Oracle BI Publisher 11g software binaries. Unzip the binaries into a directory (
$BI_HOME). Then, locate the installer software (runInstaller) in the following directory:$BI_HOME/bishiphome/Disk1. Open and run the installer to start the installation wizard.Choose the Software Only Install installation type and follow the onscreen instructions to complete the installation. This option allows you to install Oracle BI into an existing MIDDLEWARE_HOME directory.
Once the software is installed, execute the WebLogic configuration wizard by executing the shell script
$MIDDLEWARE_HOME\ORACLE_BI\common\bin\config.sh(or wherever you installed Oracle BI to) and choose the option to Create a New BI System and click on Next.Next, select the Middleware Home that houses the OER and OSR software and hit Next.
On the next screen, choose to install the Business Intelligence Publisher component only as shown in the following screenshot:

Next, configure the database connection details as configured using the Repository Creation Utility (RCU).
Follow the configuration wizard, selecting default values and when completed, the BI software will be installed and configured.
Tip
Since this installation has created a new domain, you might need to reconfigure the listening port for the new Admin Server once installation has completed so that it doesn't clash with existing URLs. This can be done from the WebLogic console.
The ports can also be configured as part of the BI Publisher installation using a file called staticports.ini. Please refer to the BI Installation Guide section 4.2.8 for further details on how to do this http://docs.oracle.com/cd/E28280_01/bi.1111/e10539/c4_installing.htm#CEGHAAJE
OER ships with a set of preconfigured BI Publisher content. This content needs to be deployed and configured before running any of the OER reports. This section assumes that you are using Oracle OER Patch Set 6 (11.1.1.7) with Oracle BI Publisher 11.1.1.7. To do so:
Stop the BI Publisher Application Server.
Locate the reports archive file named
11.1.1.7.0-OER-BIP11gReports.zipin the following directory$MIDDLEWARE_HOME/repository111/core/tools/solutions/reports. This archive contains three folders corresponding to each database supported by BI Publisher (Oracle, SQL Server, and DB2). In our case we are using an Oracle database so we will use the Oracle folder from this archive. Locate theOERfolder that is contained within the aforementioned Oracle folder into the BI Publisher Reports directory, that is,$MIDDLEWARE_HOME/user_projects/bi_domain/config/bipublisher/repository/Reports.Restart the BI publisher Application Server. Open the BI web console (http://hostname:port/xmlpserver)and check that the
OERfolder copied above appears in theShared Folderdirectory as follows:
The next step is to configure a user. To create users in BI Publisher 11g, you must use Oracle WebLogic Console. Log in to the console using the Administrator account created during the installation process. Locate the Security Realms link. Select the security realm (by default myrealm) and from the Users and Groups tab choose the New link shown in the following screenshot:

Create user for OER and ensure that the BI groups are associated withthat user.
The next step is to configure the OER JDBC connection.

The final step is to configure the OER settings to enable reporting. To do this, logon to OER using the Administrator account and then go to the Administration page.
Click on the System Settings link. In the Search field enter
reportto filter out all system settings relevant for reporting configuration.Set
oracle.reports.server.urltohttp://<OER SERVER>:<PORT>/xmlpserver/OER.To enable OER users to access BI Publisher reports without needing an extra set of credentials set oracle.reports.server.endpoint.url to
http:/<BI SERVER>:<PORT>/xmlpserver/services/PublicReportService.Save the system settings and try a report from the Reports Page.
Tip
For more information on this configuration please refer to section 16 Configuring Reporting with BI Publisher of the OER Configuration Guide:
http://docs.oracle.com/cd/E28280_01/admin.1111/e16580/bipub.htm#sthref868