
So we have covered what OpenStack is, the services that make up OpenStack, and some of the key features of OpenStack. It is only appropriate to show a working example of the OpenStack functionality and the methods available to manage/administer your OpenStack cloud.
To re-emphasize, OpenStack management, administration, and consumption of services can be accomplished either by an API, CLI, and/or web dashboard. When considering some level of automation, the last option of the web dashboard is normally not involved. So, for the remainder of this book, we will solely focus on using the OpenStack APIs and CLIs.
Now, let's take a look at how you can use either the OpenStack API or CLI to check for the available services and endpoints active within your cloud. We will first start with listing the available services.
The first step in using the OpenStack services is authentication against Keystone. You must always first authenticate (tell the API who you are) and then receive authorization (API ingests your username and determines what predefined task(s) you can execute) based on what your user is allowed to do. That complete process ends with providing you with an authentication token.
Tip
The Keystone can provide two different types of token formats: UUID or PKI. A typical UUID token looks similar to 53f7f6ef0cc344b5be706bcc8b1479e1. While a PKI token is a much longer string and harder to work with. It is suggested to set Keystone to provide UUID tokens within your cloud.
In the following section, there is an example of making an authentication request for a secure token. Making API requests using cURL, a useful tool to interact with RESTful APIs, is the easiest approach. Using cURL with various options, you can simulate actions similar to ones using the OpenStack CLI or the Horizon dashboard:
$ curl -d @credentials.json –X POST -H "Content-Type: application/json" http://127.0.0.1:5000/v2.0/tokens | python -mjson.tool
Tip
Since the credential string is fairly long and easy to manipulate incorrectly, it is suggested to utilize the –d @<filename> functionality part of cURL. This allows you to insert the credential string into a file and then pass it into your API request by just referencing the file. This exercise is very similar to creating a client environment script (also known as OpenRC files).
Adding | python -mjson.tool to the end of your API request makes the JSON output easier to read.
The following is an example of the credential string:
{"auth": {"tenantName": "admin", "passwordCredentials": {"username": "raxuser", "password": "raxpasswd"}}}When the example is executed against the Keystone API, it will respond with an authentication token. That token should be used for all subsequent API requests. Keep in mind that the token does expire, but traditionally, a token is configured to last 24 hours from the creation timestamp.
The token can be found in the second to last section of the JSON output, in the section labeled token as shown in the following code snippet:
"token": {
"audit_ids": [
"tWnOdGc-Qpu71Ag6QUo9JQ"
],
"expires": "2015-06-30T04:53:27Z",
"id": "907ca229af164a09918a661ffa224747",
"issued_at": "2015-06-29T16:53:27.191192",
"tenant": {
"description": "Admin Tenant",
"enabled": true,
"id": "4cc43830491046ada1f0f26317da41c0",
"name": "admin"
}
}
Once you have the authentication token, you can begin crafting subsequent API requests to request information about your cloud and/or execute tasks. Now, we will request the list of services available in your cloud, using the following command:
$ curl -X GET http://127.0.0.1:35357/v2.0/OS-KSADM/services -H "Accept: application/json" -H "X-Auth-Token: 907ca229af164a09918a661ffa224747" | python -mjson.tool
The output from this API request will be the complete list of services registered within your cloud by name, description, type, id, and whether it is active. An abstract of the output will look similar to the following code block:
{
"OS-KSADM:services": [
{
"description": "Nova Compute Service",
"enabled": true,
"id": "020cc772b9c942eb979fc587877a9239",
"name": "nova",
"type": "compute"
},
{
"description": "Nova Compute Service V3",
"enabled": true,
"id": "1565c929d84b423fb3c9561b22e4468c",
"name": "novav3",
"type": "computev3"
},
...All the base principles applied to using the API in the preceding section also applies to using the CLI. The major difference with the CLI is that all you need to do is create an OpenRC file with your credentials and execute defined commands. The CLI handles the formatting of the API calls behind the scenes and also takes care of grabbing the token for subsequent requests and even handles formatting the output.
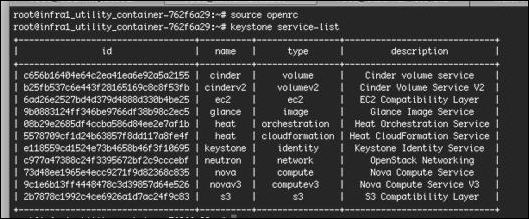
As discussed earlier, first you need to authenticate against Keystone to be granted a secure token. This action is accomplished by first sourcing your OpenRC file and then by executing the service-list command. The following example will demonstrate this in more detail.
Here is an example of an OpenRC file named openrc:
# To use an OpenStack cloud you need to authenticate against keystone.
export OS_ENDPOINT_TYPE=internalURL
export OS_USERNAME=admin
export OS_TENANT_NAME=admin
export OS_AUTH_URL=http://127.0.0.1:5000/v2.0

# With Keystone you pass the keystone password.
echo "Please enter your OpenStack Password: "
read -sr OS_PASSWORD_INPUT
export OS_PASSWORD=$OS_PASSWORD_INPUT
Once you create and source the OpenRC file, you can begin using the CLI to execute commands, such as requesting the list of services; you can follow the following working example:
$ source openrc
$ keystone service-list
The output will look similar to this:
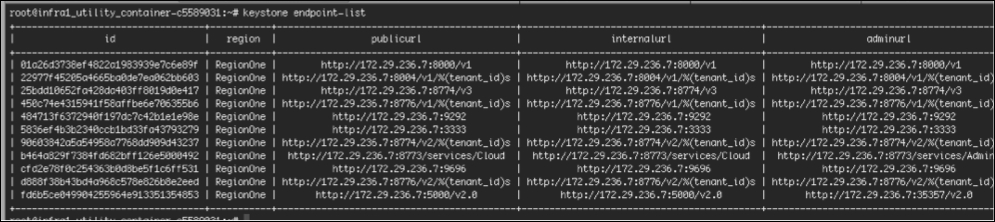
We will now move onto listing the available endpoints registered within your cloud. You will note that the process is very similar to the previous steps just explained.
Since we are already authenticated against Keystone in the previous example, we can just execute the following command to get back the full list of API endpoints available for your OpenStack cloud.
$ curl -X GET http://127.0.0.1:35357/v2.0/endpoints -H "Accept: application/json" -H "X-Auth-Token: 907ca229af164a09918a661ffa224747" | p
ython -mjson.tool
The output of this API request will be the complete list of endpoints registered within your cloud by adminurl, internalurl, publicurl, region, service_id, id, and whether it is active. An abstract of the output will look similar to the following code block:
{
"endpoints": [
{
"adminurl": "http://172.29.236.7:8774/v2/%(tenant_id)s",
"enabled": true,
"id": "90603842a5a54958a7768dd909d43237",
"internalurl": "http://172.29.236.7:8774/v2/%(tenant_id)s",
"publicurl": "http://172.29.236.7:8774/v2/%(tenant_id)s",
"region": "RegionOne",
"service_id": "020cc772b9c942eb979fc587877a9239"
},
...As with the earlier CLI request, after sourcing the OpenRC file you will simply execute the following command:
$ keystone endpoint-list
The output will look similar to the following screenshot:
Tip
Downloading the example code
You can download the example code files from your account at http://www.packtpub.com for all the Packt Publishing books you have purchased. If you purchased this book elsewhere, you can visit http://www.packtpub.com/support and register to have the files e-mailed directly to you.