

Ever Chef workstation has at least one Chef repository. The Chef repo is where all working copies of the cookbooks, recipes, templates, and so on live. It is where you do your development work. It is from where you check your work into your source code repository, and it is from where you upload your work to the Chef server.
Let's take a look at how to set up a new empty Chef repo on your new ChefDK-installed workstation.
Another benefit of the new Chef command-line tool is that it will create a standard chef repo for you. You no longer need to download or clone a starter repo from GitHub. You can use the chef generate command to create your new repo. Let's take a look at the chef generate repo command's help:
chef generate repo -help
Based on the description of the default values for the chef generate repo command, we can simply issue the following command on our workstation:
chef generate repo ~/chef-repo
That was easy! So what do we get? Well, let's have a look:
tree -a chef-repo
chef-repo
├── .chef-repo.txt
├── .git
│   ├── HEAD
│   ├── branches
│   ├── config
│   ├── description
│   ├── hooks
│   │   ├── applypatch-msg.sample
│   │   ├── commit-msg.sample
│   │   ├── post-update.sample
│   │   ├── pre-applypatch.sample
│   │   ├── pre-commit.sample
│   │   ├── pre-push.sample
│   │   ├── pre-rebase.sample
│   │   ├── prepare-commit-msg.sample
│   │   └── update.sample
│   ├── info
│   │   └── exclude
│   ├── objects
│   │   ├── info
│   │   └── pack
│   └── refs
│       ├── heads
│       └── tags
├── .gitignore
├── LICENSE
├── README.md
├── chefignore
├── cookbooks
│   ├── README.md
│   └── example
│       ├── README.md
│       ├── attributes
│       │   └── default.rb
│       ├── metadata.rb
│       └── recipes
│           └── default.rb
├── data_bags
│   ├── README.md
│   └── example
│       └── example_item.json
├── environments
│   ├── README.md
│   └── example.json
└── roles
    ├── README.md
    └── example.json
This list of files looks pretty good but, as you may have noted, an essential folder is missing: the .chef folder, which needs to contain the private key files and the knife.rb file, used to communicate with the Chef server. Let's take a look at creating or obtaining these files. One way is to use the starter kit. It is an OK way if this is a new Chef server. But, if it's not, be sure to read the following Starter Kit info; it could save your job!
You still need the .chef files for your new workstation to securely communicate with your Chef server. These files are your user private key file, the organization's validator private key file, and the knife.rb file. These files need to be placed in a .chef folder in your chef-repo.
When setting up a new organization in your Chef server, there is an easy way to get the files: with the repo starter kit.
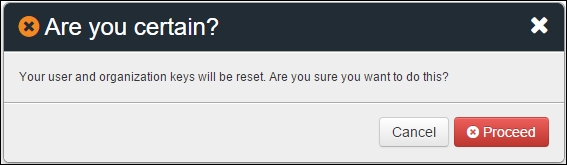
Warning!!! Only download the starter kit if you are the Chef server admin and are the first (or only) person setting up your repo for a brand new organization. Currently, the act of downloading the starter kit will reset both your user private key and the organization validator key.
Note
Let me say this again. Downloading the Starter Kit will reset the private key values for both your user and your organization.
Downloading the starter kit on a mature organization will essentially break the Internet.
With this warning, if you are still going to use the starter kit, proceed at your own risk.
To get the starter kit, you will want to browse to your Chef server and log in. Once there, click on Administration and then select your Organization. Now click on Starter Kit and you will see the Download Starter Kit button. When you click the button, you will get the warning shown earlier. Click on the Proceed button to transfer a zip archive to your workstation, then unzip it into your chef-repo folder, and you're done.
Really, the only files you need from the starter kit are the .chef folder files:
The organization's validator private key file
Your user private key file
A
knife.rbfile
The organization's key file can be provided by an administrator of the Chef server. The organization's validator key is generated when the organization is created. When the command-line tool is used to create the org, the location of the validator key file may be provided in the command. Otherwise, it will be displayed to stdout. The Chef server admin will have captured the validator key info and will be able to provide it to you now.
The user private key is much like the organization's private key in that it is created when the user is created and must be captured and securely stored at that time as it is not saved to the Chef server database. A user can reset their private key through the use of the Reset Key feature available when viewing the user profile on a Chef server. A user resetting their private key will have no negative impact on other users or the organization, so it is relatively safe to do.
Finally, you need the knife.rb file. This file is the easy one. It can be downloaded from the Chef server any time by logging in and browsing to the organization. From there, you can click on any of the Generate Knife Config links in the UI. This will create the knife.rb file and download it to your workstation. Another option is to use the knife configure command. This will prompt you through the process of creating your knife.rb file.
Put all three of these files into the .chef folder of your new chef-repo. Make sure that you save the two key files using the names in the knife.rb file (or conversely, update the contents of the knife.rb file to match the file names used to save your key files).

OS X doesn't come with a version of the tree command installed so, if you like that tool and use a Mac, I've found a clever way to have your cake and eat it too by creating your own tree script. This script was used to create the "tree" output shown in the preceding screenshot. This idea was shared by users Ahmed Masud and JakeGould on http://superuser.com. It goes like this:

When you are using an On Premise Chef server, you need to do one more thing to finish setting up your chef-repo. If the Chef server you are connecting to has a self-signed certificate, then you will need to add the server's certificate to your chef-repo to allow your workstation to trust your Chef server. An easy way to check if this applies to you is to run the ssl check command. It goes like this:
knife ssl check
If the Chef Server you are communicating with has a self-signed certificate, you will see a message like this:
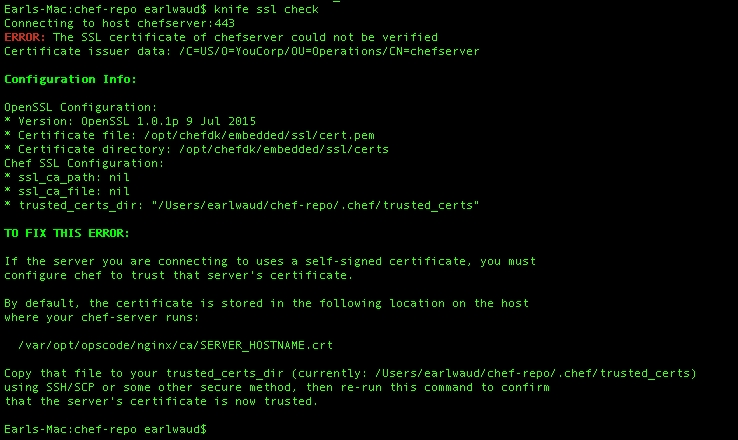
As you can see in the error message generated by the ssl check command, the Chef server's certificate needs to be obtained and placed into a trusted_certs folder in your chef-repo/.chef folder. Again, you will need to contact your Chef server administrator to get a copy of the certificate file. Once you have it, just place it in the trusted certs folder; when you run your ssl check command again, you should get a message back that says something like:
knife ssl check
Connecting to host chefserver:443
Successfully verified certificates from 'chefserver'
With that successful knife command completed, you have verified that you have successfully set up your chef-repo and are ready to start creating your infrastructure as code.
Learn about setting up your Chef repo at the link https://docs.chef.io/chef_repo.html.
Learn more about setting up a chef-repo at the link https://learn.chef.io/manage-a-web-app/ubuntu/get-set-up/.
OS X doesn't come with a version of tree installed so, if you like that tool and use Mac, there is a clever way to have your cake and eat it too by creating your own a tree script. You can find an example shared by Ahmed Masud and JakeGould at the link http://superuser.com/questions/359723/mac-os-x-equivalent-of-the-ubuntu-tree-command.
Keep up-to-date on the Starter Kit resetting the organization's validator key at the link https://feedback.chef.io/forums/301644-chef-product-feedback/suggestions/9618459-starter-kit-should-not-reset-validator-and-user-ke.