
Exploring the Filesystem
The space in which a command line operates is called a filesystem (FS). A lot of shell activity revolves around manipulating and organizing files; thus, learning the basics of filesystems is imperative to learning the command line. In this topic, we will learn about filesystems, and how to navigate, examine, and modify them via the shell. For regular users of computers, some of these ideas may seem familiar, but it is necessary to revisit them to have a clear and unambiguous understanding.
Filesystems
The UNIX design philosophy is to represent every object on a computer as a file; thus, the main objects that we manipulate with a command line are files. There are many different types of file-like objects under UNIX, but for our purposes, we will deal with simple data files, typically ASCII text files, that are human readable.
From this UNIX perspective, the system is accessible under what is termed a filesystem (FS). An FS is a representation of the system that's analogous to a series of nested boxes, each of which is called a directory or folder. Most of us are familiar with this folder structure, which we would have encountered when using a GUI file manager.
A directory that contains another directory is called the parent of the latter. The latter is called a sub-directory of the former. On UNIX-like systems, the outermost directory is called the root directory, and each directory can contain either files or other directories in turn. Some files are not data, but rather represent devices or other resources on the system. To be concise, we will refer to folders, regular files, and special files as FS objects.
Typically, every user of a system has their own distinct home directory, named after the user's name, where they store their own data. Various other directories used by the operating system, called system directories, exist on the filesystem, but we need not concern ourselves with them for the purposes of this book. For the sake of simplicity, we will assume that our entire filesystem resides on only a single disk or partition (although this is not true in general):
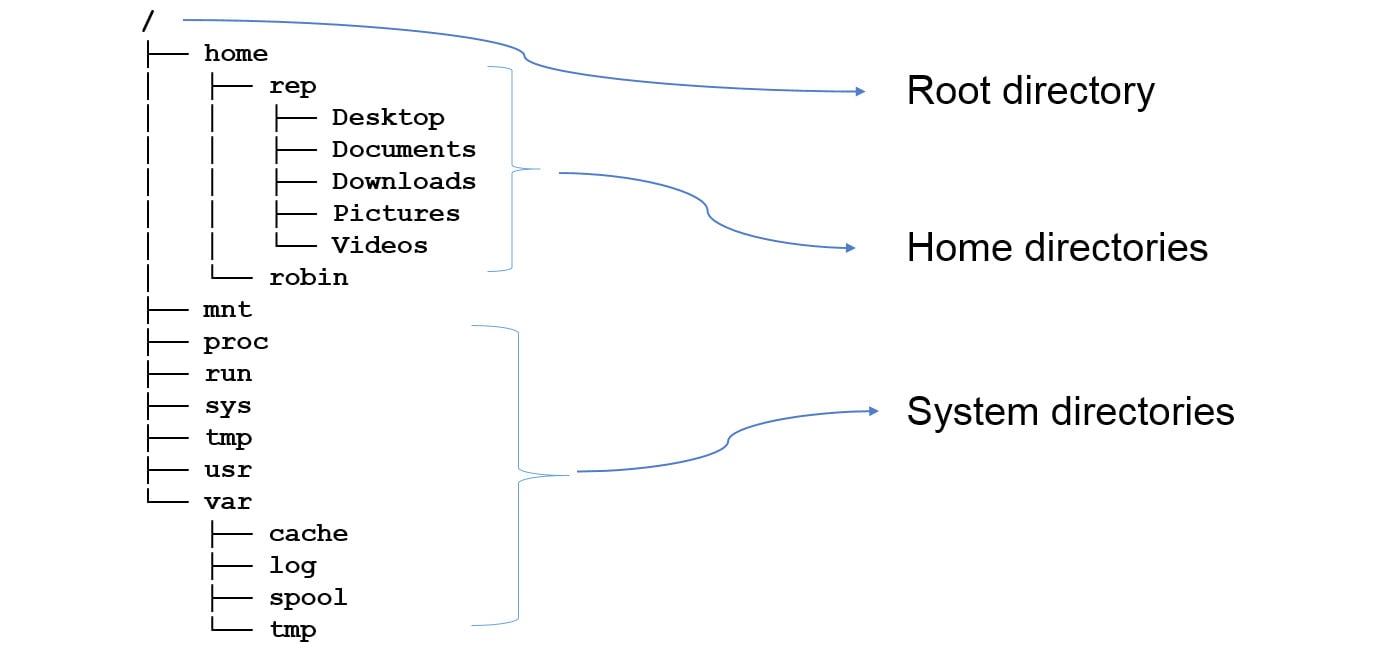
Figure 1.1: An illustration of an example structure of a typical filesystem
The notation used to refer to a location in a filesystem is called a path. A path consists of the list of directories that need to be navigated to reach some FS object. The list is separated by a forward slash, which is called a path separator. The complete location of an FS object, including its path from the root directory onward, is called a fully qualified pathname.
Paths can be absolute or relative. An absolute path starts at the root directory, whereas a relative path starts at what is called the current working directory (CWD). Every process that runs on a system is started with its CWD set to some location. This includes the command-line process itself. When an FS object is accessed within the CWD, the name of the object alone is enough to refer to it.
The root directory itself is represented by a single forward slash; thus, any absolute path starts with a single forward slash. The following is an example of an absolute path relative to the root directory:
/home/robin/Lesson1/data/cupressaceae/juniperus/indica
Special syntax is used to refer to the current, parent, and user's home directories:
./refers to the current directory explicitly. The CWD is implicit in many cases, but is useful when the current directory needs to be explicitly specified as an argument to some commands. For instance, the same directory that we've just seen can be expressed relative to the CWD (/home/robin, in this case) as follows: one pathname specifying./explicitly and one without:./Lesson1/data/cupressaceae/juniperus/indica Lesson1/data/cupressaceae/juniperus/indica
../refers to the parent directory. This can be extended further, such as../../../, and so on. For instance, the preceding directory can be expressed relative to the parent of the CWD, as follows:../robin/Lesson1/data/cupressaceae/juniperus/indica
The
../takes us to one level up to the parent of all the user home directories, and then we go back down torobinand the rest of the path.~/refers to the home directory of the current user.~robin/refers to the home directory of a user called "robin". This is a useful shorthand, because the home directory of a user could be configured to be anywhere in the filesystem. For example, macOS keeps the users' home directories in/Users, whereas Linux systems keep it in/home.Note
The trailing slash symbol at the end of a directory pathname is optional. The shell does not mandate this. It is usually typed only to make it obvious that it is the name of a directory rather than a file.
Navigating Filesystems
We will now look briefly at the most common commands for moving around the filesystem and examining its contents:
- The
cd(change directory) command changes the CWD to the path specified as its argument—if the path is non-existent, it prints an error message. Specifying just a single hyphen as the argument tocdchanges the CWD to the last directory that was navigated from. - The
pwd(print working directory) command simply displays the absolute path of the CWD. - The
pushdandpopd(push directory and pop directory) commands are used to bookmark the CWD and return to it later, respectively. They work by pushing and popping entries on to an internal directory stack, hence the namespushdandpopd. Since they use a stack, you can push multiple values and pop them later in reverse order. - The
treecommand displays the hierarchical structure of a directory as a text-based diagram. - The
ls(list) command displays the contents of one or more specified directories (by default, the CWD) in various formats. - The
cat(concatenate) command outputs the concatenation of the contents of the files specified to it. If only one file is specified, it simply displays the file. This is a quick way to look at a file's content, if the files are small.catcan also apply some transformations on its output, such as numbering the lines or suppressing multiple blank lines. - The
lesscommand can be used to interactively scroll through one or more files easily, search for a string, and so on. This command is called a pager (it lets text content be viewed page by page). On most systems,lessis configured to be the default pager. Other commands that require a pager interface will request the default pager from the system for this purpose. Here are some of the most useful keyboard shortcuts forless:(a) The up or down and Page Up or Page Down keys scroll vertically.
(b) The Enter and spacebar keys scroll down by one line and one screenful, respectively.
(c) < and > or g and G characters will scroll to the beginning and end of the file, respectively.
(d) / followed by a string and then Enter searches for the specified string. The occurrences are also highlighted.
(e) n and N jump to the next or previous match, respectively.
(f) Esc followed by u turns off the highlights.
(g) h shows a help screen, with the list of shortcuts and commands that are supported.
(h) q exits the application or exits the help screen if it is being shown.
There are many more features for navigating, searching, and editing that
lessprovides, which we will not cover in this basic introduction.
Commonly Used Options for the Commands
The following options are used with the ls command:
- The
-loption (which stands for long list) shows the contents with one entry per line—each column in the listing shows some specific information, namely permissions, link count, owner, group, size, and modification time, followed by the name, respectively. For the purposes of this book, we will only consider the size and the name. Information about the type of each FS object is indicated in the first character of the permissions field. For example,-for a file, anddfor a directory. - The
--reverseoption sorts the entries in reverse order. This is an example of a long option, where the option is a complete word, which is easy to remember. Long options are usually aliases for short options—in this case, the corresponding short option is-r. - The
--coloroption is used to make different kinds of FS objects display in different colors—there is no corresponding short option for this.
The following options are used with the tree command:
- The
-doption prints only directories and skips files - The
-ooption writes the output to a file rather than the display - The
-Hoption generates a formatted HTML output, and typically would be used along with-oto generate an HTML listing to serve on a website
Before going ahead with the exercises, let's establish some conventions for the rest of this book. Each chapter of this book includes some test data to practice on. Throughout this book, we will assume that each chapter's data is in its own folder called Lesson1, Lesson2, and so on.
In all of the exercises that follow, it is assumed that the work is in the home directory of the logged-in user (here, the user is called robin).
Exercise 1: Exploring Filesystem Contents
In this exercise, we will navigate through a complex directory structure and view files using the commands learned so far. The sample data used here is a dataset of conifer trees, hierarchically structured as per botanic classification, which will be used in future activities and exercises too.
- Open the command-line shell.
- Navigate to the
Lesson1directory and examine the contents of the folder with thelscommand:robin ~ $ cd Lesson1 robin ~/Lesson1 $ ls data data1
In the preceding code snippet, the part of the first line up to the
$symbol is called a prompt. The system is prompting for a command to be typed. The prompt shows the current user, in this case robin, followed by the CWD~/Lesson1. The text shown after the command is what the command itself prints as output.Note
Recall that
~means the home directory of the current user. - Use the
cdcommand to navigate to thedatadirectory and examine its contents withls:robin ~/Lesson1 $ cd data robin ~/Lesson1/data $ ls cupressaceae pinaceae podocarpaceae taxaceae
Note
Notice that the prompt shown afterward displays the new CWD. This is not always true. Depending on the configuration of the system, the prompt may vary, and may even be a simple $ symbol with no other information shown.
- The
lscommand can be provided with one or more arguments, which are the names of files and folders to list. By default, it lists only the CWD. The following snippet can be used to view the subdirectories within thetaxaceaeandpodocarpaceaedirectories:robin ~/Lesson1/data $ ls taxaceae podocarpaceae podocarpaceae/: acmopyle dacrydium lagarostrobos margbensonia parasitaxus podocarpus saxegothaea afrocarpus falcatifolium lepidothamnus microcachrys pherosphaera prumnopitys stachycarpus dacrycarpus halocarpus manoao nageia phyllocladus retrophyllum sundacarpus taxaceae/: amentotaxus austrotaxus cephalotaxus pseudotaxus taxus torreya
The dataset contains a directory for every member of the botanical families of coniferous trees. Here, we can see the top-level directories for each botanical family. Each of these has subdirectories for the genii, and those in turn for the species.
- You can also use
lsto request a long output in color, as follows:robin ~/Lesson1/data $ ls -l --color total 16 drwxr-xr-x 36 robin robin 4096 Aug 20 14:01 cupressaceae drwxr-xr-x 15 robin robin 4096 Aug 20 14:01 pinaceae drwxr-xr-x 23 robin robin 4096 Aug 20 14:01 podocarpaceae drwxr-xr-x 8 robin robin 4096 Aug 20 14:01 taxaceae
- Navigate into the
taxaceaefolder, and then use thetreecommand to visualize the directory structure at this point. For clarity, specify the-doption, which instructs it to display only directories and exclude files:robin ~/Lesson1/data $ cd taxaceae robin ~/Lesson1/data/taxaceae $ tree -d
You should get the following output on running the preceding command:

Figure 1.2: The directory structure of the taxaceae folder (not shown entirely)
cdcan be given a single hyphen as an argument to jump back to the last directory that was navigated from:robin ~/Lesson1/data/taxaceae $ cd taxus robin ~/Lesson1/data/taxaceae/taxus $ cd - /home/robin/Lesson1/data/taxaceae
Observe that it prints out the absolute path of the directory it is changing to.
Note
The home directory is stored in
/homeon UNIX-based systems. Other operating systems such as Mac OS may place them in other locations, so the output of some of the following commands may slightly differ from that shown here.- We can move upwards in the hierarchy by using
..any number of times. Type the first command that follows to reach the home directory, which is three levels up. Then, usecd -to return to the previous location:robin ~/Lesson1/data/taxaceae $ cd ../../.. robin ~ $ cd - /home/robin/Lesson1/data/taxaceae robin ~/Lesson1/data/taxaceae $
- Use
cdwithout any arguments to go to the home directory. Then, once again, usecd -to return to the previous location:robin ~/Lesson1/data/taxaceae $ cd robin ~ $ cd - /home/robin/Lesson1/data/taxaceae robin ~/Lesson1/data/taxaceae $
- Now, we will explore commands that help us navigate the folder structure, such as
pwd,pushd, andpopd. Use thepwdcommand to display the path of the CWD, as follows:robin ~/Lesson1/data/taxaceae $ pwd /home/robin/Lesson1/data/taxaceae
The
pwdcommand may not seem very useful when the CWD is being displayed in the prompt, but it is useful in some situations, for example, to copy the path to the clipboard for use in another command, or to share it with someone. - Use the
pushdcommand to navigate into a folder, while remembering the CWD:robin ~/Lesson1/data/taxaceae $ pushd taxus/baccata/ ~/Lesson1/data/taxaceae/taxus/baccata ~/Lesson1/data/taxaceae
Use it once again, saving this location to the stack too:
robin ~/Lesson1/data/taxaceae/taxus/baccata $ pushd ../sumatrana/
~/Lesson1/data/taxaceae/taxus/sumatrana ~/Lesson1/data/taxaceae/taxus/baccata ~/Lesson1/data/taxaceae
Using it yet again, now we have three folders on the stack:
robin ~/Lesson1/data/taxaceae/taxus/sumatrana $  pushd ../../../pinaceae/cedrus/deodara/
~/Lesson1/data/pinaceae/cedrus/deodara ~/Lesson1/data/taxaceae/taxus/sumatrana ~/Lesson1/data/taxaceae/taxus/baccata ~/Lesson1/data/taxaceae
robin ~/Lesson1/data/pinaceae/cedrus/deodara $
Notice that it prints out the list of directories that have been saved so far. Since it is a stack, the list is ordered according to recency, with the first entry being the one we just changed into.
- Use
popdto walk back down the directory stack, successively visiting the folders we saved earlier. Notice the error message when the stack is empty:robin ~/Lesson1/data/pinaceae/cedrus/deodara $ popd ~/Lesson1/data/taxaceae/taxus/sumatrana ~/Lesson1/data/taxaceae/taxus/baccata ~/Lesson1/data/taxaceae robin ~/Lesson1/data/taxaceae/taxus/sumatrana $ popd ~/Lesson1/data/taxaceae/taxus/baccata ~/Lesson1/data/taxaceae robin ~/Lesson1/data/taxaceae/taxus/baccata $ popd ~/Lesson1/data/taxaceae robin ~/Lesson1/data/taxaceae $ popd bash: popd: directory stack empty
The entries on the directory stack are added and removed from the top of the stack as
pushdandpopdare used, respectively. - Each of the folders for a species has a text file called
data.txtthat contains data about that tree from Wikipedia, which we can view withcat. Use thecatcommand to view the file's content, after navigating into thetaxus/baccatadirectory:robin ~/Lesson1/data/taxaceae $ cd taxus/baccata robin ~/Lesson1/data/taxaceae/taxus/baccata $ cat data.txt
The output will look as follows:

Figure 1.3: A screenshot showing a partial output of the data.txt file
Notice that the output from the last command scrolled outside the view rapidly.
catis not ideal for viewing large files. You can scroll through the window manually to see the contents, but this may not extend to the whole output. To view files in a more user-friendly, interactive fashion, we can use thelesscommand. - Use
lsto see that there is a file calleddata.txt, and then use thelesscommand to view it:robin ~/Lesson1/data/taxaceae/taxus/baccata $ ls -l total 40 -rw-r--r-- 1 robin robin 38260 Aug 16 01:08 data.txt robin ~/Lesson1/data/taxaceae/taxus/baccata $ less data.txt
The output is shown here:
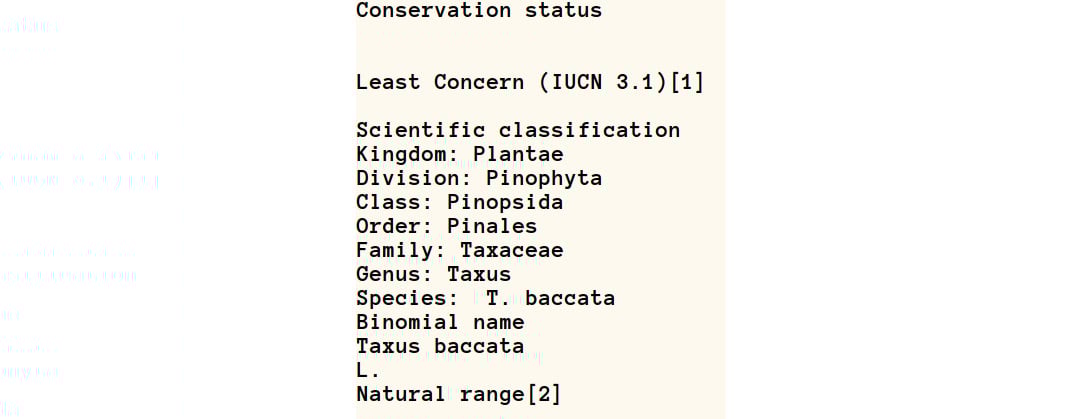
Figure 1.4: A screenshot showing the output of the less command
In this exercise, we have practiced the basic commands used to view directories and files. We have not covered all of the options available with these commands in detail, but what we have learned so far will serve for most of our needs.
Given this basic knowledge, we should be able to find our way around the entire filesystem and examine any file that we wish.
Manipulating a Filesystem
So far, we have looked at commands that only examine directories and files. Now we will learn how to manipulate filesystem objects. We will not be manipulating the contents of files yet, but only their location in the filesystem.
Here are the most common commands that are used to modify a filesystem. The commonly used options for some of these commands are also mentioned:
mkdir(make directory) creates the directory specified as its argument. It can also create a hierarchy of directories in one shot.The
-por--parentsflag can be used to tellmkdirto create all the parent directories for the path if they do not exist. This is useful when creating a nested path in one shot.rmdir(remove directory) is used to remove a directory. It only works if the directory is empty.The
-por--parentsflag works similarly to how it does inmkdir. All the directories along the path that's specified are deleted if they are empty.touchis used to create an empty file or update an existing file's timestamp.cp(copy) is used to copy files or folders between directories. When copying directories, it can recursively copy all subdirectories, too. The syntax for this command is as follows:cp <sources> <dest>
Here,
<sources>is the paths of one or more files and folders to be copied, and<dest>is the path of the folder where<sources>are copied. This can be a filename, if<sources>is a single filename. The following options can be used with this command:The
-ror--recursiveflag is necessary when copying folders. It recursively copies all of the folder's contents to the destination.The
-vor--verboseflag makescpprint out the source and destination pathname of every file it copies.mv(move) can be used to rename an object and/or move it to another directory.Note
The
mvcommand performs both renaming and moving. However, these are not two distinct functions. If you think about it, renaming a file and moving it to a different path on the same disk are the same thing. Inherently, a file's content is not related to its name. A change to its name is not going to affect its contents. In a sense, a pathname is also a part of a file's name.rm(remove) deletes a file permanently, and can also be used to delete a directory, recursively deleting all the subdirectories. Unlike sending files to the Trashcan or Recycle Bin in a GUI interface, files deleted withrmcannot be recovered. This command has the following options:The
-ror--recursiveflag deletes folders recursively.The
-vor--verboseflag makesrmprint out the pathname of every file it deletes.The
-ior--interactive=alwaysoptions allows review and confirmation before each entry being deleted. Answeringnrather thanyto the prompts (Enter must be pressed after y or n) will either skip deleting some files or skip entire directories.-Ior--interactive=onceprompts only once before removing more than three files, or when removing recursively, whereas-iprompts for each and every file or directory.
Exercise 2: Manipulating the Filesystem
In this exercise, we will learn how to manipulate the FS and files within it. We will modify the directories in the Lesson1 folder by creating, copying, and deleting files/folders using the commands that we learned about previously:
- Open a command-line shell and navigate to the directory for this lesson:
robin ~ $ cd Lesson1/
robin ~/Lesson1 $
- Create some directories, using
mkdir, that classify animals zoologically. Type the commands shown in the following snippet:robin ~/Lesson1 $ mkdir animals robin ~/Lesson1 $ cd animals robin ~/Lesson1/animals $ mkdir canis robin ~/Lesson1/animals $ mkdir canis/familiaris robin ~/Lesson1/animals $ mkdir canis/lupus robin ~/Lesson1/animals $ mkdir canis/lupus/lupus robin ~/Lesson1/animals $ mkdir leopardus/colocolo/pajeros mkdir: cannot create directory 'leopardus/colocolo/pajeros': No such file or directory
- Notice that
mkdirnormally creates subdirectories that are only in already-existing directories, so it raises an error when we try to makeleopardus/colocolo/pajeros. Use the--parentsor-pswitch to overcome this error:robin ~/Lesson1/animals $ mkdir -p leopardus/colocolo/pajeros robin ~/Lesson1/animals $ mkdir --parents panthera/tigris robin ~/Lesson1/animals $ mkdir panthera/leo
- Now, use
treeto view and verify the directory structure we created:robin ~/Lesson1/animals $ tree
The directory structure is shown here:

Figure 1.5: The directory structure of the animals folder
- Now use the
rmdircommand to delete the directories. Try the following code snippets:robin ~/Lesson1/animals $ rmdir canis/familiaris/ robin ~/Lesson1/animals $ rmdir canis rmdir: failed to remove 'canis': Directory not empty robin ~/Lesson1/animals $ rmdir canis/lupus rmdir: failed to remove 'canis/lupus': Directory not empty
- Notice that it raises an error when trying to remove a directory that is not empty. You need to empty the directory first, removing
canis/lupus/lupus, and then use the-poption to remove bothcanis/lupusand its parent,canis:robin ~/Lesson1/animals $ rmdir canis/lupus/lupus robin ~/Lesson1/animals $ rmdir -p canis/lupus
- Now, use
treeto view the modified directory structure, as follows:robin ~/Lesson1/animals $ tree
The directory structure is shown here:

Figure 1.6: A screenshot of the output displaying the modified folder structure of the animals folder
- Create some directories with the following commands:
robin ~/Lesson1/animals $ mkdir -p canis/lupus/lupus
robin ~/Lesson1/animals $ mkdir -p canis/lupus/familiaris
robin ~/Lesson1/animals $ ls
canis  leopardus  panthera
- Create some dummy files with the
touchcommand, and then view the entire tree again:robin ~/Lesson1/animals $ touch canis/lupus/familiaris/dog.txt robin ~/Lesson1/animals $ touch panthera/leo/lion.txt robin ~/Lesson1/animals $ touch canis/lupus/lupus/wolf.txt robin ~/Lesson1/animals $ touch panthera/tigris/tiger.txt robin ~/Lesson1/animals $ touch leopardus/colocolo/pajeros/colocolo.txt robin ~/Lesson1/animals $ tree
The output will look as follows:

Figure 1.7: A screenshot of the output displaying the revised folder structure of the animals folder
- Use
cpto copy thedog.txtandwolf.txtfiles from thefamiliarisandlupusdirectories into a new directory calleddogs, as follows:robin ~/Lesson1/animals $ mkdir dogs robin ~/Lesson1/animals $ cp canis/lupus/familiaris/dog.txt dogs/ robin ~/Lesson1/animals $ cp canis/lupus/lupus/wolf.txt dogs/ robin ~/Lesson1/animals $ tree
The output will look as follows:

Figure 1.8: A screenshot of the output displaying the revised folder structure of the animals folder, along with the newly copied files
- Now clone the entire
pantheradirectory into a new directory calledcatsusingcp:robin ~/Lesson1/animals $ mkdir cats robin ~/Lesson1/animals $ cp -r panthera cats robin ~/Lesson1/animals $ tree
The output will look as follows:

Figure 1.9: A screenshot of the output displaying the revised folder structure of the animals folder
- Now use the
--verboseoption withcpto copy the files with verbose progress displayed and print the output using thetreecommand:robin ~/Lesson1/animals $ mkdir bigcats robin ~/Lesson1/animals $ cp -r --verbose leopardus/ panthera/ bigcats 'leopardus/' -> 'bigcats/leopardus' 'leopardus/colocolo' -> 'bigcats/leopardus/colocolo' 'leopardus/colocolo/pajeros' -> 'bigcats/leopardus/colocolo/pajeros' 'leopardus/colocolo/pajeros/colocolo.txt' -> 'bigcats/leopardus/colocolo/pajeros/colocolo.txt' 'panthera/' -> 'bigcats/panthera' 'panthera/tigris' -> 'bigcats/panthera/tigris' 'panthera/tigris/tiger.txt' -> 'bigcats/panthera/tigris/tiger.txt' 'panthera/leo' -> 'bigcats/panthera/leo' 'panthera/leo/lion.txt' -> 'bigcats/panthera/leo/lion.txt' robin ~/Lesson1/animals $ tree bigcats
The output of the
treecommand is shown here:
Figure 1.10: A screenshot of the output displaying the folder structure of the animals folder after a recursive directory copy
- Now use
mvto rename theanimalsfolder tobeasts:robin ~/Lesson1/animals $ cd .. robin ~/Lesson1 $ mv animals beasts robin ~/Lesson1 $ cd beasts robin ~/Lesson1/beasts $ ls bigcats canis cats dogs leopardus panthera
- Use
mvto move an individual file to a different path. We movedogs/dog.txtto the CWD asfido.txtand move it back again:robin ~/Lesson1/beasts $ mv dogs/dog.txt fido.txt robin ~/Lesson1/beasts $ ls bigcats canis cats dogs fido.txt leopardus panthera robin ~/Lesson1/beasts $ mv fido.txt dogs/
- Use
mvto relocate an entire folder. Move the wholecanisfolder intodogs:robin ~/Lesson1/beasts $ mv canis dogs robin ~/Lesson1/beasts $ tree dogs
The revised folder structure is shown here:

Figure 1.11: A screenshot of the output displaying the folder structure of the animals folder after relocating a folder
- Use the
-vor--verboseoption withmvto make it report each item being moved. In this case, there was only one file being moved, but this can be a long list:robin ~/Lesson1/beasts $ mkdir panthers robin ~/Lesson1/beasts $ mv --verbose panthera panthers renamed 'panthera' -> 'panthers/panthera' robin ~/Lesson1/beasts $ tree panthers
The output is shown here:

Figure 1.12: A screenshot of the output displaying the folder structure of the animals folder after moving a folder
- Use
treeto view the dogs folder (before we usermto delete it):robin ~/Lesson1/beasts $ tree dogs
The output is shown here:

Figure 1.13: A screenshot of the output displaying the folder structure of the animals folder before the deletion of files
- Delete the files one by one with
rm:robin ~/Lesson1/beasts $ rm dogs/fido.txt robin ~/Lesson1/beasts $ rm dogs/wolf.txt robin ~/Lesson1/beasts $ rm dogs/canis/lupus/familiaris/dog.txt robin ~/Lesson1/beasts $ rm dogs/canis/lupus/lupus/wolf.txt robin ~/Lesson1/beasts $ tree dogs
The output is shown here:

Figure 1.14: The folder structure of the animals folder after the deletion of files
- Remove the complete directory structure with the
-ror--recursiveswitch ofrm:robin ~/Lesson1/beasts $ ls bigcats cats dogs leopardus panthers robin ~/Lesson1/beasts $ rm -r dogs robin ~/Lesson1/beasts $ ls bigcats cats leopardus panthers
As we can see, the entire
dogsdirectory was silently removed without warning. - Use the
-iflag to remove items interactively. Each individual operation is prompted for confirmation:Note
Depending on your system configuration, the prompts you see for the following command and the one in step 21 may be in a different order or worded differently. The system will prompt you for every deletion to be performed, regardless.
robin ~/Lesson1/beasts $ rm -r -i panthers
rm: descend into directory 'panthers'? y
rm: descend into directory 'panthers/panthera'? y
rm: descend into directory 'panthers/panthera/leo'? y
rm: remove regular empty file 'panthers/panthera/leo/lion.txt'? n
rm: remove directory 'panthers/panthera/leo'? n
rm: descend into directory 'panthers/panthera/tigris'? n
robin ~/Lesson1/beasts $ ls
bigcats  cats  leopardus  panthers
Now use the
-Iflag to remove items interactively. Confirmation is asked only a few times, and not for each file:robin ~/Lesson1/beasts $ rm -r -I bigcats rm: remove 1 argument recursively? y robin ~/Lesson1/beasts $ ls cats leopardus panthers
- Use the
-vor--verboseoption to makermreport each file or directory that's removed:robin ~/Lesson1/beasts $ rm -r -v panthers/ removed 'panthers/panthera/leo/lion.txt' removed directory 'panthers/panthera/leo' removed 'panthers/panthera/tigris/tiger.txt' removed directory 'panthers/panthera/tigris' removed directory 'panthers/panthera' removed directory 'panthers/'
- Now clear the entire folder we used for this exercise so that we can move on to the next lesson with a blank slate:
robin ~/Lesson1/beasts $ cd ..
robin ~/Lesson1 $ ls
beasts  data  data1
robin ~/Lesson1 $ rm -r beasts
robin ~/Lesson1 $ ls
data  data1
In this exercise, we learned how to change or extend the structure of the filesystem tree. We have yet to learn how to create and manipulate the content within files, which will be covered in future chapters.
Activity 1: Navigating the Filesystem and Viewing Files
For this activity, use the conifer tree dataset that has been supplied as a hierarchy of folders representing each tree's Family, Genus, and Species. Every species has an associated text file called data.txt containing information about the species, which has been mined from a Wikipedia page. Your aim is to navigate this hierarchy via the command line and answer basic questions about certain species by looking it up the data in those text files. Navigate through the directories within the example dataset provided for this lesson and answer the following questions:
- Provide two common names for the species Cedrus Deodara, which belongs to the Pinaceae family.
- Look up information about Abies Pindrow in the Pinaceae family and fill in the following blank: "The name pindrow derives from the tree's name in _______".
- How many species of the Taxus genus in the family Taxaceae are documented in this dataset?
- How many species in total are documented in this dataset?
Follow these steps to complete this activity:
- Use the
cdcommand to navigate to the appropriate folder and uselessto read the relevant information. - Use the
cdcommand to navigate to the appropriate folder and view the file withless. Use the/command to search for the phrase "derives from" and read the rest of the sentence to get the answer. - Navigate to the right folder and run the
treecommand, which reports the number of directories in it. Each directory is a species. - Navigate to the top-level
datafolder and run thetreecommand, which reports the number of files. Each file is associated with one species.
The expected answers for the preceding questions are as follows:
- Any two of the following: deodar cedar, Himalayan cedar, deodar, devdar, devadar, devadaru
- Nepali
- 12
- 770
Note
The solution for this activity can be found on page 270.
Activity 2: Modifying the Filesystem
For this activity, you will be using the conifer tree sample dataset that is in the ~/Lesson1/data folder. You need to collect the data for all trees from the family taxaceae and the genus torreya into one folder. Each file should be named <species>.txt, where <species> is the name of the species/folder. Execute the following steps to complete this objective:
- Use the
cdcommand to go into theLesson1folder and create a new folder calledactivity2. - Navigate to the folder for the genus specified and view the subfolders which represent each species.
- Use the
cpcommand to copy a data file from one sub-directory of thedata/taxaceae/torreyafolder into the output folder. - Use the
mvcommand to rename the file as per the species name. - Repeat steps 3 and 4 for all the species that are requested.
The expected listing of the activity2 folder is as follows:
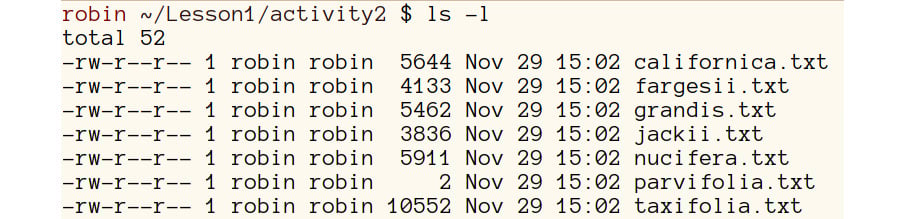
Figure 1.15: A screenshot of the expected listing of the activity2 folder
Note
The solution for this activity can be found on page 270.
So far, we have explored the space in which a shell command-line operates. In a GUI, we deal with an abstract space of windows, menus, applications, and so on. In contrast, a CLI is based on a lower layer of the operating system, which is the filesystem.
In this topic, we have learned what a filesystem is and how to navigate it, and examined its structure or looked at the contents of files in it using the command line. We also learned how to modify the FS structure and perform simple file management tasks.
We learned how the shell is a way to provide precise, unambiguous, and repeatable instructions to the computer. You may have noticed the fact that most command-line tools perform just one simple function. This stems from one of the UNIX design philosophies: Do only one thing but, do it well. These small commands can be combined like the parts of a machine into constructs that can automate tasks and process data in complex ways.
The focus of this topic was mainly to get familiar with the FS, the arena where most of the command-line work happens. In the next topic, we will learn how to reduce effort when composing commands, making use of several convenience features in Bash.