

A tale of two kernels
When working on a project or product, there obviously will be a Linux kernel that will be deployed as part of the overall system.
Requirements for a Working Linux System
A quick aside: a working Linux system minimally requires a bootloader, a kernel, and root filesystem images. Additionally, typical arm/arm64/ppc systems require a Device Tree Blob (DTB) as well.
This system that's deployed to the outside world is, in general, termed the production system and the kernel the production kernel. Here, we'll limit our discussion to the kernel only. The configuration, build, test, debug, and deployment of the production kernel is, no doubt, a key part of the overall project.
Do note though, that in many systems (especially the enterprise-class ones), the production kernel is often simply the default kernel that's supplied by the vendor (Red Hat, SUSE, Canonical, or others). On most embedded Linux projects and products, this is likely not the case: the platform (or Board Support Package (BSP)) team or a vendor will select a base mainline kernel (typically from kernel.org) and customize it. This can include enhancements, careful configuration, and deployment of the custom-built production kernel.
For the purpose of our discussion, let's assume that we need to configure and build a custom kernel.
A production and a debug kernel
However (and especially after having read the earlier Software bugs – a few actual cases section), you will realize that there's always the off-chance that even the kernel – more likely the code you and your team added to it (the kernel modules, drivers, interfacing components) – has hidden faults (bugs). With a view to catching them before the system hits the field, thorough testing/QA is of prime importance!
Now, the issue is this: unless certain deeper checks are enabled within the kernel itself, it's entirely possible that they can escape your test cases. So, why not simply enable them? Well, one, these deeper checks are typically switched off by default in the production kernel's configuration. Two, when turned on, they do result in performance degradation, at times quite significantly.
So, where does that leave us? Simple, really: you should plan on working with at least two, and possibly three, kernels:
- One, a carefully tuned production kernel, geared toward efficiency, security, and performance.
- Two, a carefully configured debug kernel, geared toward catching pretty much all kinds of (kernel) bugs! Performance is not a concern here, catching bugs is.
- Three (optional, case by case): a production kernel with one or more very specific debug options enabled and the rest turned off.
The second one, the so-called debug kernel, is configured in such a way that all required or recommended debug options are turned on, enabling you to (hopefully!) catch those hidden bugs. Of course, performance might suffer as a result, but that's okay; catching – and subsequently fixing – kernel-level bugs is well worth it. Indeed, in general, during development and (unit) testing, performance isn't paramount; catching and fixing deeply hidden bugs is! We do understand that, at times, bugs need to be reproduced and identified on the production kernel itself. The third option mentioned above can be a life-saver here.
The debug kernel is only used during development, testing, and very possibly later when bugs do actually surface. How exactly it's used later is something we shall certainly cover in the course of this book.
Also, this point is key: it usually is the case that the mainline (or vanilla) kernel that your custom kernel is based upon is working fine; the bugs are generally introduced via custom enhancements and kernel modules. As you will know, we typically leverage the kernel's Loadable Kernel Module (LKM) framework to build custom kernel code – the most common being device drivers. It can also be anything else: custom network filters/firewalls, a new filesystem, or I/O scheduler. These are out-of-tree kernel components (typically some .ko files) that become part of the root filesystem (they're usually installed in /lib/modules/$(uname –r)). The debug kernel will certainly help catch bugs in your kernel modules as their test cases are executed, as they run.
The third kernel option – an in-between of the first two – is optional of course. From a practical real-world point of view, it may be exactly what's required on a given setup. With certain kernel debug systems turned on, to catch specific types of bugs that you're hunting (or anticipate) and the rest turned off, it can be a pragmatic way to debug even a production system, keeping performance high enough.
For practical reasons, in this book, we'll configure, build, and make use of the first two kernels – a custom production one and a custom debug one, only; the third option is yours to configure as you gain experience with the kernel debug features and tools as well as your particular product or project.
Which kernel release should you use?
The Linux kernel project is often touted as the most successful open source project ever, with literally hundreds of releases and a release cadence that's truly phenomenal for such an enormous project (it averages a new release every 6 to 8 weeks!). Among all of them, which one should we use (as a starting point, at least)?
It's really important to use the latest stable kernel version, as it will include all the latest performance and security fixes. Not just that, the kernel community has different release types, which determine how long a given kernel release will be maintained (with bug and security fixes being applied, as they become known). For typical projects or products, selecting the latest Long Term Stable (LTS) kernel release thus makes the best sense. Of course, as already mentioned, on many projects – typically, the server-/enterprise-class ones – the vendor (Red Hat, SUSE, and others) might well supply the production kernel to be used; here, for the purpose of our learning, we'll start from scratch and configure and build a custom Linux kernel ourselves (as is often the case on embedded projects).
As of when I wrote this chapter, the latest LTS Linux kernel is 5.10 (particularly, version 5.10.60); I shall use this kernel throughout this book. (You will realize that by the time you're reading this, it's entirely possible – in fact pretty much guaranteed – that the latest LTS kernel has evolved to a newer version).
Important – Security
It's already happened of course. Now, it's March 2022, I'm writing the tenth chapter, the latest 5.10 LTS kernel is 5.10.104, and guess what? A serious and critical vulnerability (vuln) has emerged in recent Linux kernels – including 5.10.60! – christened Dirty Pipe. Details: New Linux bug gives root on all major distros, exploit released, Mar 2022: https://www.bleepingcomputer.com/news/security/new-linux-bug-gives-root-on-all-major-distros-exploit-released/. Here's an explanation by the person who found and reported the vuln (a must read!): The Dirty Pipe Vulnerability, Max Kellerman: https://dirtypipe.cm4all.com/.
(It's also very interesting – the fix comes down to 2 lines – initializing a local variable to 0!: https://lore.kernel.org/lkml/[email protected]/.)
The upshot of all this: I recommend you use a fixed kernel (as of now, kernel versions 5.16.11, 5.15.25, and 5.10.102 are fixed). Since this book is based on the 5.10 LTS kernel, I thus highly recommend you use a version 5.10 LTS kernel, specifically, version 5.10.102 or later. (The material, of course, continues to be based on 5.10.60; besides the security implication, which of course really matters on actual production systems, the technical details remain identical.)
Besides, a key point in our favor – the 5.10 LTS kernel will be supported by the community until December 2026, thus keeping it relevant and valid for a pretty long time!
So, great – let's get to configuring and building both our custom production and debug 5.10 kernels! We'll begin with the production one.
Setting up our custom production kernel
Here, I shall have to assume you are familiar with the general procedure involved in building a Linux kernel from source: obtaining the kernel source tree, configuring it, and building it. In case you'd like to brush up on this, the Linux Kernel Programming book covers this in a lot of detail. As well, do refer to the tutorials and links in the Further reading section of this chapter.
Though this is meant to be our production kernel, we'll begin with a rather simplistic default that's based on the existing system (this approach is sometimes called the tuned kernel config via the localmodconfig one. FYI, this, and a lot more, is covered in depth in the Linux Kernel Programming book). Once we've got a reasonable starting point, we'll further tune the kernel for security. Let's begin by performing some base configuration:
- Create a new directory in which you'll work upon the upcoming production kernel:
mkdir –p ~/lkd_kernels/productionk
Bring in the kernel source tree of your choice. Here, as mentioned in Which kernel release should you use?, we shall use the latest (at the time of writing this) LTS Linux kernel, version 5.10.60:
cd ~/lkd_kernels
wget https://mirrors.edge.kernel.org/pub/linux/kernel/v5.x/linux-5.10.60.tar.xz
Notice that here we have simply used the wget utility to bring in the compressed kernel source tree; there are several alternate ways (including using git).
Note
As you'll know, the number in parentheses following the command name – for example, wget(1) – is the section within the manual or man pages where documentation on this command can be found.
- Extract the kernel source tree:
tar xf linux-5.10.60.tar.xz --directory=productionk/
- Switch to the directory it's just been extracted into (using
cd linux-5.10.60) and briefly verify the kernel version information as shown in the following screenshot:
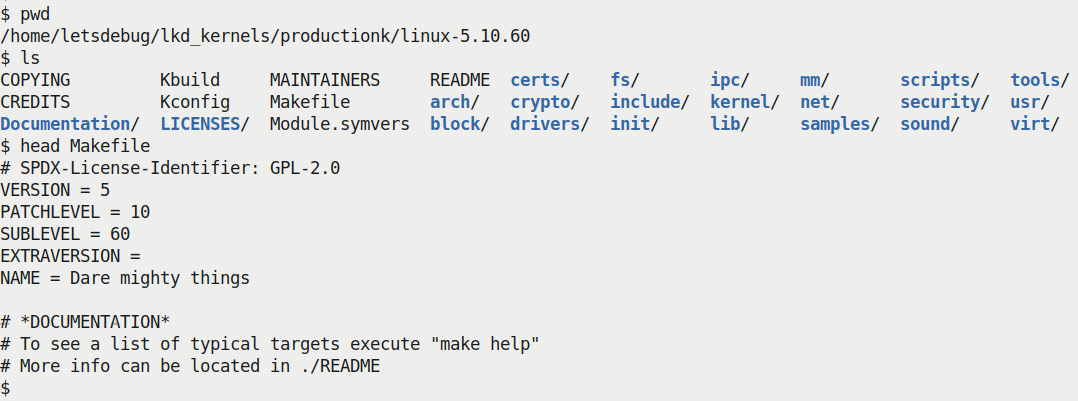
Figure 1.2 – Screenshot of the LTS kernel source tree
Every kernel version is christened with a (rather exotic) name; our 5.10.60 LTS kernel has an appropriately nice name – Dare mighty things – don't you think?
- Configure for appropriate defaults. This is what you can do to obtain a decent, tuned starting point for the kernel config based on the current config:
lsmod > /tmp/lsmod.now
make LSMOD=/tmp/lsmod.now localmodconfig
Note
The preceding command might interactively ask you to specify some choices; just selecting the defaults (by pressing the Enter key) is fine for now. The end result is the kernel configuration file saved as
.configin the root of the kernel source tree (the current directory).
We back up the config file as follows:
cp –af .config ~/lkd_kernels/kconfig_prod01
Tip
You can always do make help to see the various options (including config) available; experienced readers can use alternate config options that better suit their project.
Before jumping into the building of our production kernel, it's really important to consider the security aspect. Let's first configure our kernel to be more secure, hardened.
Securing your production kernel
With security being a major concern, the modern Linux kernel has many security and kernel hardening features. The thing is, there always tends to be a trade-off between security and convenience/performance. Thus, many of these hardening features are off by default; several are designed as an opt-in system: if you want it, turn it on by selecting it from the kernel config menu (via the familiar make menuconfig UI). It makes sense to do this, especially on a production kernel.
The question is: how will I know exactly which config features regarding security to turn on or off? There's literature on this and, better, some utility scripts that examine your existing kernel config and can make recommendations based on existing state-of-the-art security best practices! One such tool is Alexander Popov's kconfig-hardened-check Python script (https://github.com/a13xp0p0v/kconfig-hardened-check). Here's a screenshot of installing and running it plus a portion of its output, when I ran it against my custom kernel configuration file:
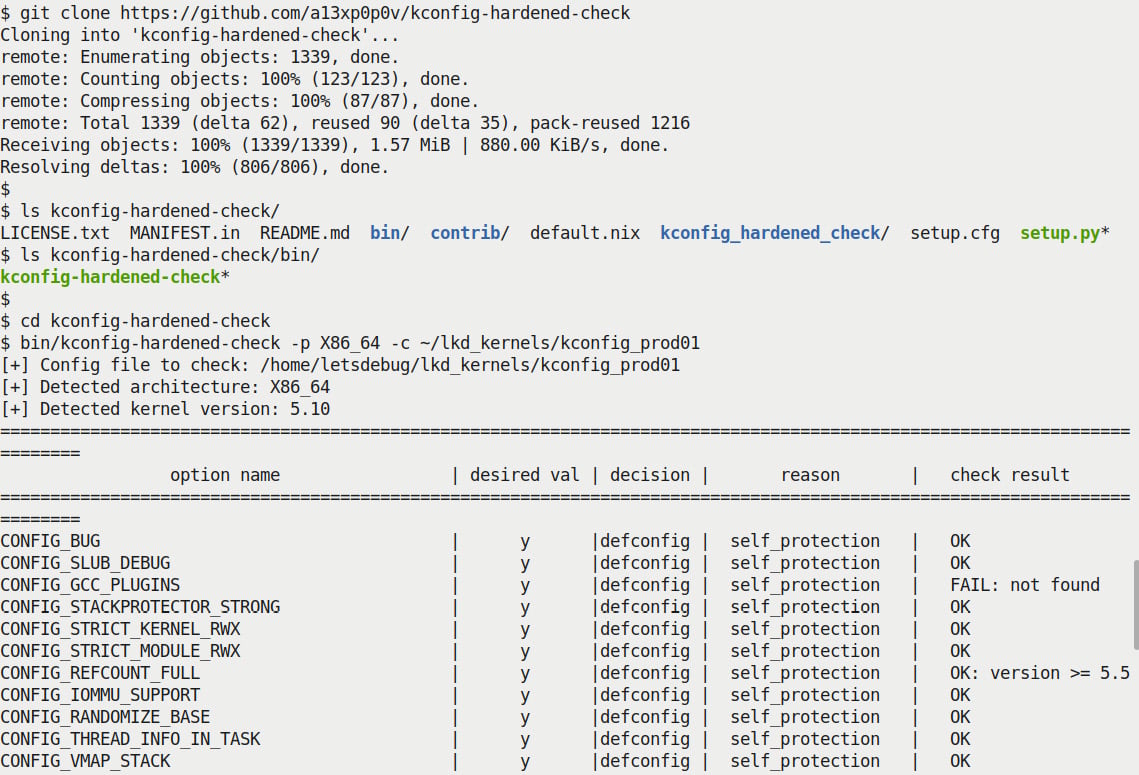
Figure 1.3 – Partial screenshot – truncated output from the kconfig-hardened-check script
(We won't be attempting to go into details regarding the useful kconfig-hardened-check script here, as it's beyond this book's scope. Do look up the GitHub link provided to see details.) Having followed most of the recommendations from this script, I generated a kernel config file:
$ ls -l .config
-rw-r--r-- 1 letsdebug letsdebug 156781 Aug 19 13:02
.config
$
Note
My kernel config file for the production kernel can be found in the book's GitHub code repository here: https://github.com/PacktPublishing/Linux-Kernel-Debugging/blob/main/ch1/kconfig_prod01. (FYI, the custom debug kernel config file that we'll be generating in the following section can be found within the same folder as well.)
Now that we have appropriately configured our custom production kernel, let's build it. The following commands should do the trick (with nproc helping us determine the number of CPU cores onboard):
$ nproc
4
$ make -j8
[ ... ]
BUILD   arch/x86/boot/bzImage
Kernel: arch/x86/boot/bzImage is ready  (#1)
$
Cross Compiling the kernel
If you're working on a typical embedded Linux project, you will need to install an appropriate toolchain and cross-compile the kernel. As well, you'd set the environment variable ARCH to the machine type (for example, ARCH=arm64) and the environment variable CROSS_COMPILE to the cross-compiler prefix (for example, CROSS_COMPILE=aarch64-none-linux-gnu-). Your typical embedded Linux builder systems – Yocto and Buildroot being very common – pretty much automatically take care of this.
As you can see, as a rule of thumb, we set the number of jobs to execute as twice the number of CPU cores available via the make option switch -j. The build should complete in a few minutes. Once done, let's check that the compressed and uncompressed kernel image files have been generated:
$ ls -lh arch/x86/boot/bzImage vmlinux
-rw-r--r-- 1 letsdebug letsdebug 9.1M Aug 19 17:21
arch/x86/boot/bzImage
-rwxr-xr-x 1 letsdebug letsdebug  65M Aug 19 17:21 vmlinux
$
Note that it's always only the first file, bzImage – the compressed kernel image – that we shall boot from. Then what's the second image, vmlinux, for? Very relevant here: it's what we shall (later) often require when we need to perform kernel debugging! It's the one that holds all the symbolic information, after all.
Our production kernel config will typically cause several kernel modules to be generated within the kernel source tree. They have to be installed in a well-known location (/lib/modules/$(uname –r)); this is achieved by doing the following, as root:
$ sudo make modules_install
[sudo] password for letsdebug: xxxxxxxxxxxxxxxx
  INSTALL arch/x86/crypto/aesni-intel.ko
  INSTALL arch/x86/crypto/crc32-pclmul.ko
[ ... ]
   DEPMOD  5.10.60-prod01
$ ls /lib/modules/
5.10.60-prod01/  5.11.0-27-generic/  5.8.0-43-generic/
$ ls /lib/modules/5.10.60-prod01/
build@  modules.alias.bin modules.builtin.bin modules.dep.bin  modules.softdep source@ kernel/        modules.builtin  modules.builtin.modinfo  modules.devname  modules.symbols modules.alias  modules.builtin.alias.bin  modules.dep modules.order modules.symbols.bin
$
For the final step, we make use of an internal script to generate the initramfs image and set up the bootloader (in this case, on our x86_64, it's GRUB) by simply running the following:
sudo make install
For details and a conceptual understanding of the initial RAM disk, as well as some basic GRUB tuning, do see the Linux Kernel Programming book. We also provide useful references within the Further reading section of this chapter.
Now all that's left to do is reboot your guest (or native) system, interrupt the bootloader (typically by holding the Shift key down during early boot; this can vary if you're booting via UEFI though), and select the newly built production kernel:
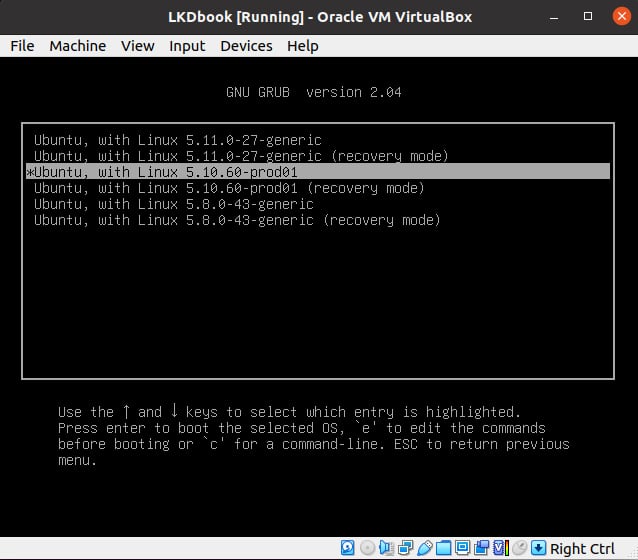
Figure 1.4 – Screenshot showing the GRUB bootloader screen and the new production kernel to boot from
As you can see from the preceding screenshot, I'm running the system as a guest OS via Oracle VirtualBox. I selected the new production kernel and pressed Enter to boot into it.
Voila, we're now running our (guest) system with our brand new production kernel:
$ uname -a
Linux dbg-LKD 5.10.60-prod01 #1 SMP PREEMPT Thu Aug 19 17:10:00 IST 2021 x86_64 x86_64 x86_64 GNU/Linux
$
Working on the guest over SSH
The new Linux kernel should run just fine with the existing root filesystem – the libraries and applications are loosely coupled with the OS, allowing different versions of the kernel (one at a time, of course) to simply mount the root filesystem and use them. Also, you may not get all the bells and whistles; for example, on my guest OS with our new production kernel, the screen resizing, shared folders, and such, features may not work. How come? They depend on the guest additions whose kernel modules haven't been built for this custom kernel. In this case, I find it a lot easier to work on the guest using the console over SSH. To do so, I installed the dropbear lightweight SSH server on the guest and then logged in over SSH from my host system. Windows users might like to try an SSH client such as putty. (In addition, you might need to set up another bridged mode network adapter on the Linux guest.)
You can (re)check the current kernel's configuration by looking up /boot/config-$(uname –r). In this case, it should be that of our production kernel, tuned towards security and performance.
Tip
To have the GRUB bootloader prompt always show up at boot: make a copy of /etc/default/grub (to be safe), then edit it as root, adding the line GRUB_HIDDEN_TIMEOUT_QUIET=false and (possibly) commenting out the line GRUB_TIMEOUT_STYLE=hidden.
Change the GRUB_TIMEOUT value from 0 to 3 (seconds). Run sudo update-grub to have the changes take effect, and reboot to test.
So, good, you now have your guest (or native) Linux OS running a new production kernel. During the course of this book, you will encounter various kernel-level bugs while running this kernel. Identifying the bug(s) will often – though not always – involve you booting via the debug kernel instead. So, let's now move on to creating a custom debug kernel for the system. Read on!
Setting up our custom debug kernel
As you have already set up a production kernel (as described in detail in the previous section), I won't repeat every step in detail here, just the ones that differ:
- Firstly, ensure you have booted into the production kernel that you built in the previous section. This is to ensure that our debug kernel config uses it as a starting point:
$ uname –r
5.10.60-prod01
- Create a new working directory and extract the same kernel version again. It's important to build the debug kernel in a separate workspace from that of the production one. True, it takes a lot more disk space but it keeps them clean and from stepping on each other's toes as you modify their configs:
mkdir –p ~/lkd_kernels/debugk
- We already have the kernel source tree (we earlier used
wgetto bring in the 5.10.60 compressed source). Let's reuse it, this time extracting it into the debug kernel work folder:cd ~/lkd_kernels tar xf linux-5.10.60.tar.xz --directory=debugk/
- Switch to the debug kernel directory and set up a starting point for kernel config – via the
localmodconfigapproach – just as we did for the production kernel. This time though, the config will be based on that of our custom production kernel, as that's what is running right now:cd ~/lkd_kernels/debugk/linux-5.10.60 lsmod > /tmp/lsmod.now make LSMOD=/tmp/lsmod.now localmodconfig
- As this is a debug kernel, we now configure it with the express purpose of turning on the kernel's debug infrastructure as much as is useful. (Though we do not care that much for performance and/or security, the fact is that as we're inheriting the config from the production kernel, the security features are enabled by default.)
The interface we use to configure our debug kernel is the usual one:
make menuconfig
Much (if not most) of the kernel debug infrastructure can be found in the last main menu item here – the one named Kernel hacking:
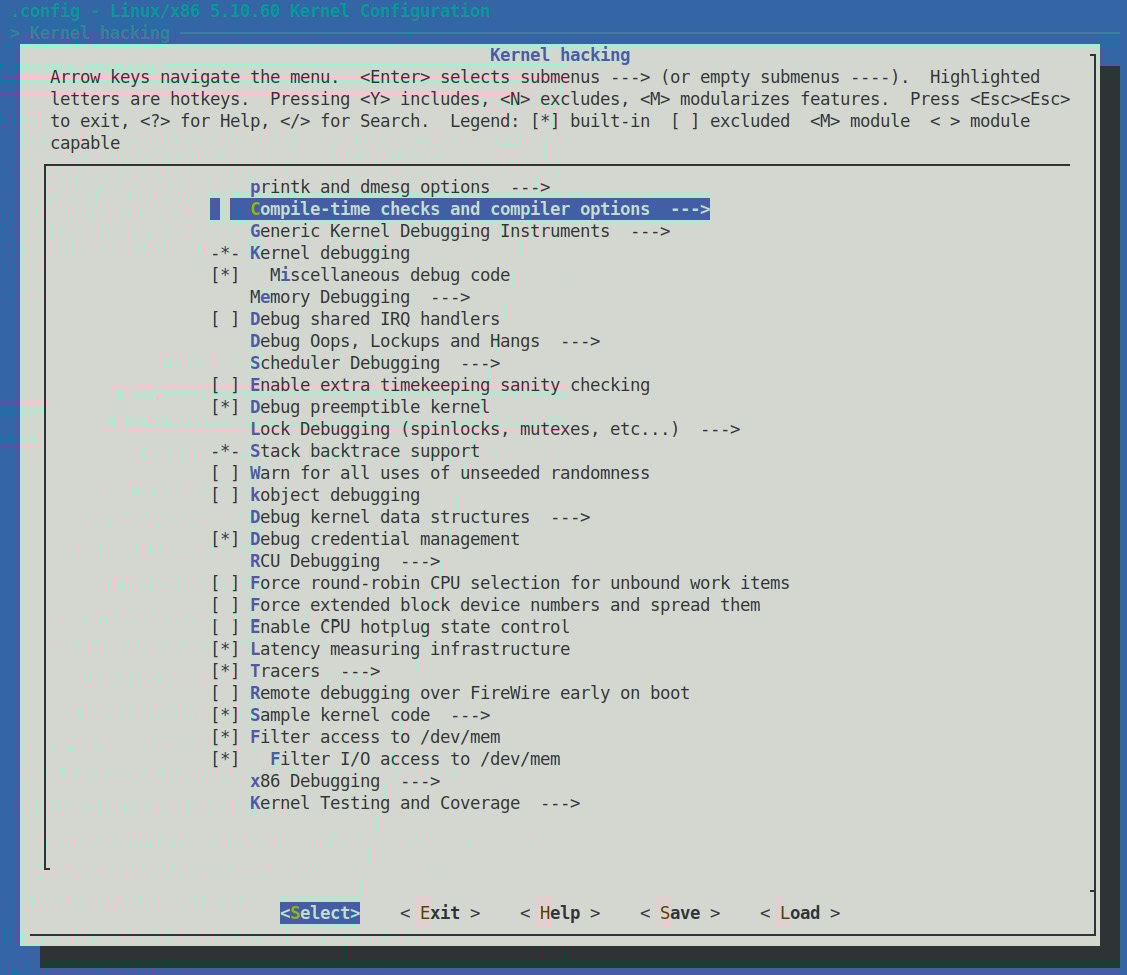
Figure 1.5 – Screenshot: make menuconfig / Kernel hacking – the majority of kernel debug options live here
There are just too many kernel configs relating to debugging to discuss individually here and now; several of them are important kernel debug features that we will explain and make use of in the chapters that follow. The following table (Table 1.1) summarizes some of the kernel config variables that we set or clear, depending on whether the config is for the debug or the production kernel. It is by no means exhaustive.
Not all of the config changes we make are within the Kernel hacking menu; others are changed as well (see the merged column rows in the table – for example, the first one is General setup: init/Kconfig, which specifies from which menu they originate as well as the Kconfig file(s) that they originate from).
Further, the <D> in the Typical, value, … columns indicates that the decision is left to you (or the platform/BSP team) as the particular value to use does depend on the actual product or project, its High Availability (HA) characteristics, security posture, and so on.
Tip
You can search within the make menuconfig UI for a given config variable (CONFIG_XXX) by typing the key / (just as in vi!) and then typing the string to search for.
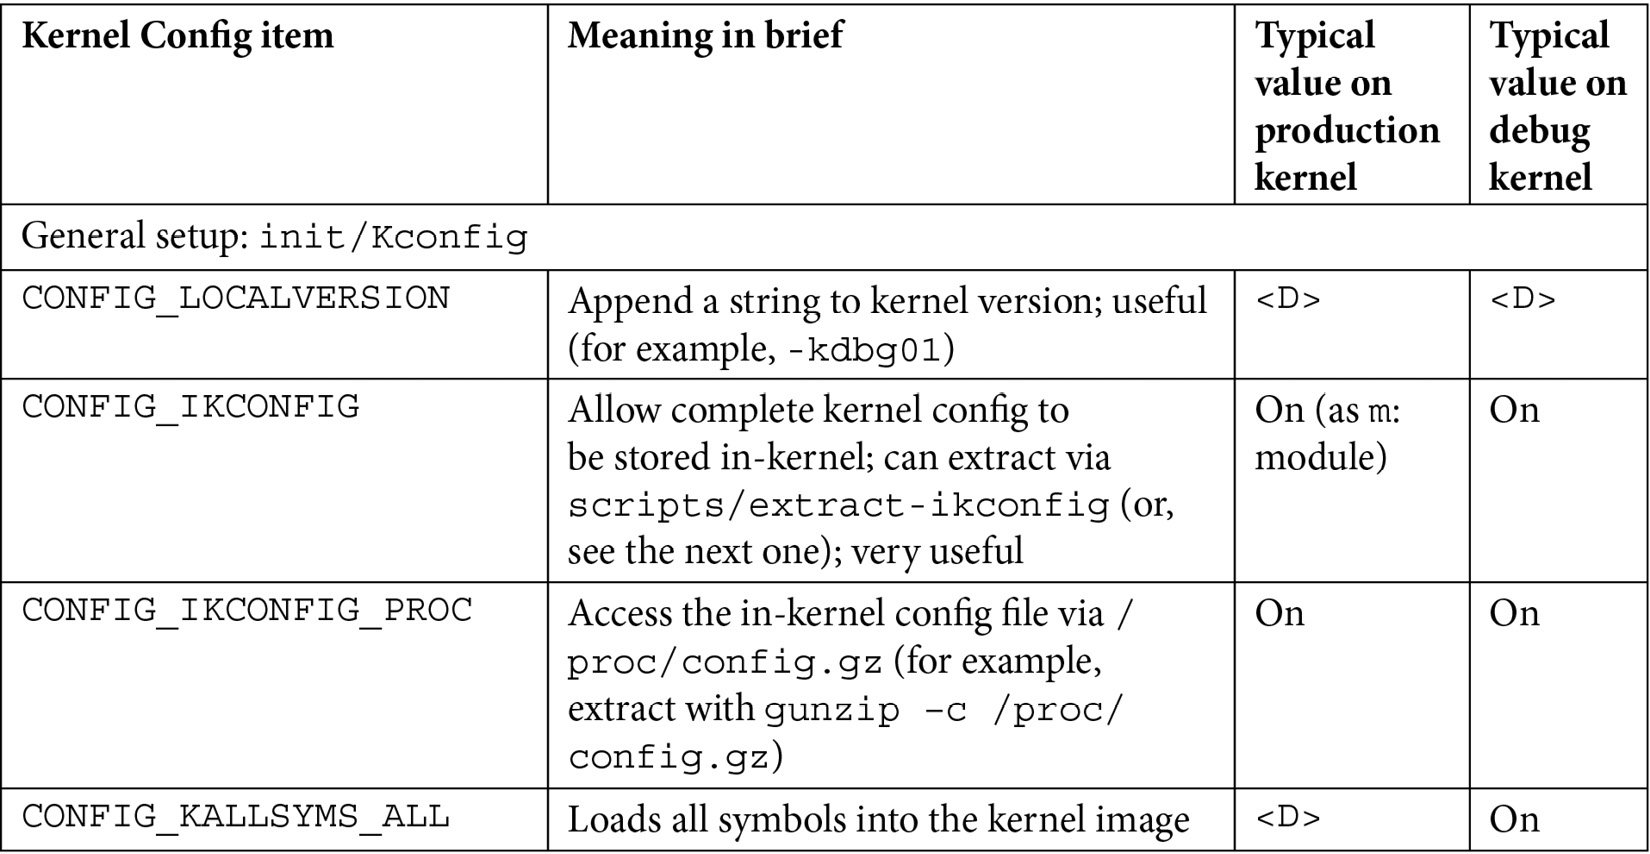
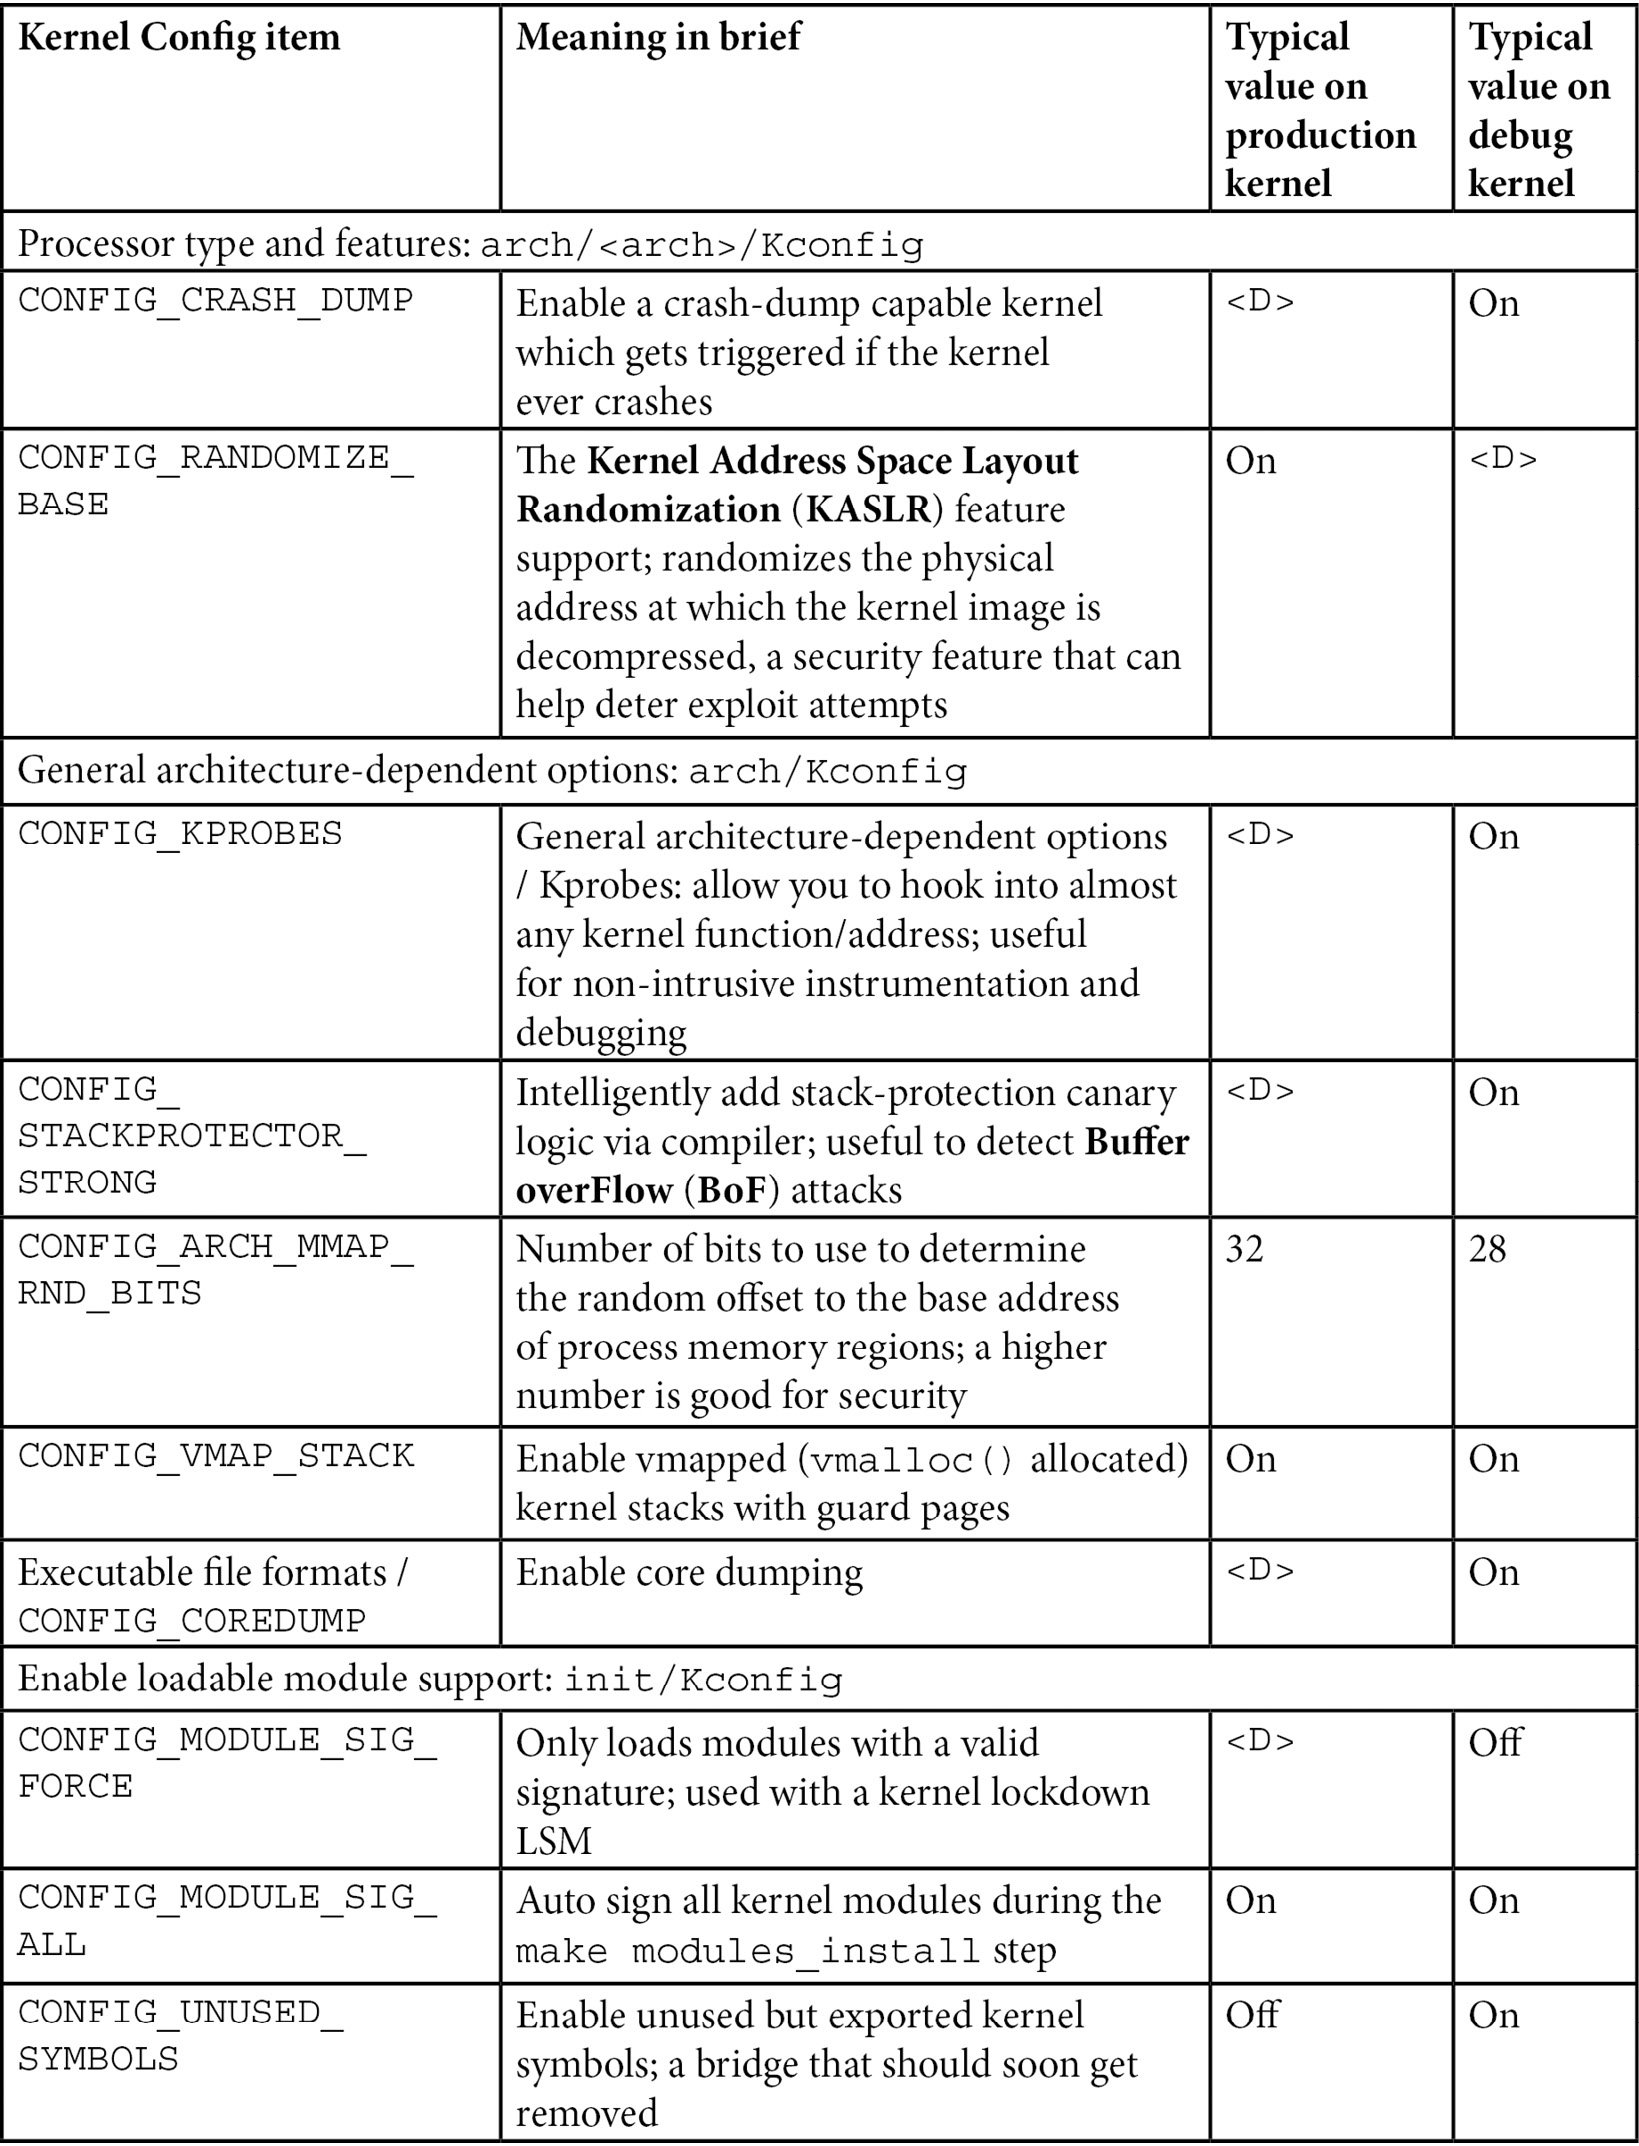
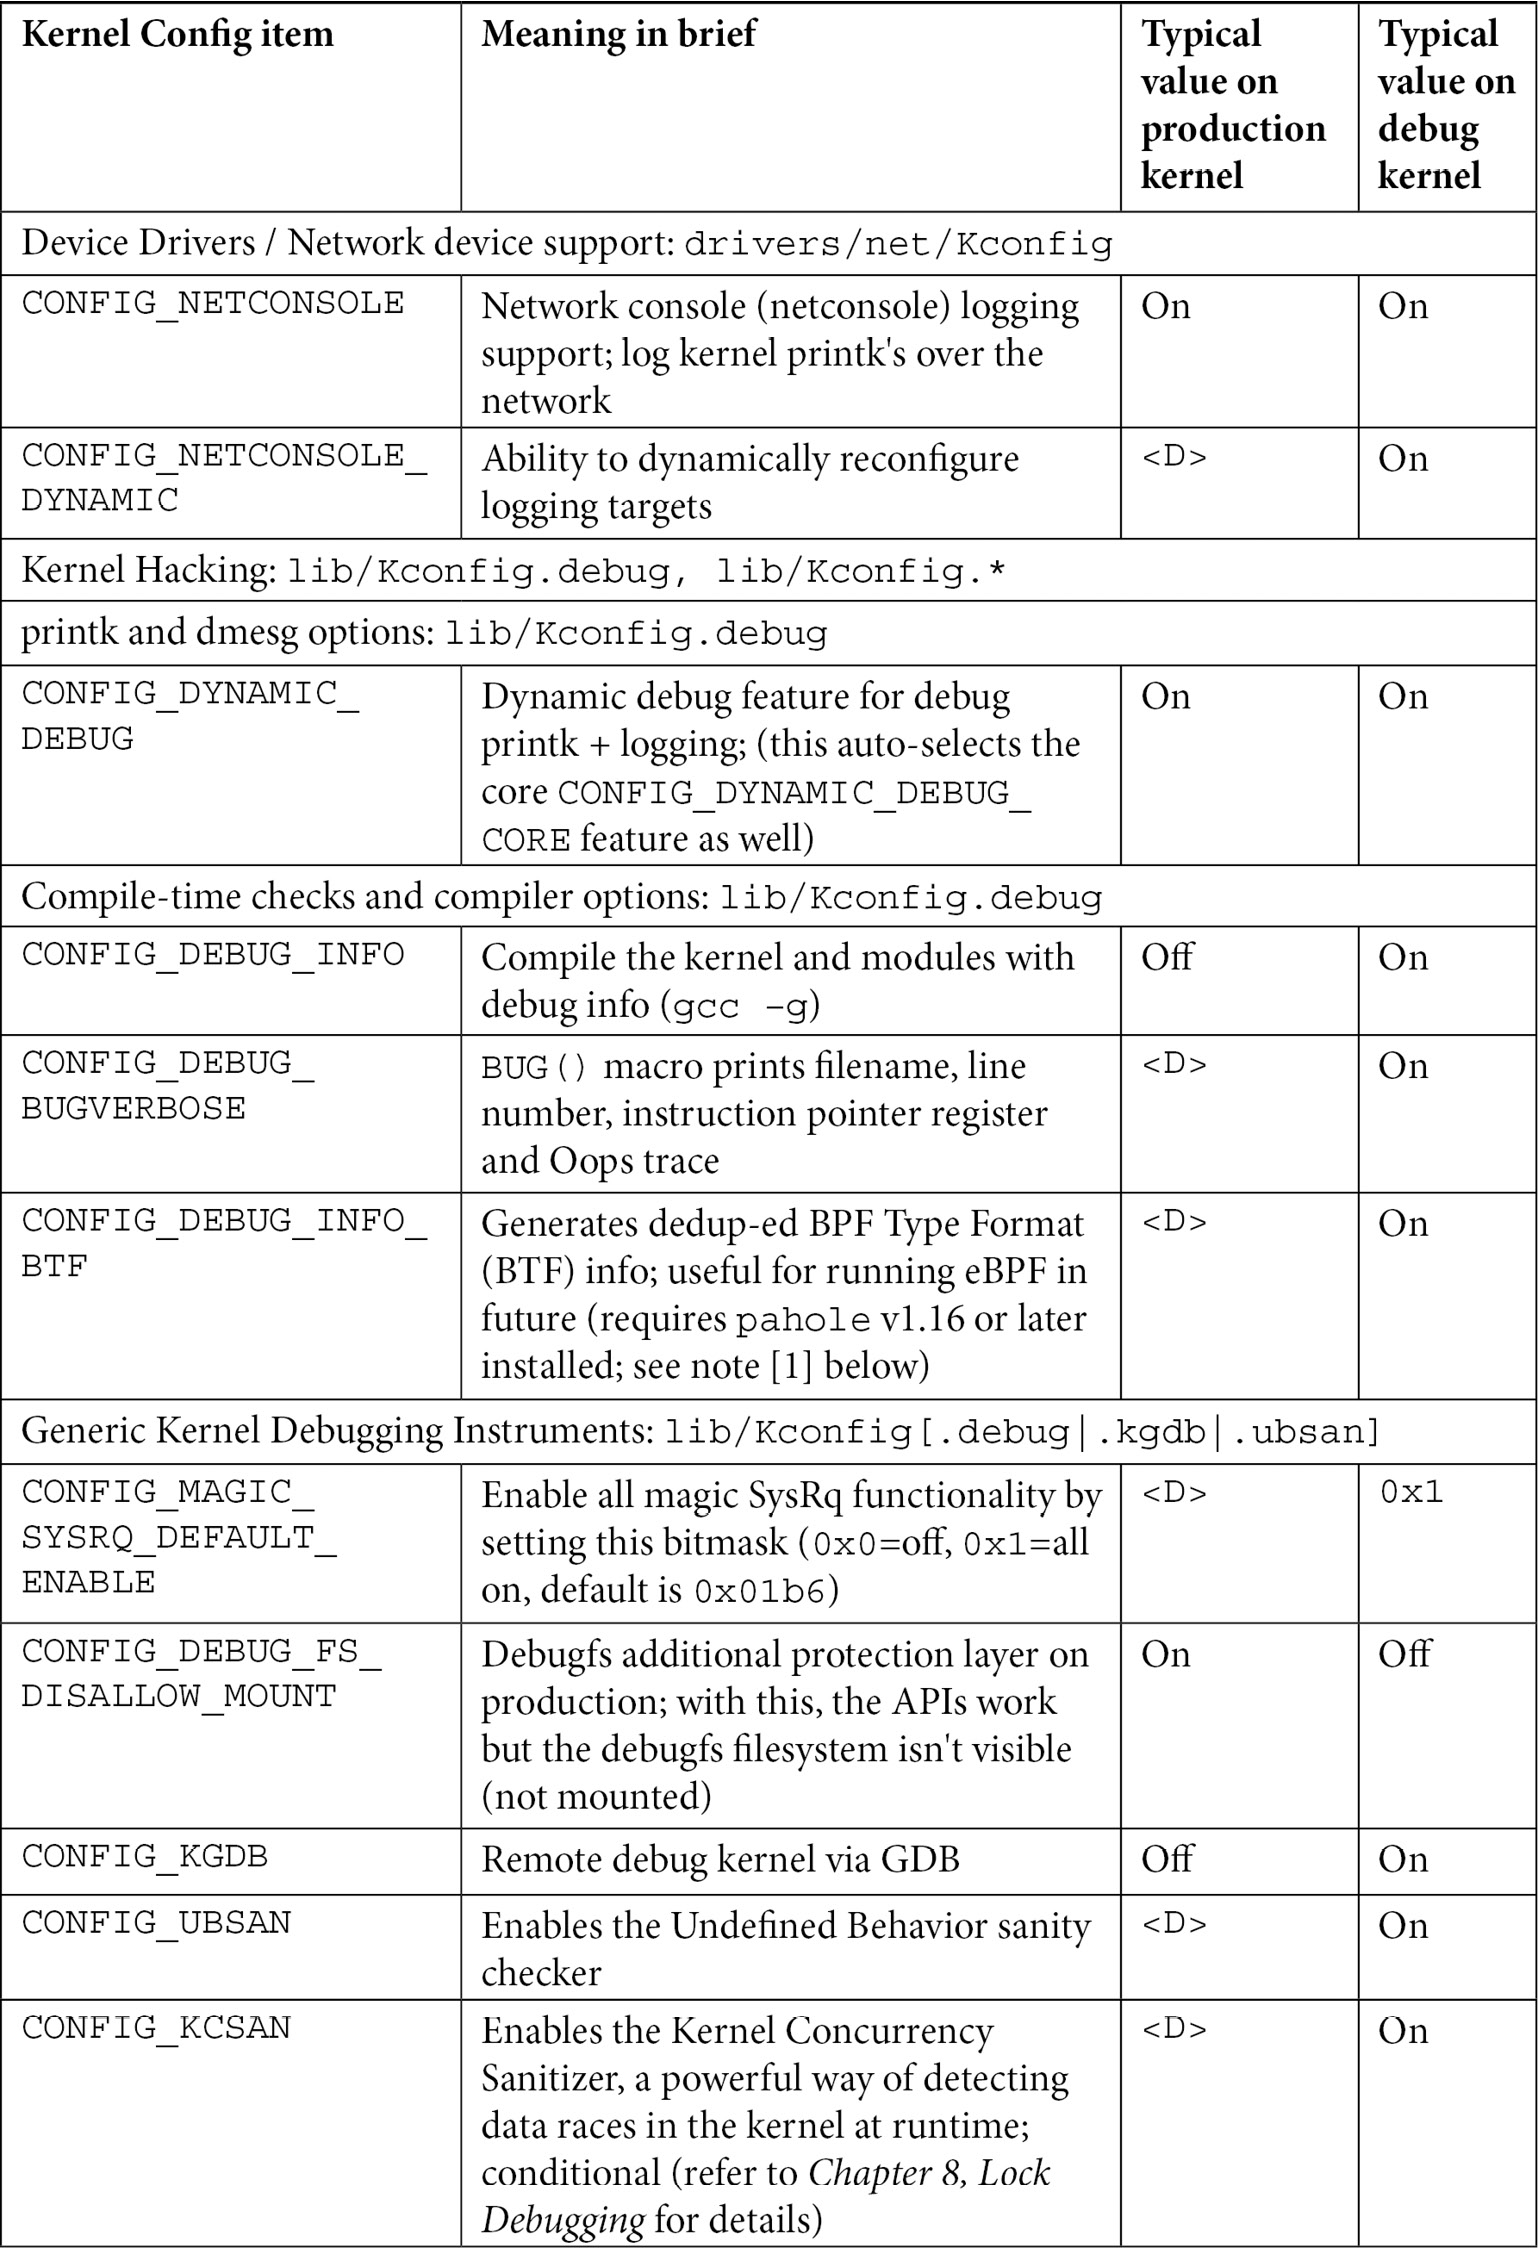
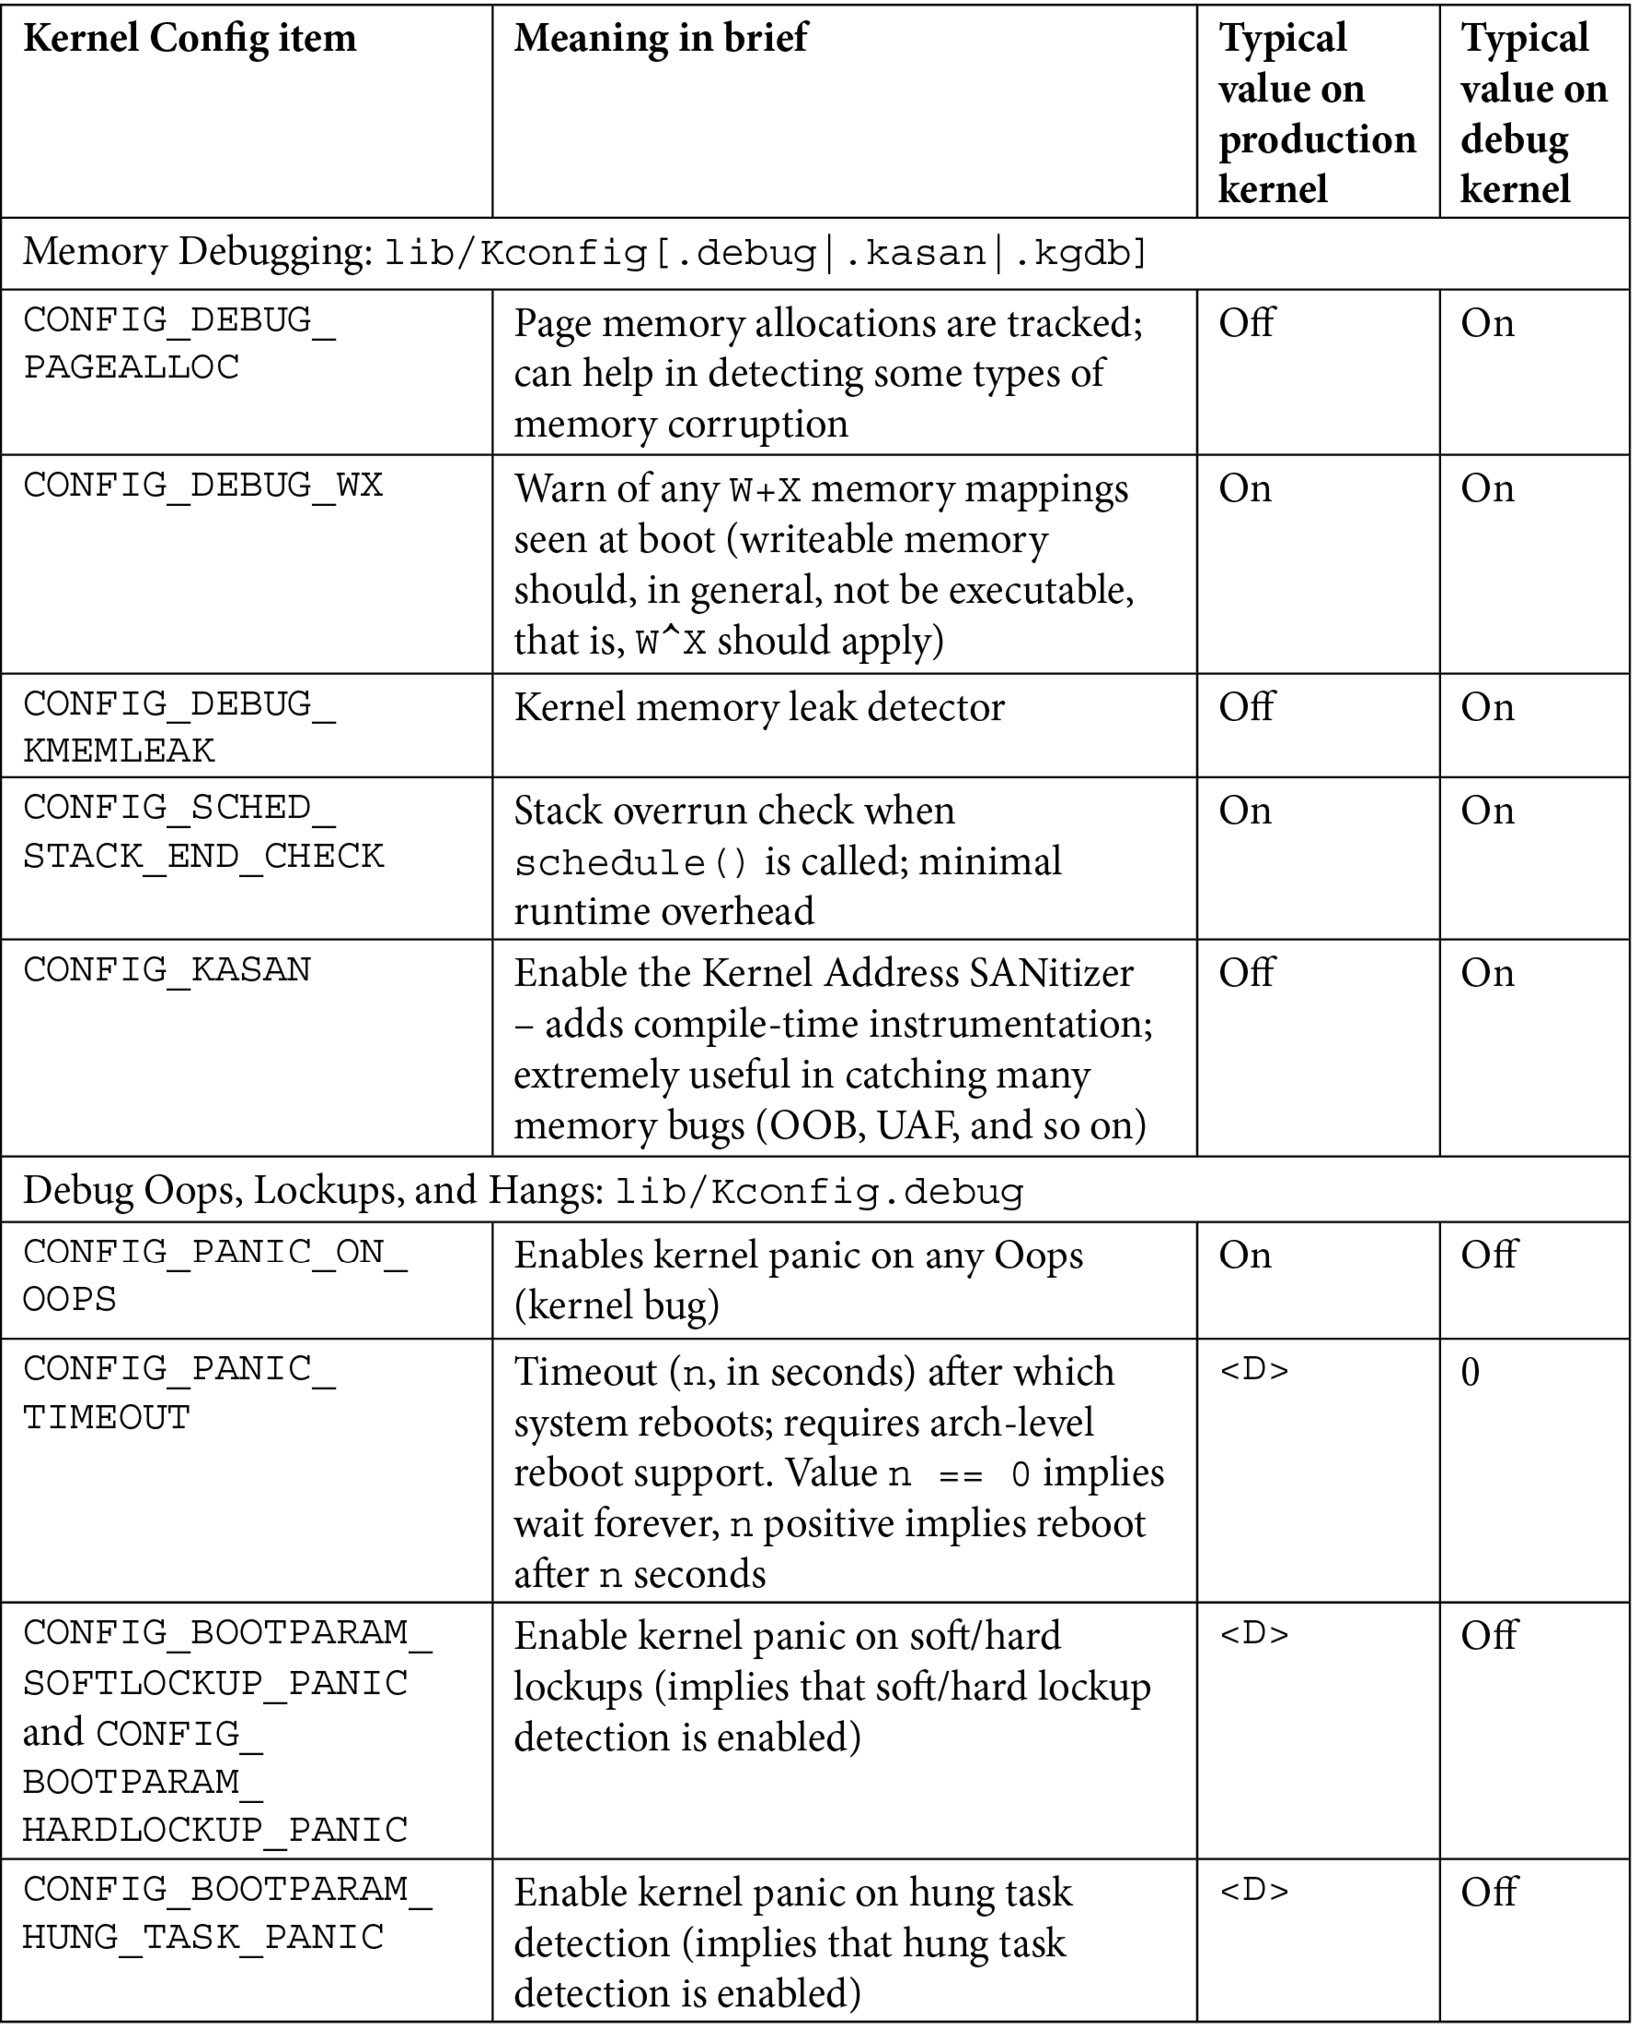
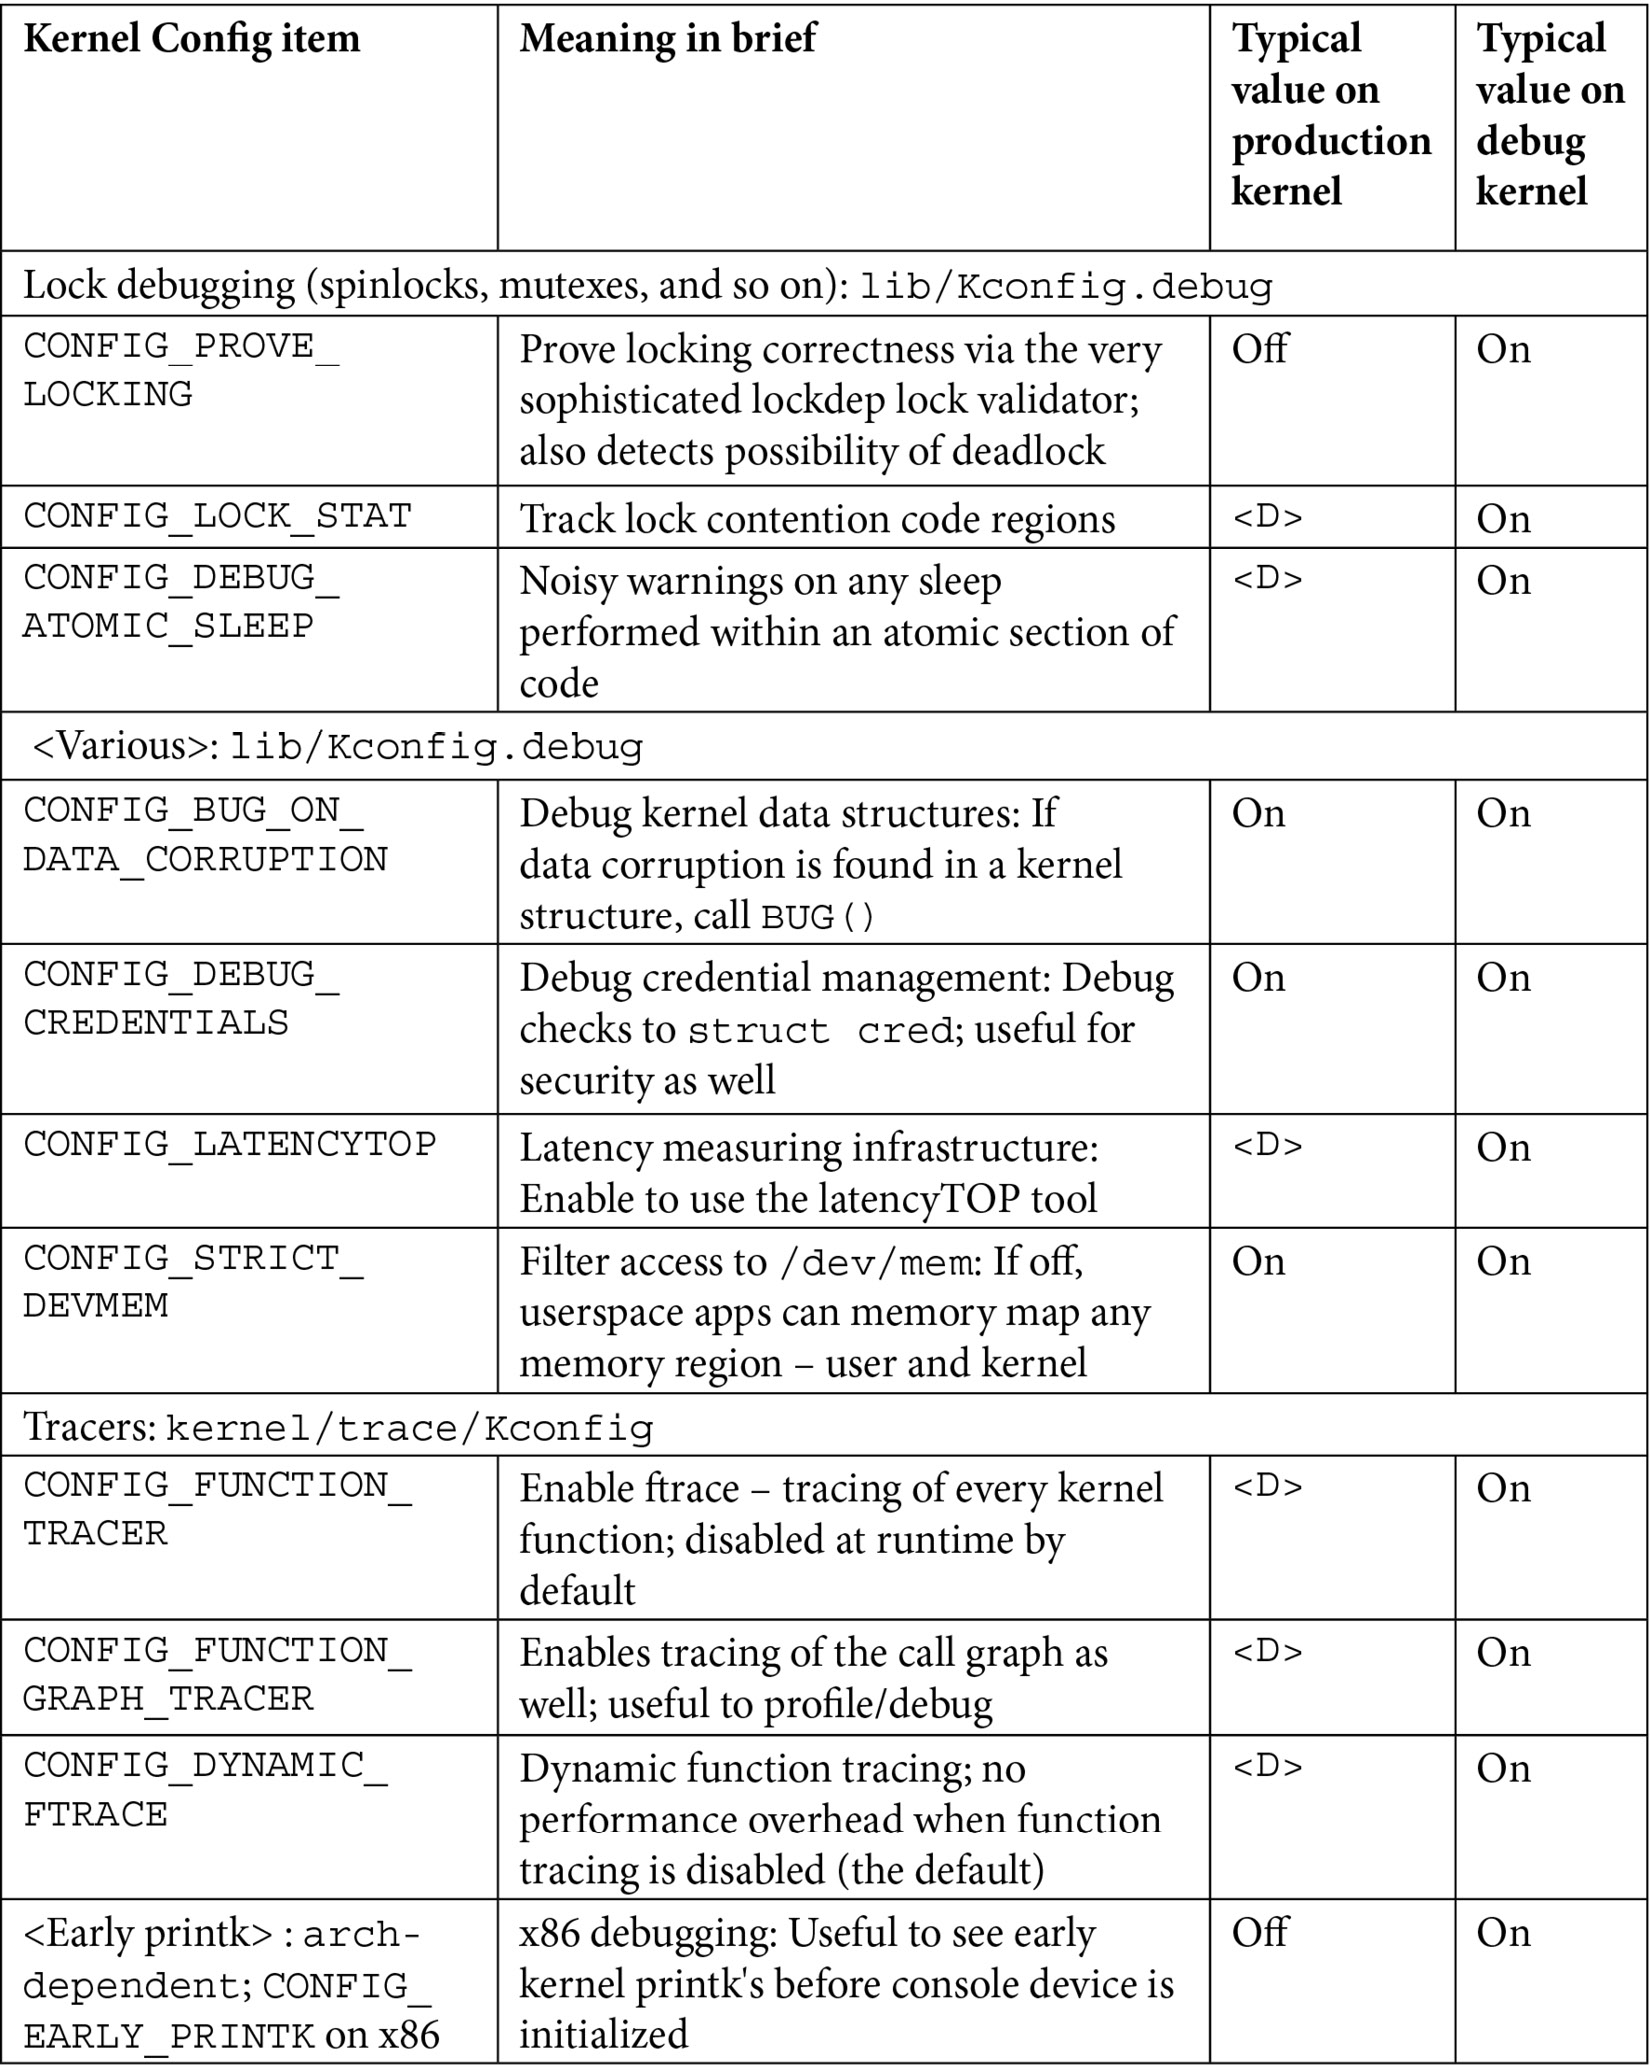
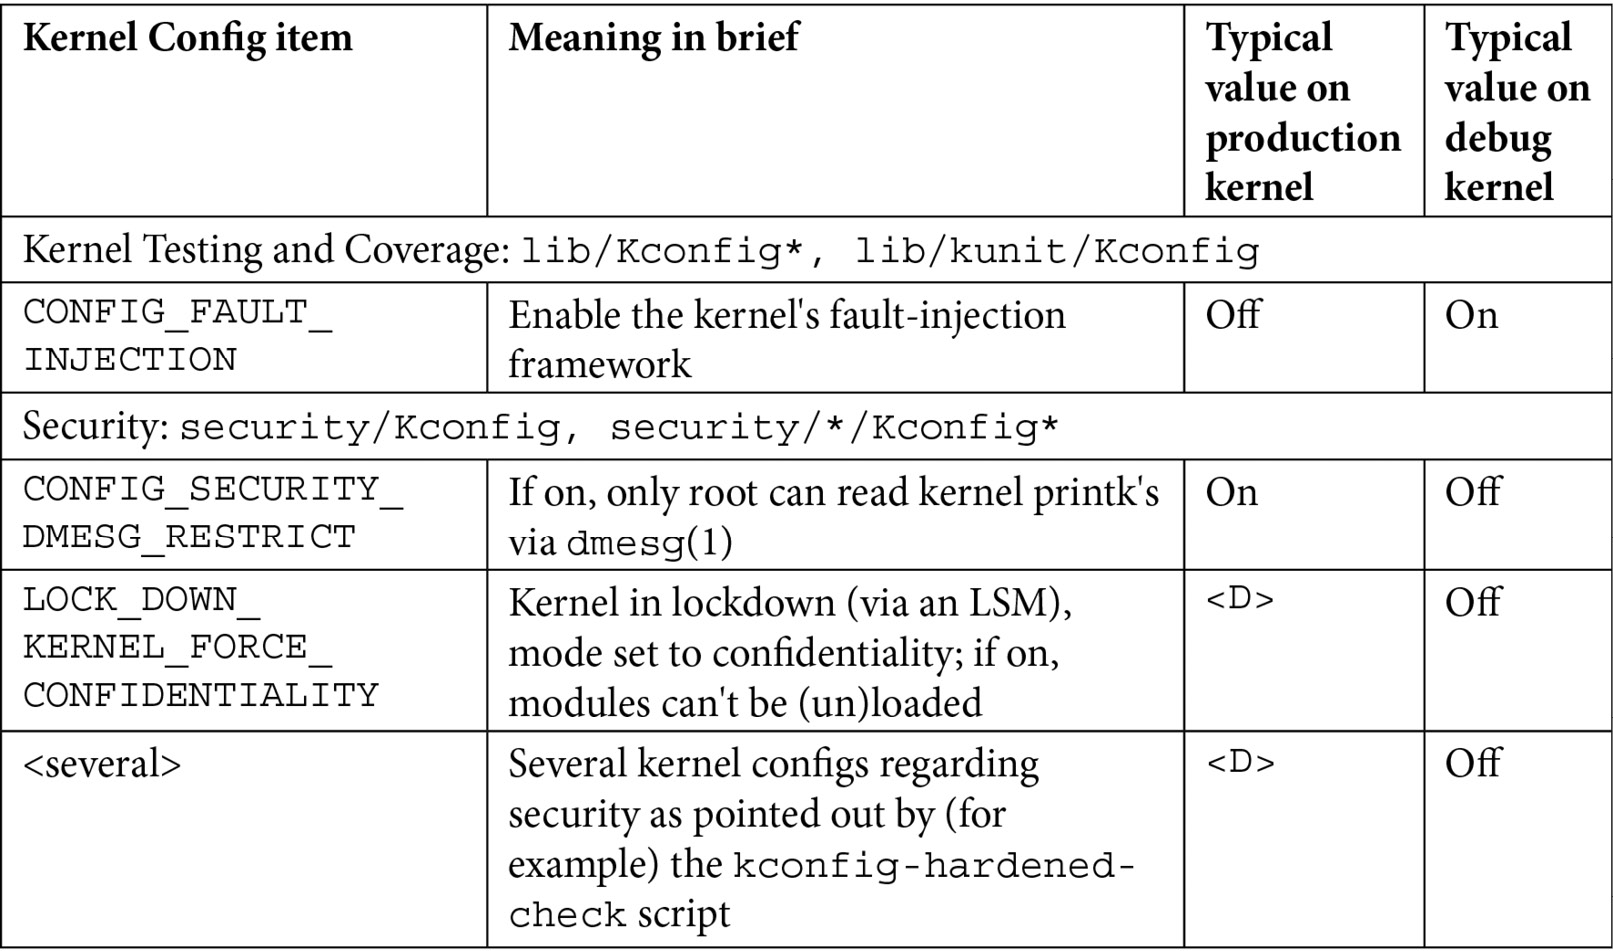
Table 1.1 – Summary of a few kernel config variables, their meaning, and value
Besides the <D> value, the other values shown in the preceding table are merely my recommendations: they may or may not be suitable for your particular use case.
[1] Installing pahole v1.16 or later: pahole is part of the dwarves package. However, on Ubuntu 20.04 (or older), it's version 1.15, which causes the kernel build – when enabled with CONFIG_DEBUG_INFO_BTF – to fail. This is because pahole version 1.16 or later is required. To address this on Ubuntu 20.04, we've provided the v1.17 Debian package in the root of the GitHub source tree. Install it manually as follows:
sudo dpkg –i dwarves_1.17-1_amd64.deb
Viewing the current kernel config
Being able to view (query) the currently running kernel's configuration can prove to be a very useful thing, especially on production systems. This can be done by looking up (grepping) /proc/config.gz (a simple zcat /proc/config.gz | grep CONFIG_<FOO> is typical). The pseudofile /proc/config.gz contains the entire kernel config (it's practically equivalent to the .config file within the kernel source tree). Now, this pseudofile is only generated by setting CONFIG_IKCONFIG=y. As a safety measure on production systems, we set this config to the value m in production, implying that it's available as a kernel module (called configs). Only once you load this module does the /proc/config.gz file become visible; and of course, to load it up you require root access...
Here's an example of loading the configs kernel module and then querying the kernel config (for this very feature!):
$ ls -l /proc/config.gz
ls: cannot access '/proc/config.gz': No such file or directory
OK, to begin with (in production), it doesn't show up. So do this:
$ sudo modprobe configs
$ ls -l /proc/config.gz
-r--r--r-- 1 root root 34720 Oct  5 19:35 /proc/config.gz
$ zcat /proc/config.gz |grep IKCONFIG
CONFIG_IKCONFIG=m
CONFIG_IKCONFIG_PROC=y
Ah, it now works just fine!
Food for Thought
Did you notice? In Table 1.1, I set the production kernel's value for CONFIG_KALLSYMS_ALL as <D>, implying it's up to the system architects to decide whether to keep it on or off. Why? Shouldn't the ability to view all kernel symbols be disabled (off) in a production system? Well, yes, that's the common decision. Recall, though, our brief on the Mars Pathfinder mission, where it initially failed due to a priority inversion issue. The tech lead of the software team at JPL, Glenn Reeves, made a very interesting statement in his now-famous response to Mike Jones (https://www.cs.unc.edu/~anderson/teach/comp790/papers/mars_pathfinder_long_version.html): The software that flies on Mars Pathfinder has several debug features within it that are used in the lab but are not used on the flight spacecraft (not used because some of them produce more information than we can send back to Earth). These features were not "fortuitously" left enabled but remain in the software by design. We strongly believe in the "test what you fly and fly what you test" philosophy.
Sometimes, keeping debug features (and of course, logging) turned on in the production version of the system, can be immensely helpful!
For now, don't stress too much about exactly what each of these kernel debug options means and how you're to use them; we shall cover most of these kernel debug options in the coming chapters. The entries in Table 1.1 are meant to kickstart the configuration of your production and debug kernels and give you a brief idea of their effect.
Once you're done generating the new debug kernel config, let's back it up as follows:
cp –af .config ~/lkd_kernels/kconfig_dbg01
Build it, as before: make -j8 all (adjust the parameter to –j based on the number of CPU cores on your box). When done, check out the compressed and uncompressed kernel image files:
$ ls -lh arch/x86/boot/bzImage vmlinux
-rw-r--r-- 1 letsdebug letsdebug  18M Aug 20 12:35 arch/x86/boot/bzImage
-rwxr-xr-x 1 letsdebug letsdebug 1.1G Aug 20 12:35 vmlinux
$
Did you notice? The size of the vmlinux uncompressed kernel binary image file is huge. How come? All the debug features plus all the kernel symbols account for this large size...
Finish off by installing the kernel modules, initramfs, and bootloader update, as earlier:
sudo make modules_install && sudo make install
Great; now that you're done configuring both the production and debug kernels, let's briefly examine the difference between the configurations.
Seeing the difference – production and debug kernel config
It's enlightening – and really, it's the key thing within this particular topic – to see the differences between our original production and the just-built debug kernel configuration. This is made easy via the convenience script scripts/diffconfig; from within the debug kernel source tree, simply do this to generate the difference:
scripts/diffconfig ~/lkd_kernels/kconfig_prod01 ~/lkd_kernels/kconfig_dbg01 > ../../kconfig_diff_prod_to_debug.txt
View the output file in an editor, seeing for yourself the changes we wrought in configuration. There are indeed many deltas – on my system, the diff file exceeds 200 lines. Here's a partial look at the same on my system (I use the ellipse [ … ] to denote skipping some output):
$ cat kconfig_diff_prod_to_debug.txt
-BPF_LSM y
-DEFAULT_SECURITY_APPARMOR y
-DEFAULT_SECURITY_SELINUX n
-DEFAULT_SECURITY_SMACK n
[ … ]
The - (minus sign) prefixing each of the preceding lines indicates that we removed this kernel config feature from the debug kernel. The output continues as follows:
DEBUG_ATOMIC_SLEEP n -> y
DEBUG_BOOT_PARAMS n -> y
DEBUG_INFO n -> y
DEBUG_KMEMLEAK n -> y
DEBUG_LOCK_ALLOC n -> y
DEBUG_MUTEXES n -> y
DEBUG_PLIST n -> y
DEBUG_RT_MUTEXES n -> y
DEBUG_RWSEMS n -> y
DEBUG_SPINLOCK n -> y
[ … ]
In the preceding code snippet, you can clearly see the change made from the production to the debug kernel; for example, the first line tells us that the kernel config named DEBUG_ATOMIC_SLEEP was disabled in the production kernel and we've not enabled it (n->y) in the debug kernel! (Note that it will be prefixed with CONFIG_, that is, it will show up as CONFIG_DEBUG_ATOMIC_SLEEP in the kernel config file itself.)
Here, we can see how the suffix to the name of the kernel – the config directive named CONFIG_LOCALVERSION – has been changed between the two kernels, besides other things:
LKDTM n -> m
LOCALVERSION "-prod01" -> "-dbg01"
LOCK_STAT n -> y
MMIOTRACE n -> y
MODULE_SIG y -> n
[ … ]
The + prefix to each line indicates the feature that has been added to the debug kernel:
+ARCH_HAS_EARLY_DEBUG y
+BITFIELD_KUNIT n
[ … ]
+IKCONFIG m
+KASAN_GENERIC y
[ … ]
In closing, it's important to realize these things:
- The particulars of the kernel configuration we're performing here – for both our production and debug kernels – is merely representative; your project or product requirements might dictate a different config.
- Many, if not most, modern embedded Linux projects typically employ a sophisticated builder tool or environment; Yocto and Buildroot are two common de facto examples. In such cases, you will have to adapt the instructions given here to cater to using these build environments (in the case of Yocto, this can become a good deal of work in specifying an alternate kernel configuration via a BB-append-style recipe).
By now, I am furtively hoping you've absorbed this material and, indeed, built yourself two custom kernels – a production and a debug one. If not, I request that you please do so before proceeding further.
So, great – well done! By now, you have both a custom 5.10 LTS production and debug kernel ready to rip. We'll certainly make use of them in the coming chapters. Let's finish this chapter with a few debug "tips" that I hope you'll find useful.