

Adding licenses and setting up dynamic updates
Before we can start adding licenses, the device needs to be registered. You will need to note down the device’s serial number or, if you do not have a support portal account, the sales order number to create a new account.
Open a new tab or browser and navigate to https://support.paloaltonetworks.com.
If you do not have an account yet, you will first need to create a new one so you gain access to the portal from where you will be able to manage all your devices, activate your licenses, download software packages and updates, and access support cases. If you already have a CSP (customer support portal) account, you can skip to Registering a new device.
Creating a new account
When creating a new account, you will be asked for an email address and whether you want to register using a serial number or an Authorization (auth) code, as in the following screenshot. The serial number is needed when registering a hardware appliance; the auth code is used when registering a VM device:
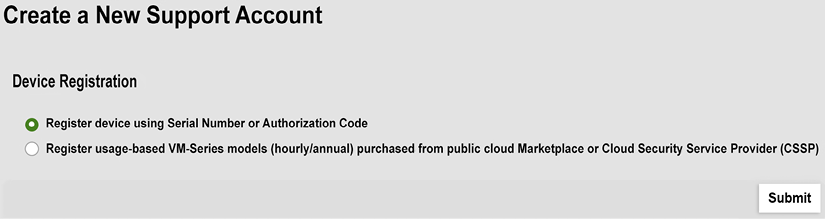
Figure 2.6: Serial or authorization code device registration
Alternatively, if you have set up a virtual appliance on one of the cloud providers, you can pick which provider your device is running on (such as Amazon Web Services, Azure, Google Cloud Platform, and so on).
You then need to provide some basic details, such as the address, the password, the device’s serial number, the auth code, and the sales order number or customer ID, if your company already has an account:
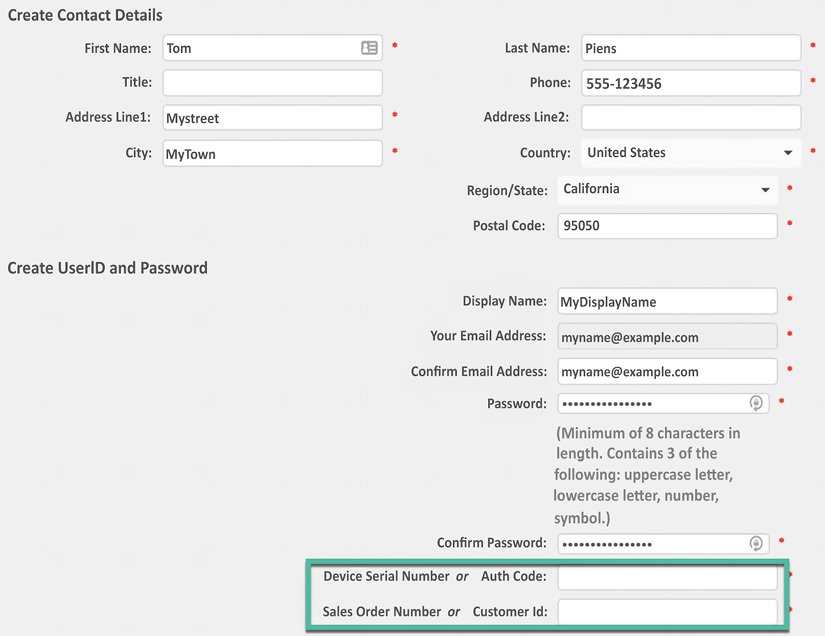
Figure 2.7: General information and device and sales order details
This account creation step will already register your first device; you can go ahead and register more devices in the following section.
Registering a new device
Ensure you are logged in to your account on the support portal and click on Register a Device from the home page:

Figure 2.8: Register a Device from the support portal home page
You will be presented with the option to register using a serial number or an auth code. The serial number is needed when registering a hardware appliance and the auth code is used when registering a VM device:

Figure 2.9: Serial or auth code device registration
Register device using Serial Number or Authorization Code will ask you for the serial number, a friendly device name, and a tag if you have several “pools” of devices in your account already. It will also request address details as to where the device will be deployed for RMA purposes.
If you deployed a cloud instance, you can choose to register usage-based VM series models. You’ll be asked for the serial number, CPUID, and UUID:
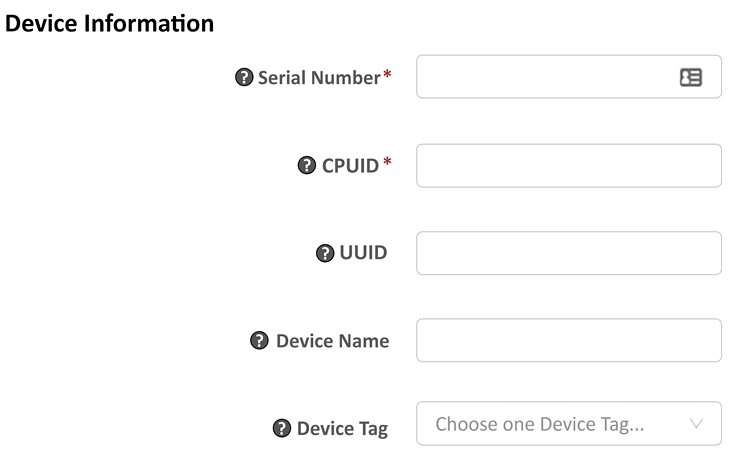
Figure 2.10: Adding a cloud instance to the assets
Now that the devices are registered, it is time to activate the feature and support licenses.
Activating licenses
Once the device is registered, you can add the licenses. You will have received one (a bundle) or several auth codes that you need to enter on the portal or via the Device | Licenses tab to activate the license and start using the feature on your device. There are multiple ways to activate licenses, which we’ll cover in the following sections, but let’s take a look at the different types of licenses first.
Some of the most common licenses include the following:
- Support: Platinum 4h (PLAT), Premium 24/7 (PREM), Standard 9/5 (STD), Partner-enabled 4h support (B4HR), or Regular Partner-enabled support (BND). Support licenses grant you access to a support organization, allow you to download software and app ID updates, and entitle you to replacement hardware if your firewall breaks.
- Threat Prevention (TP): Antivirus, anti-spyware, threat prevention, and daily updates.
- PAN-DB URL filtering (URL4) is the basic cloud-based URL category lookup license. This license will be phased out in favor of ADVURL.
- Advanced URL filtering (ADVURL) is the Machine Learning (ML)-enabled URL filtering license that adds an automated mechanism to analyze unknown URLs in real time.
- GlobalProtect (GP) enables mobile applications on Android, iOS, Win10 UWP, Chrome OS, and Linux. It enables Host Information Profile (HIP) checks and agentless VPNs. It also allows split tunneling based on host application or domain names.
- DNS security (DNS): Dynamic DNS signature lookups and blocking or “sinkholing” of malicious DNS requests.
- WildFire (WF): Live threat signature feed, real-time ML-enabled analysis, and cloud-based sandbox analysis.
- Decryption port mirroring: Allows decrypted sessions to be copied to a different device for additional IDS scanning via a dedicated “port mirror” interface.
- Internet of Things (IOT): Enables detection of IoT devices and generates rulebase adjustments to protect vulnerable IoT devices.
- Data Loss Prevention (DLP): ML-powered data loss prevention scanning.
More features are being added as Palo Alto Networks announces new products.
Activating licenses via the customer support portal
In the Customer Support Portal (CSP), you can find your registered devices under the Assets tab as a device. There’s a pencil icon that allows you to activate auth codes:

Figure 2.11: The Devices page in the CSP
You will notice there is already a software warranty support license active for a limited amount of time. This is a temporary support license that allows a Return Merchandise Authorization (RMA) to be started if your device arrives broken in the box. To add the actual support license and any feature licenses, click on the pencil icon in the Actions column you see in Figure 2.11. This will call the pop-over feature activation window:
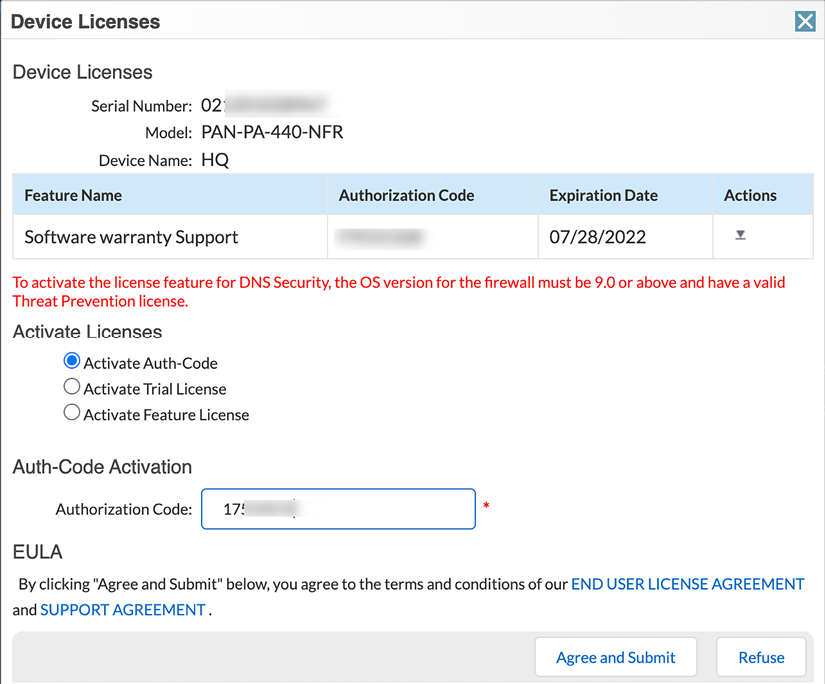
Figure 2.12: Adding auth codes to activate services
Once you’ve added all your licenses, the device should look something like this:
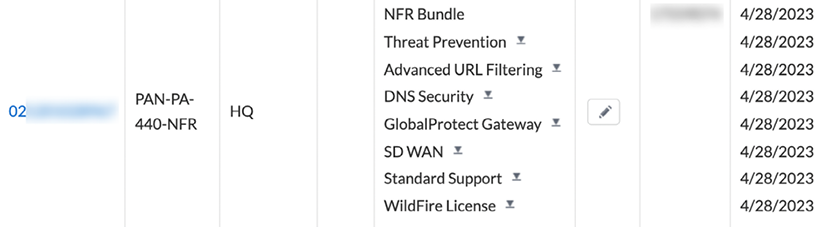
Figure 2.13: A fully licensed device
The little download icons next to each license allow you to download the license key file so that you can upload the key onto the firewall. This is required if you intend to run the firewall without an internet connection and want to be able to upload signature files and enforce security profiles.
Besides activating licenses via the support portal, they can also be activated directly from the firewall interface.
Activating licenses via the web interface
You can also activate licenses by navigating to Device | Licenses. This procedure requires that the management interface has an internet connection and is able to resolve internet domain names via DNS. If an internet connection is not available, see the previous section on how to download the license keys.
If you activated the licenses in the CSP and then proceeded to download the license key files, you can click on Manually upload license key.
If you activated the licenses on the CSP and want to fetch the licenses, click Retrieve license keys from license server. Make sure the firewall has been set up with a functional default gateway and DNS servers.
If you want to activate new licenses with an auth code, click on Activate feature using authorization code and you will see a popup where you can enter each auth code individually:

Figure 2.14: Activating a license using an auth code
With each added license, a section will be added containing the license information:
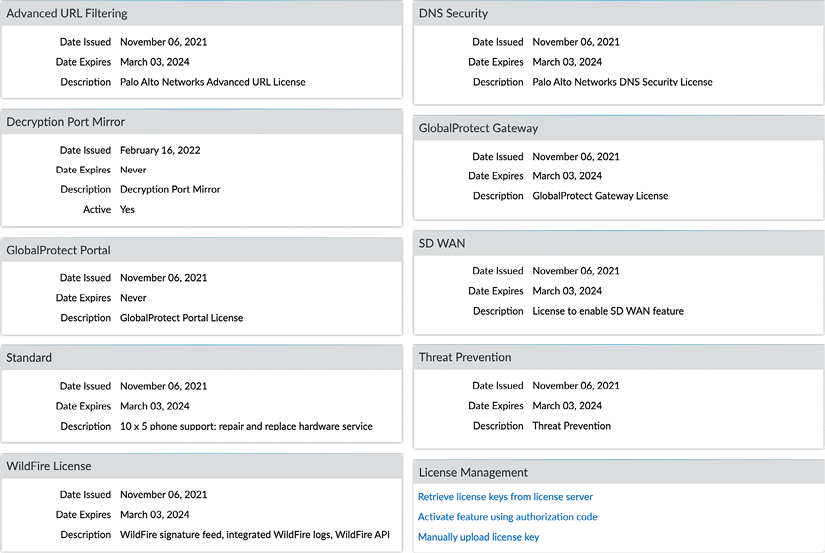
Figure 2.15: Active licenses on the device
To activate the support license, you may need to activate the auth key through the Support menu item:
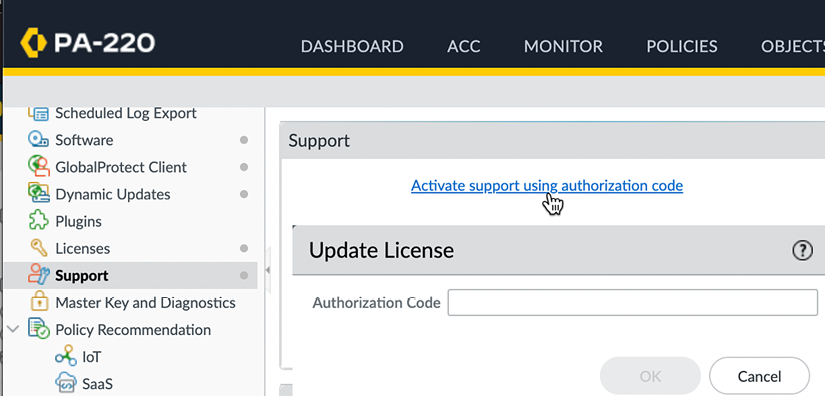
Figure 2.16: Activate support using an authorization code
Important note
The support license is more like a contract than a license required for a feature to work; a support person will take your call if something goes wrong, a replacement device will be sent if your unit is broken, and so on. This is the only license that does not need to be on the device necessarily before features start to function, i.e. all base functionality will work without the support license present.
After all licenses are activated on the device, the next step is to start downloading and scheduling updates to the different databases.
Downloading and scheduling dynamic updates
Now that all the licenses are active, you can set up dynamic updates and start downloading all the content packages.
Navigate to the Dynamic Updates menu under the Device tab, where you can manually download content packages and set up schedules and installation preferences. The first time you visit this menu, it may look a bit off as the available content has not been loaded onto the device yet. Click the Check Now button to connect to the updates server and fetch the available packages for your system, as shown:
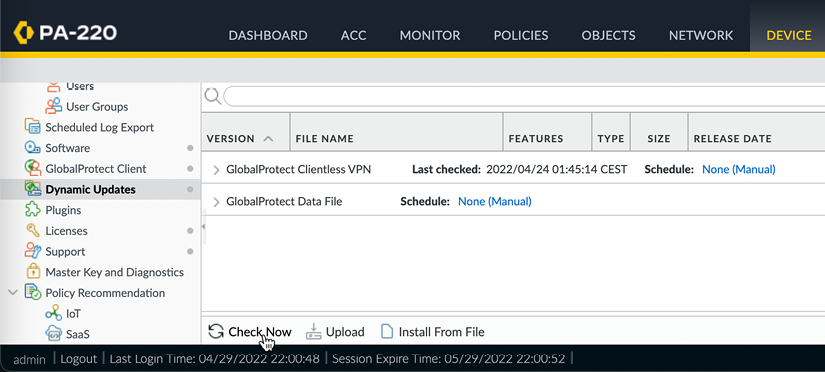
Figure 2.17: The initial Dynamic Updates view
Once the updates have been fetched, you may still notice that some antivirus packages are missing. This is because the device first needs to be brought up to date with all the app ID and content ID application and decoder updates before further packages can be loaded onto the system. Go ahead and download the latest Applications and Threats package:

Figure 2.18: Downloading the first Applications and Threats package
Important note
If no threat prevention license has been activated, there will only be an Applications package available for download.
Once the package has been downloaded, click Install. Once the installation has completed, click Check Now again, and the antivirus will become available. Go ahead and download and install the latest package of antivirus updates.
Important note
URL filtering and DNS security do not have update packages because URLs are looked up against the cloud service and then stored in the local cache.
You can now start building schedules by clicking on the blue None (Manual) option after Schedule:
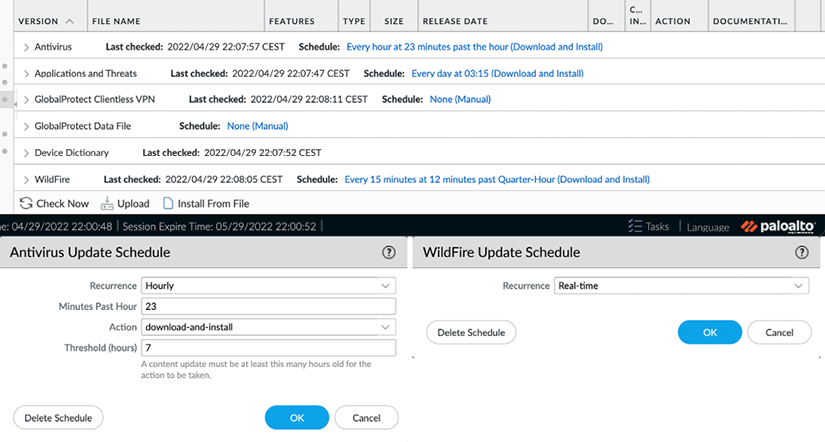
Figure 2.19: The antivirus and Wildfire schedules
The antivirus and WildFire schedules look very similar.
Recurrence tells the firewall how regularly it needs to check for updates. The update interval options for Antivirus are Weekly, Daily, Hourly, or Manual. The update interval options for WildFire are Real-time, Every minute, 15 minutes, 30 minutes, 1 hour, or Never. When Recurrence is set to any value higher than 1 minute, you can additionally set at which minute within the frame the actual check should take place. This helps prevent conflicting update connections to the update server in cases where the outgoing internet bandwidth is restricted. The action can be set to simply download or to download-and-install. If the action is set to download, manual installation is required.
Threshold is a feature that the antivirus update shares with Applications and Threats:
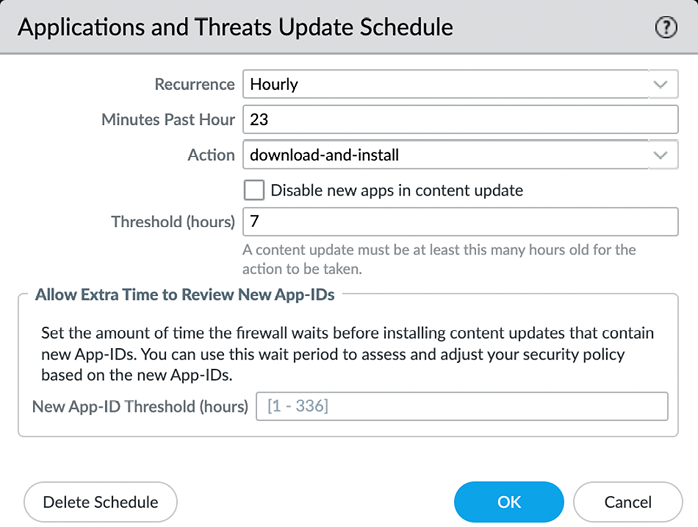
Figure 2.20: Antivirus and WildFire schedules
Threshold is a setting that delays the installation of a content package for a set amount of hours. At the time that this threshold expires, the firewall checks for a new update package. If a new package is found, the new package is downloaded and Threshold is reset for one more attempt. If yet another update package is found after the first reset, the schedule will reset until the next full occurrence. If no new packages are detected, the package will be installed as defined by Threshold.
The threshold delay is a mechanism to prevent installing faulty packages; if the vendor provides poorly crafted content, the delay is set in hours, which should allow other accounts to experience the flaws and report the content issue back to the support teams. So, the content is rolled back via the administrators or the vendor. This thresholding option correlates with a company’s tolerance for the risk of vendor errors and the balance of new and emerging threats to the organization.
PCNSE Tip:
According to Palo Alto Networks’ best practices, a security-first approach is to set the threshold between 6 to 12 hours; however, for a critical environment the threshold should be 24 hours.
The Application content package also has an option to completely disable all new app IDs or enable a separate threshold on the app IDs only. The reasoning here is that what is identified as web browsing today may change into a unique application after installing the Application content package tomorrow. If the security policy has been set up to only allow previously known applications, this could potentially cause issues with users who suddenly can’t access that specific application.
The Threshold setting allows you to schedule a review period to see whether any applications need to be accounted for in the security policy before they become active. If no action is needed, the applications will become active automatically. The Disable new apps in content update option will not activate any new applications until you manually review and activate all new applications.
Important note
At the time of writing, the release schedule for new applications is every third Thursday of each month. Regular threat package updates happen on Tuesdays, but urgent updates are sent out immediately.
The following section provides a quick set of recommendations for scheduling dynamic updates.
Dynamic updates cheat sheet
- Click on Check Now
- Download and install the latest
panupv2-all-contentsorpanupv2-all-appspackage:panupv2-all-contentincludes all app ID, spyware, and vulnerability updates. This package requires an active TP license to be installed successfully.panupv2-all-appsonly includes app ID updates and is used when a TP license is not active on the device.
- Click Check Now, which will make the antivirus packages visible
- Download and install the latest
panup-all-antiviruspackage - Set an Antivirus update schedule:
- Hourly recurrence
- 15 minutes after the hour
- Download and install
- 6 hour threshold
- If you have a WildFire subscription license, set a WildFire update schedule:
- Realtime (firewalls on high-latency internet links can be set to 1-minute or 15-minute update intervals)
- Set an Applications and Threats update schedule:
- Every 30 minutes.
- 7 minutes past the half-hour.
- Download and Install.
- 6 hour threshold.
- Allow extra time to review new App-IDs: Leave blank if new app IDs can be added immediately; set to 48 hour threshold (or more) if the security team wishes to review new applications before they are activated.
The settings in the previous section are considered best practices as they ensure dynamic updates are scheduled not to interfere with other scheduled tasks, like report generation. The threshold ensures an update is not applied until some time has passed by postponing the actual installation and then rechecking the available content package at the threshold time. If a new package is available due to an error or an urgent update, the new package is downloaded and the threshold timer refreshed. The process repeats once the threshold has been reached again and either the latest package is installed, or the update is postponed to the next scheduled occurrence. Not only do content packages need to be updated frequently, but new software versions are made available at regular times to address bugs, or introduce new features. Let’s now have a look at the steps needed to upgrade your firewall.