Book Image

Scala and Spark for Big Data Analytics

By : Md. Rezaul Karim, Sridhar Alla
Book Image

Scala and Spark for Big Data Analytics

By: Md. Rezaul Karim, Sridhar Alla

Overview of this book

Scala has been observing wide adoption over the past few years, especially in the field of data science and analytics. Spark, built on Scala, has gained a lot of recognition and is being used widely in productions. Thus, if you want to leverage the power of Scala and Spark to make sense of big data, this book is for you. The first part introduces you to Scala, helping you understand the object-oriented and functional programming concepts needed for Spark application development. It then moves on to Spark to cover the basic abstractions using RDD and DataFrame. This will help you develop scalable and fault-tolerant streaming applications by analyzing structured and unstructured data using SparkSQL, GraphX, and Spark structured streaming. Finally, the book moves on to some advanced topics, such as monitoring, configuration, debugging, testing, and deployment. You will also learn how to develop Spark applications using SparkR and PySpark APIs, interactive data analytics using Zeppelin, and in-memory data processing with Alluxio. By the end of this book, you will have a thorough understanding of Spark, and you will be able to perform full-stack data analytics with a feel that no amount of data is too big.
Table of Contents (19 chapters)

Installing and setting up Scala

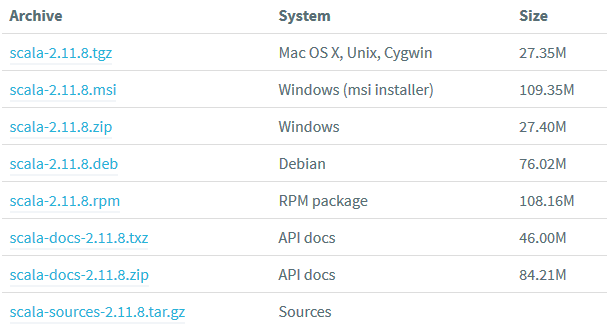
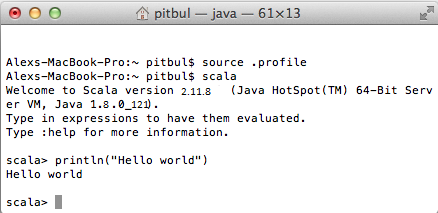
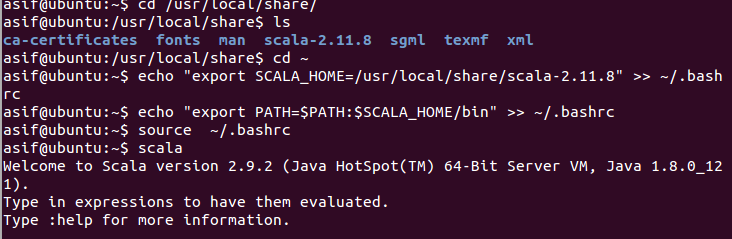
As we have already mentioned, Scala uses JVM, therefore make sure you have Java installed on your machine. If not, refer to the next subsection, which shows how to install Java on Ubuntu. In this section, at first, we will show you how to install Java 8 on Ubuntu. Then, we will see how to install Scala on Windows, Mac OS, and Linux.

Installing Java

For simplicity, we will show how to install Java 8 on an Ubuntu 14.04 LTS 64-bit machine. But for Windows and Mac OS, it would be better to invest some time on Google to know how. For a minimum clue for the Windows users: refer to this link for details https://java.com/en/download/help/windows_manual_download.xml.

Now, let's see how to install Java 8 on Ubuntu with step-by-step commands and instructions. At first, check whether Java is already installed:

$ java -version

If it returns The program java cannot be found in the following packages, Java hasn't been installed yet. Then you would like to execute the following command to get rid of:

 $ sudo apt-get install default-jre 

This will install the Java Runtime Environment (JRE). However, if you may instead need the Java Development Kit (JDK), which is usually needed to compile Java applications on Apache Ant, Apache Maven, Eclipse, and IntelliJ IDEA.

The Oracle JDK is the official JDK, however, it is no longer provided by Oracle as a default installation for Ubuntu. You can still install it using apt-get. To install any version, first execute the following commands:

$ sudo apt-get install python-software-properties
$ sudo apt-get update
$ sudo add-apt-repository ppa:webupd8team/java
$ sudo apt-get update

Then, depending on the version you want to install, execute one of the following commands:

$ sudo apt-get install oracle-java8-installer

After installing, don't forget to set the Java home environmental variable. Just apply the following commands (for the simplicity, we assume that Java is installed at /usr/lib/jvm/java-8-oracle):

$ echo "export JAVA_HOME=/usr/lib/jvm/java-8-oracle" >> ~/.bashrc  
$ echo "export PATH=$PATH:$JAVA_HOME/bin" >> ~/.bashrc
$ source ~/.bashrc

Now, let's see the Java_HOME as follows:

$ echo $JAVA_HOME

You should observe the following result on Terminal:

 /usr/lib/jvm/java-8-oracle

Now, let's check to make sure that Java has been installed successfully by issuing the following command (you might see the latest version!):

$ java -version

You will get the following output:

java version "1.8.0_121"
Java(TM) SE Runtime Environment (build 1.8.0_121-b13)
Java HotSpot(TM) 64-Bit Server VM (build 25.121-b13, mixed mode)

Excellent! Now you have Java installed on your machine, thus you're ready Scala codes once it is installed. Let's do this in the next few subsections.

Windows

This part will focus on installing Scala on the PC with Windows 7, but in the end, it won't matter which version of Windows you to run at the moment:

  1. The first step is to download a zipped file of Scala from the official site. You will find it at https://www.Scala-lang.org/download/all.html. Under the other resources section of this page, you will find a list of the archive files from which you can install Scala. We will choose to download the zipped file for Scala 2.11.8, as shown in the following figure:
Figure 2: Scala installer for Windows
  1. After the downloading has finished, unzip the file and place it in your favorite folder. You can also rename the file Scala for navigation flexibility. Finally, a PATH variable needs to be created for Scala to be globally seen on your OS. For this, navigate to Computer | Properties, as shown in the following figure:
Figure 3: Environmental variable tab on windows
  1. Select Environment Variables from there and get the location of the bin folder of Scala; then, append it to the PATH environment variable. Apply the changes and then press OK, as shown in the following screenshot:
Figure 4: Adding environmental variables for Scala
  1. Now, you are ready to go for the Windows installation. Open the CMD and just type scala. If you were successful in the installation process, then you should see an output similar to the following screenshot:
Figure 5: Accessing Scala from "Scala shell"

Mac OS

It's time now to install Scala on your Mac. There are lots of ways in which you can install Scala on your Mac, and here, we are going to mention two of them:

Using Homebrew installer

  1. At first, check your system to see whether it has Xcode installed or not because it's required in this step. You can install it from the Apple App Store free of charge.
  2. Next, you need to install Homebrew from the terminal by running the following command in your terminal:
$ /usr/bin/ruby -e "$(curl -fsSL https://raw.githubusercontent.com/Homebrew/install/master/install)"

Note: The preceding command is changed by the Homebrew guys from time to time. If the command doesn't seem to be working, check the Homebrew website for the latest incantation: http://brew.sh/.

  1. Now, you are ready to go and install Scala by typing this command brew install scala in the terminal.
  2. Finally, you are ready to go by simply typing Scala in your terminal (the second line) and you will observe the following on your terminal:
Figure 6: Scala shell on macOS

Installing manually

Before installing Scala manually, choose your preferred version of Scala and download the corresponding .tgz file of that version Scala-verion.tgz from http://www.Scala-lang.org/download/. After downloading your preferred version of Scala, extract it as follows:

$ tar xvf scala-2.11.8.tgz

Then, move it to /usr/local/share as follows:

$ sudo mv scala-2.11.8 /usr/local/share

Now, to make the installation permanent, execute the following commands:

$ echo "export SCALA_HOME=/usr/local/share/scala-2.11.8" >> ~/.bash_profile
$ echo "export PATH=$PATH: $SCALA_HOME/bin" >> ~/.bash_profile

That's it. Now, let's see how it can be done on Linux distributions like Ubuntu in the next subsection.

Linux

In this subsection, we will show you the installation procedure of Scala on the Ubuntu distribution of Linux. Before starting, let's check to make sure Scala is installed properly. Checking this is straightforward using the following command:

$ scala -version

If Scala is already installed on your system, you should get the following message on your terminal:

Scala code runner version 2.11.8 -- Copyright 2002-2016, LAMP/EPFL

Note that, during the writing of this installation, we used the latest version of Scala, that is, 2.11.8. If you do not have Scala installed on your system, make sure you install it before proceeding to the next step. You can download the latest version of Scala from the Scala website at http://www.scala-lang.org/download/ (for a clearer view, refer to Figure 2). For ease, let's download Scala 2.11.8, as follows:

$ cd Downloads/
$ wget https://downloads.lightbend.com/scala/2.11.8/scala-2.11.8.tgz

After the download has been finished, you should find the Scala tar file in the download folder.

The user should first go into the Download directory with the following command: $ cd /Downloads/. Note that the name of the downloads folder may change depending on the system's selected language.

To extract the Scala tar file from its location or more, type the following command. Using this, the Scala tar file can be extracted from the Terminal:

$ tar -xvzf scala-2.11.8.tgz

Now, move the Scala distribution to the user's perspective (for example, /usr/local/scala/share) by typing the following command or doing it manually:

 $ sudo mv scala-2.11.8 /usr/local/share/

Move to your home directory issue using the following command:

$ cd ~

Then, set the Scala home using the following commands:

$ echo "export SCALA_HOME=/usr/local/share/scala-2.11.8" >> ~/.bashrc       
$ echo "export PATH=$PATH:$SCALA_HOME/bin" >> ~/.bashrc

Then, make the change permanent for the session by using the following command:

$ source ~/.bashrc

After the installation has been completed, you should better to verify it using the following command:

$ scala -version

If Scala has successfully been configured on your system, you should get the following message on your terminal:

Scala code runner version 2.11.8 -- Copyright 2002-2016, LAMP/EPFL

Well done! Now, let's enter into the Scala shell by typing the scala command on the terminal, as shown in the following figure:

Figure 7: Scala shell on Linux (Ubuntu distribution)

Finally, you can also install Scala using the apt-get command, as follows:

$ sudo apt-get install scala

This command will download the latest version of Scala (that is, 2.12.x). However, Spark does not have support for Scala 2.12 yet (at least when we wrote this chapter). Therefore, we would recommend the manual installation described earlier.