
Now that the model has been loaded, we are ready to draw it. We do this in the Draw() function of our game. Games redraw dozens of times per second, and each redraw is called a
frame. We need to clear the screen before drawing a new frame, and we do so using XNA's GraphicsDevice.Clear() function. The single argument allows us to change the color to which the screen is cleared:
GraphicsDevice.Clear(Color.CornflowerBlue);
The first step of drawing the model itself is to calculate the view and projection matrices. To calculate the view matrix, we will use the CreateLookAt() static function of the Matrix class, which accepts as arguments a camera position, target, and up direction. The position is simply where in 3D space the camera should be placed, the
target is the point the camera should be looking at, and the up vector is literally the direction that is "up" relative to the camera position. This code will go in the Draw() function after the GraphicsDevice is cleared:
Matrix view = Matrix.CreateLookAt(new Vector3(200, 300, 900),new Vector3(0, 50, 0),Vector3.Up);
There are some exceptions, but usually we calculate the projection matrix using the Matrix class' CreatePerspectiveFieldOfView() function, which accepts, in order, a field of view (in radians), the aspect ratio, and the near and far plane distances. These values define the shape of the view frustum as seen in the following figure. It is used to decide which objects and vertices are onscreen and which are not when drawing, and how to squish the scene down to fit onto the two-dimensional screen.
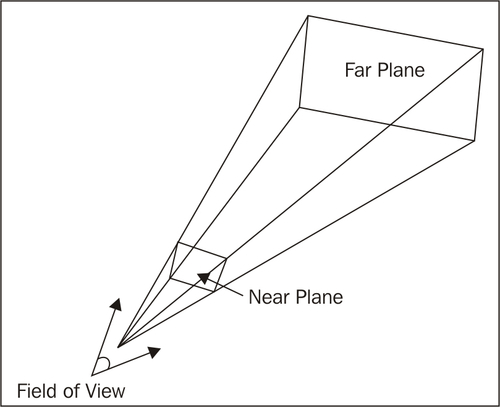
The near plane and far plane determine the distances at which objects will start and stop being drawn. Outside of the range between the two planes, objects will be
clipped—meaning they will not be drawn. The field of view determines how "wide" the area seen by the camera is. Most first person shooters use an angle between 45 and 60 degrees for their field of view as anything beyond that range would start to distort the scene. A fish eye lens, on the other hand, would have a field of view closer to 180 degrees. This allows it to see more of the scene without moving, but it also distorts the scene at the edges. 45 degrees is a good starting point as it matches human vision closest without warping the image. The final value, the aspect ratio , is calculated by dividing the width of the screen by the height of the screen, and is used by the CreatePerspectiveFieldOfView() function to determine the "shape" of the screen in regards to its width and height. The
GraphicsDevice has a precalculated aspect ratio value available that we can use when calculating the projection matrix:
Matrix projection = Matrix.CreatePerspectiveFieldOfView(MathHelper.ToRadians(45), GraphicsDevice.Viewport.AspectRatio,0.1f, 10000.0f);
The last matrix needed to draw the model is the world matrix. However, as discussed earlier, each mesh in the model has its own transformation relative to the model's overall transformation. This means that we will need to calculate a world matrix for each mesh. We'll start with the overall transformation and add the transformations from the modelTransformations array per mesh. Each mesh also has what is called an
effect. We will look at effects in much more depth in the coming chapters, but for now, just remember that they are used to determine the appearance of a model. We will be using one of XNA's built-in effects (called
BasicEffect) for now, so all we need to do is set its World, View, and Projection properties:
// Calculate the starting world matrix
Matrix baseWorld = Matrix.CreateScale(0.4f) * Matrix.CreateRotationY(MathHelper.ToRadians(180));

foreach (ModelMesh mesh in model.Meshes)
{
   // Calculate each mesh's world matrix
   Matrix localWorld = modelTransforms[mesh.ParentBone.Index]
        * baseWorld;

   foreach (ModelMeshPart part in mesh.MeshParts)
   {
      BasicEffect e = (BasicEffect)part.Effect;

      // Set the world, view, and projection matrices to the effect
      e.World = localWorld;
      e.View = view;
      e.Projection = projection;

      e.EnableDefaultLighting();
   }

   // Draw the mesh
   mesh.Draw();
}
XNA will already have added the last piece of code for you as well, but it is important to ensure that this code is still in place at the end of the Draw() function. This line of code simply calls the Draw() function of the base Game class, ensuring that the game runs correctly.
base.Draw(gameTime);
The complete code for the Game1 class is now as follows:
public class Game1 : Microsoft.Xna.Framework.Game
{
GraphicsDeviceManager graphics;
SpriteBatch spriteBatch;
Model model;
Matrix[] modelTransforms;
public Game1()
{
graphics = new GraphicsDeviceManager(this);
Content.RootDirectory = "Content";
graphics.PreferredBackBufferWidth = 1280;
graphics.PreferredBackBufferHeight = 800;
}
// Called when the game should load its content
protected override void LoadContent()
{
spriteBatch = new SpriteBatch(GraphicsDevice);
model = Content.Load<Model>("ship");
modelTransforms = new Matrix[model.Bones.Count];
model.CopyAbsoluteBoneTransformsTo(modelTransforms);
}
// Called when the game should update itself
protected override void Update(GameTime gameTime)
{
base.Update(gameTime);
}
// Called when the game should draw itself
protected override void Draw(GameTime gameTime)
{
GraphicsDevice.Clear(Color.CornflowerBlue);
Matrix view = Matrix.CreateLookAt(new Vector3(200, 300, 900),new Vector3(0, 50, 0),Vector3.Up);
Matrix projection = Matrix.CreatePerspectiveFieldOfView(MathHelper.ToRadians(45), GraphicsDevice.Viewport.AspectRatio,0.1f, 10000.0f);
// Calculate the starting world matrix
Matrix baseWorld = Matrix.CreateScale(0.4f) * Matrix.CreateRotationY(MathHelper.ToRadians(180));
foreach (ModelMesh mesh in model.Meshes)
{
// Calculate each mesh's world matrix
Matrix localWorld = modelTransforms[mesh.ParentBone.Index]* baseWorld;
foreach (ModelMeshPart part in mesh.MeshParts)
{
BasicEffect e = (BasicEffect)part.Effect;
// Set the world, view, and projection
// matrices to the effect
e.World = localWorld;
e.View = view;
e.Projection = projection;
e.EnableDefaultLighting();
}
// Draw the mesh
mesh.Draw();
}
base.Draw(gameTime);
}
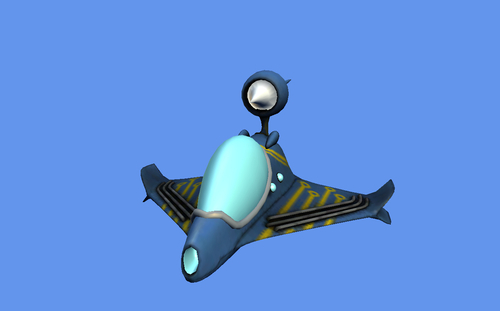
}Run the game (Debug | Start Debugging, or F5) and you should see our spaceship in all its glory: