

In this section, we will create a new script to control the movement of our character and a sprite animation for each action of our character. We will use MonoDevelop as our scripting editor, which comes with Unity. MonoDevelop is mainly designed for the C# and .NET environments, so if you are comfortable with C#, you will probably love it. However, if you use Unity JavaScript, it also has many tools to help us write the script faster and debug better, such as finding as well as replacing words in the whole project by pressing command + Shift + F in Mac or Ctrl + Shift + F in Windows and autocomplete (or Intellisense), to name a few. Moving from Unity JavaScript to C# or C# to Unity JavaScript is also a comparatively smooth transition.
Note
In this version of this book, we will show examples for both Unity JavaScript and C#. You can check out the major difference between Unity JavaScript and C# in the Appendix C, Major differences Between C# and Unity JavaScript.
Now, we are just about to start coding, but first let's make sure that we have everything ready:
Next, we want to make sure that Unity uses MonoDevelop as our main Scripting editor (Unity | Preferences in Mac or Edit | Preferences in Windows).
We will see a Unity Preferences window. In the External Tools tab, go to the External Script Editor and make sure that the MonoDevelop option is selected. Click on Browse…, go to Applications | Unity | MonoDevelop.app in Mac or {unity install path} | Unity | MonoDevelop | MonoDevelop.exe in Windows, and we are done:
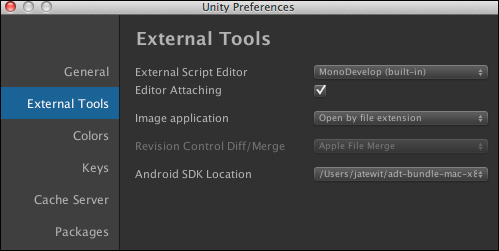
If we develop a game for Android, we can also set the Android SDK Location path here as shown in the previous screenshot.
Now, we are ready to create the PlayerController_2D script. Let's get started:
First, go to Assets | Create | Javascript (for Unity JavaScript developers) or Assets | Create | C# Script (for C# developers) and name our script as
PlayerController_2D.Double-click on the script; it will open the MonoDevelop window.
Now, we will see three windows in the MonoDevelop screen:
On the top-left is Solution; we can see our project folder here, but it will only show the folder that contains a script
On the bottom-left, we will see a Document Outline; this window will show all the functions, classes, and parameters in the file
The last window on the right will be used to type our code
Let's get our hands dirty with some code—first start with defining the following functions to initialize the variables: the
Awake()andStart()function.Tip
Awake ()Awake()is called when the script instance is being loaded. It used to initialize any variable or game state before calling theStart()function. In theAwake()function, we usually put anyGetComponent()orFind()object function, which will make it easier to set up all the parameters duringStart().We need to remove the autogenerated code and replace it with the following code:
// Unity JavaScript user:

#pragma strict
@script RequireComponent(AudioSource)
@script RequireComponent(BoxCollider2D)
@script RequireComponent(Rigidbody2D)
// Distance from the character position to the ground
private final var RAYCAST_DISTANCE : float = 0.58f;
// This number should be between 0.35 to 0.49
private final var CHARACTER_EDGE_OFFSET : float = 0.40f;
var doorOpenSound : AudioClip;
var getKeySound : AudioClip;
var jumpSound : AudioClip;
var moveForce : float = 80f;
var jumpForce : float = 350f;
var maxSpeed : float = 3f;
var layerMask : LayerMask;
private var _animator : Animator;
private var _boxCollider2D : BoxCollider2D;
private var _isFacingRight : boolean = true;
private var _isJump : boolean = false;
private var _isFall : boolean = false;
private var _isGrounded : boolean = false;
private var _gameEnd : boolean = false;
private var _height : float;
private var _lastY : float;
private var _horizontalInput : float;
function Awake() {
  _animator = GetComponent.<Animator>();
  _boxCollider2D = GetComponent.<BoxCollider2D>();
  _height = _boxCollider2D.size.y;
}
function Start () {
  _isFacingRight = true;
  _isJump = false;
  _isFall = false;
  _isGrounded = false;
  _gameEnd = false;
  _lastY = transform.position.y;
  Camera.main.transform.position = new Vector3(transform.position.x, transform.position.y, Camera.main.transform.position.z);
}
Note
#pragma strictIn Unity JavaScript, we can use
#pragma strictto tell Unity to disable dynamic typing (var name = 5) and force us to use static typing (var name : int = 5). This will make it easy for us to debug. For example, if we forgot to use static typing, you will see an error message from the Unity console window. Using strict typing also makes the code run faster as the complier doesn't have to go and do the type lookups.// C# user: using UnityEngine; using System.Collections; [RequireComponent(typeof(AudioSource))] [RequireComponent(typeof(BoxCollider2D))] [RequireComponent(typeof(Rigidbody2D))] public class PlayerController_2D : MonoBehaviour { // Distance from the character position to the ground const float RAYCAST_DISTANCE = 0.58f; // This number should be between 0.35 to 0.49 const float CHARACTER_EDGE_OFFSET = 0.40f; public AudioClip doorOpenSound; public AudioClip getKeySound; public AudioClip jumpSound; public float moveForce = 80f; public float jumpForce = 350f; public float maxSpeed = 3f; public LayerMask layerMask; Animator _animator; BoxCollider2D _boxCollider2D; bool _isFacingRight = true; bool _isJump = false; bool _isFall = false; bool _isGrounded = false; bool _gameEnd = false; float _height; float _lastY; float _horizontalInput; void Awake() { _animator = GetComponent<Animator>(); _boxCollider2D = GetComponent<BoxCollider2D>(); _height = _boxCollider2D.size.y; } void Start () { _isFacingRight = true; _isJump = false; _isFall = false; _isGrounded = false; _gameEnd = false; _lastY = transform.position.y; Camera.main.transform.position = new Vector3(transform.position.x, transform.position.y, Camera.main.transform.position.z); } }Tip
Downloading the example code
You can download the example code files for all Packt books you have purchased from your account at http://www.packtpub.com. If you purchased this book elsewhere, you can visit http://www.packtpub.com/support and register to have the files e-mailed directly to you.
Note
@script RequireComponent(Component)and[RequireComponent(typeof(Component))]We add
RequireComponentto force the script to automatically add the required component as a dependency when adding this class to the game object. For more details, visit http://docs.unity3d.com/Documentation/ScriptReference/RequireComponent.html.Next, we will add the
Flip()function after theStart()function to make our character sprite show the correct graphics when moving left or right. The code for Unity JavaScript and C# users are as follows:// Unity JavaScript user: private function Flip () { _isFacingRight = !_isFacingRight; var scale : Vector3 = transform.localScale; scale.x *= -1; transform.localScale = scale; } // C# user: (Put the code inside the class) void Flip () { _isFacingRight = !_isFacingRight; Vector3 scale = transform.localScale; scale.x *= -1; transform.localScale = scale; }
Next, we will add another function, which will use
Physics2D.Raycastto check whether the player is on the ground or not. Let's create theGrounded()function as follows:// Unity JavaScript user: private function Grounded () { var distance : float = _height*RAYCAST_DISTANCE; var hitDirectionV3 : Vector3 = transform.TransformDirection(-Vector3.up); var hitDirection : Vector2 = new Vector2(hitDirectionV3.x,hitDirectionV3.y); var rightOrigin : Vector2 = new Vector2(transform.position.x + (_boxCollider2D.size.x*CHARACTER_EDGE_OFFSET), transform.position.y); var leftOrigin : Vector2 = new Vector2(transform.position.x - (_boxCollider2D.size.x*CHARACTER_EDGE_OFFSET), transform.position.y); var origin : Vector2 = new Vector2(transform.position.x, transform.position.y); if (Physics2D.Raycast (origin, hitDirection, distance, layerMask.value)) { _isGrounded = true; } else if (Physics2D.Raycast (rightOrigin, hitDirection, distance, layerMask.value)) { _isGrounded = true; } else if (Physics2D.Raycast (leftOrigin, hitDirection, distance, layerMask.value)) { _isGrounded = true; } else { if (_isGrounded) { if (Mathf.Floor(transform.position.y) == _lastY) { _isGrounded = true; } else { _isGrounded = false; } } } _lastY = Mathf.Floor(transform.position.y); } // C# user: (Put the code inside the class) void Grounded () { float distance = _height*RAYCAST_DISTANCE; Vector3 hitDirectionV3 = transform.TransformDirection (-Vector3.up); Vector2 hitDirection = new Vector2(hitDirectionV3.x,hitDirectionV3.y); Vector2 rightOrigin = new Vector2(transform.position.x + (_boxCollider2D.size.x*CHARACTER_EDGE_OFFSET), transform.position.y); Vector2 leftOrigin = new Vector2(transform.position.x - (_boxCollider2D.size.x*CHARACTER_EDGE_OFFSET), transform.position.y); Vector2 origin = new Vector2(transform.position.x, transform.position.y); if (Physics2D.Raycast (origin, hitDirection, distance, layerMask.value)) { _isGrounded = true; } else if (Physics2D.Raycast (rightOrigin, hitDirection, distance, layerMask.value)) { _isGrounded = true; } else if (Physics2D.Raycast (leftOrigin, hitDirection, distance, layerMask.value)) { _isGrounded = true; } else { if (_isGrounded) { if (Mathf.Floor(transform.position.y) == _lastY) { _isGrounded = true; } else { _isGrounded = false; } } } _lastY = Mathf.Floor(transform.position.y); }
Next, we will include the script in the
Update()function andLateUpdate()function that get called after theUpdate()function. These functions will be used to check the input from the user and update the camera to follow our character movement. The code for these functions are as follows:// Unity JavaScript user: function Update() { if (!_gameEnd) { _horizontalInput = Input.GetAxis("Horizontal"); if ((!_isFacingRight && (_horizontalInput > 0)) || (_isFacingRight && (_horizontalInput < 0))) { Flip(); } Grounded(); if(Input.GetButtonDown("Jump") && _isGrounded) { _isJump = true; } } } function LateUpdate() { if (!_gameEnd) { Camera.main.transform.position = new Vector3(transform.position.x, transform.position.y, Camera.main.transform.position.z); } } // C# user: (Put the code inside the class) void Update() { if (!_gameEnd) { _horizontalInput = Input.GetAxis("Horizontal"); if ((!_isFacingRight && (_horizontalInput > 0)) || (_isFacingRight && (_horizontalInput < 0))) { Flip(); } Grounded(); if(Input.GetButtonDown("Jump") && _isGrounded) { _isJump = true; } } } void LateUpdate() { if (!_gameEnd) { Camera.main.transform.position = new Vector3(transform.position.x, transform.position.y, Camera.main.transform.position.z); } }
Then, we create a
FixedUpdate()function, which will handle the animation state changing (Idle, Walk, Jump, or Fall) and add force to move our character horizontally and vertically. Let's add this function as follows:// Unity JavaScript user: function FixedUpdate () { if (!_gameEnd) { _animator.SetFloat("Speed", Mathf.Abs(_horizontalInput)); var xSpeed : float = Mathf.Abs(_horizontalInput * rigidbody2D.velocity.x); if (xSpeed < maxSpeed) { rigidbody2D.AddForce(Vector2.right * _horizontalInput * moveForce); } if (Mathf.Abs(rigidbody2D.velocity.x) > maxSpeed) { var newVelocity : Vector2 = rigidbody2D.velocity; newVelocity.x = Mathf.Sign(newVelocity.x) * maxSpeed; rigidbody2D.velocity = newVelocity; } if(_isJump) { _animator.SetTrigger("Jump"); audio.volume = 0.3f; audio.PlayOneShot(jumpSound); rigidbody2D.AddForce(new Vector2(0f, jumpForce)); _isJump = false; } if (!_isGrounded) { if ((rigidbody2D.velocity.y <= 0f) && !_isFall) { _animator.SetTrigger("Fall"); _isFall = true; } } if (_isGrounded) { if (_isFall) { _animator.SetTrigger("Ground"); _isFall = false; } else { var animationStateInfo : AnimatorStateInfo = _animator.GetCurrentAnimatorStateInfo(0); if ((rigidbody2D.velocity.y < 0f) && (animationStateInfo.IsName("Base Layer.Jump"))) { _animator.SetTrigger("Fall"); _isFall = true; } } } } } // C# user: (Put the code inside the class) void FixedUpdate () { if (!_gameEnd) { #region Setting player horizontal movement _animator.SetFloat("Speed", Mathf.Abs(_horizontalInput)); float xSpeed = Mathf.Abs(_horizontalInput * rigidbody2D.velocity.x); if (xSpeed < maxSpeed) { rigidbody2D.AddForce(Vector2.right * _horizontalInput * moveForce); } if (Mathf.Abs(rigidbody2D.velocity.x) > maxSpeed) { Vector2 newVelocity = rigidbody2D.velocity; newVelocity.x = Mathf.Sign(newVelocity.x) * maxSpeed; rigidbody2D.velocity = newVelocity; } #endregion #region If the player should jump if(_isJump) { _animator.SetTrigger("Jump"); audio.volume = 0.3f; audio.PlayOneShot(jumpSound); rigidbody2D.AddForce(new Vector2(0f, jumpForce)); _isJump = false; } #endregion #region If the player should fall if (!_isGrounded) { if ((rigidbody2D.velocity.y <= 0f) && !_isFall) { _animator.SetTrigger("Fall"); _isFall = true; } } #endregion #region If the player is grounded if (_isGrounded) { if (_isFall) { _animator.SetTrigger("Ground"); _isFall = false; } else { AnimatorStateInfo animationStateInfo = _animator.GetCurrentAnimatorStateInfo(0); if ((rigidbody2D.velocity.y < 0f) && (animationStateInfo.IsName("Base Layer.Jump"))) { _animator.SetTrigger("Fall"); _isFall = true; } } } #endregion } }
Tip
#region YourComment - #endregionIn C#, we can put any script between
#region Your Code Discriptionand#endregionto specify a block of code that we can expand or collapse by clicking on the plus and minus sign in MonoDevelop.We can see how to use
#region ….. #endregionin the following screenshot: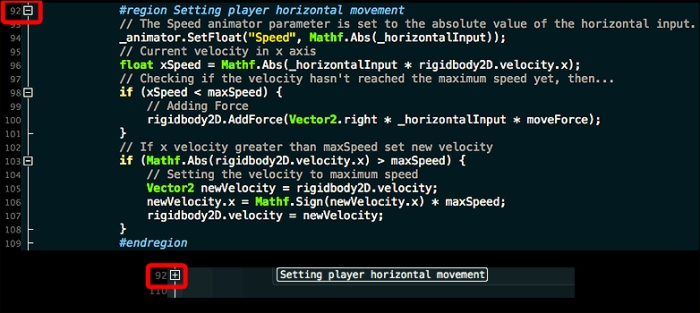
Lastly, we will add the
OnDrawGizmos()function in this class. It is a very nice function that allows us to debug the game, the result of which we won't see in the real game. Let's add the following block of code:// Unity JavaScript user: function OnDrawGizmos() { _boxCollider2D = GetComponent.<BoxCollider2D>(); _height = _boxCollider2D.size.y; var distance : float = (_height * RAYCAST_DISTANCE); var rightOrigin : Vector3 = new Vector3(transform.position.x + (_boxCollider2D.size.x*CHARACTER_EDGE_OFFSET), transform.position.y, transform.position.z); var leftOrigin : Vector3 = new Vector3(transform.position.x - (_boxCollider2D.size.x*CHARACTER_EDGE_OFFSET), transform.position.y, transform.position.z); Gizmos.color = Color.red; Gizmos.DrawRay(transform.position, transform.TransformDirection (-Vector3.up) * distance); Gizmos.DrawRay(rightOrigin, transform.TransformDirection (-Vector3.up) * distance); Gizmos.DrawRay(leftOrigin, transform.TransformDirection (-Vector3.up) * distance); } // C# user: (Put the code inside the class) void OnDrawGizmos() { _boxCollider2D = GetComponent<BoxCollider2D>(); _height = _boxCollider2D.size.y; float distance = (_height * RAYCAST_DISTANCE); Vector3 rightOrigin = new Vector3(transform.position.x + (_boxCollider2D.size.x*CHARACTER_EDGE_OFFSET), transform.position.y, transform.position.z); Vector3 leftOrigin = new Vector3(transform.position.x - (_boxCollider2D.size.x*CHARACTER_EDGE_OFFSET), transform.position.y, transform.position.z); Gizmos.color = Color.red; Gizmos.DrawRay(transform.position, transform.TransformDirection (-Vector3.up) * distance); Gizmos.DrawRay(rightOrigin, transform.TransformDirection (-Vector3.up) * distance); Gizmos.DrawRay(leftOrigin, transform.TransformDirection (-Vector3.up) * distance); }
Now, save it and go back to Unity; drag-and-drop the PlayerController_2D script to Player, click on Player, and go to the Inspector window. Click on Idle Sprite and Walk Sprite to expand it and then set the following:
Player Controller_2D (Script)
Door Open Sound
doorOpenGet Key Sound
getkeyJump Sound
jumpLayer Mask
Ground
Yes! We are done. Let's click on the Play button to play the game. We will see our player moving his hand back and forth. Next, press the A or left arrow / D or right arrow to move the player to the left or to the right; now we see that he is walking. We can also press the Space bar to make our character jump. Isn't that cool?
We just created a script that controls the movement of our character and his animation. First, we created the parameters to use in our script. We also used the const keyword in C# and the final keyword in Unity JavaScript to create the constant variables.
Note
The const and final keywords
We used the const keyword in C# to specify that the value of the field or local variable is constant, which means it can't be modified from anywhere else.
However, there is no const keyword in Unity JavaScript, so we use the final keyword instead; there is a slight difference between the final and const keywords. The const keyword can only applied to a field whose value is to be known at compile time, such as const float. So, this means that we can't use the const keyword with Vector3, Rect, Point, and all the struct that are included in Unity. On the other hand, we will use readonly instead. However, the final keyword can be used in the both cases.
For more details, visit http://tutorials.csharp-online.net/CSharp_FAQ%3A_What_are_the_differences_between_CSharp_and_Java_constant_declarations.
Then, we get _animator, _boxCollider2D, and _height in the Awake() function to check the animation state while it is moving. Then, we set all the variables to their default value. Next, we created the Flip() function, which will set _isFacingRight to true or false depending on the character movement. This function also sets the local x scale to 1 if the character is facing right and -1 if it's facing left.
The next function that we created is the Grounded() function that uses Physics2D.Raycast to check whether our character is on the ground or not.
In the Update() function, we get the character's horizontal movement by using Input.GetAxis("Horizontal"). Then, we check for the movement direction and call the Flip() function. After that, we call the Grounded() function to check whether the character is on the ground or not. If not, we can make the character jump by using Input.GetButtonDown("Jump"). Next, we update our camera position by using Camera.main to get access to the Main Camera object and set its position relative to Player.
In the FixedUpdate() function, we change the animation state from Idle to Walk by using _animator.SetFloat("Speed", Mathf.Abs(_horizontalInput));. Next, we get the x speed and check that the speed is lower than the maximum speed. Then, we add the force to Rigidbody2D by using rigidbody2D.AddForce(Vector2.right * _horizontalInput * moveForce);. We also make sure that the velocity doesn't reach the maximum limit after adding the force by assigning newVelocity to rigidbody2D.velocity.
Next, we trigger the jump animation state by using _animator.SetTrigger("Jump");. We also add the force to make our character jump using rigidbody2D.AddForce(new Vector2(Of,jumpForce);. Then, we trigger the fall animation state by using _animator.SetTrigger("Fall");. We also trigger the ground animation state by using _animator.SetTrigger("Ground"); if our character is falling.
Then, we check for the current animation state by getting animatorStateInfo using _animator.GetCurrentAnimatorStateInfo(0);. Then, if the current state is the jump state and y velocity lower than 0, we will change the animation state to the fall state using if ((rigidbody2D.velocity.y < 0) && (animationStateInfo.IsName("BaseLayer.Jump")).
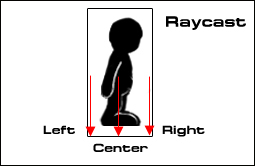
At last, we use the OnDrawGizmos() function to see the visual of the ray that was drawn in the Grounded() function using Physics2D.Raycast. We can also use this function to debug the game without removing any code when releasing the game. Because all the code in the OnDrawGizmos() function won't be shown in the real game, it's a convenient way to debug our game. As we can see from the following figure, the red arrows represent where the raycast is, which will only show in the scene view:
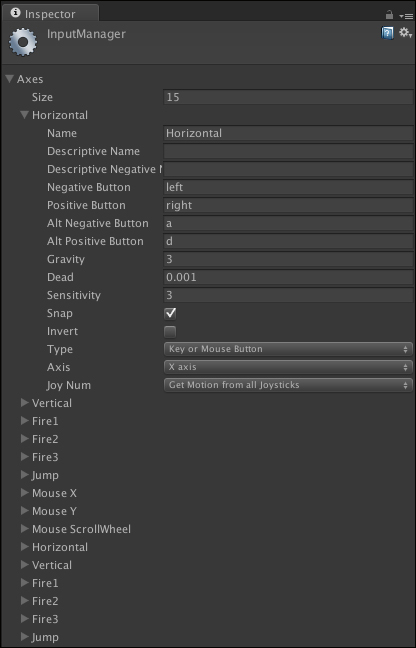
In Unity, we can set a custom Input Manager by going to Edit | Project Settings | Input. In Inspector, click on Axes and you will see that the value of Size is 15, which is the array length of all the inputs. If we want more than 15 inputs, we can put the number here (the default is 15). Next, we will see all 15 names from Horizontal to Jump as a default setting. Each one will have its own parameters, which we can set up as follows:
For more information of each parameter, go to the following link: http://docs.unity3d.com/Manual/class-InputManager.html.
The Negative
Button and Positive Button here will send the negative and positive value, which in most cases is used to control directions such as, left, right, up, and down. There is a Dead parameter, which will set any number that is lower than this parameter to 0, which is very useful when we use a joystick.
Also, setting Type to Key or Mouse Button and enabling the Snap parameter will reset axis values to zero after it receives opposite inputs.
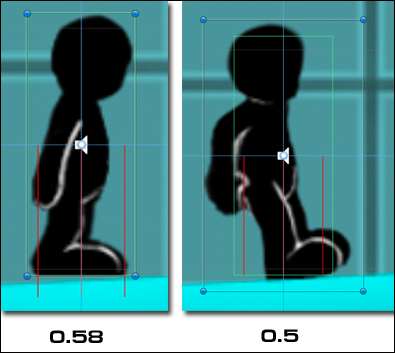
If we take a look at the Grounded() function and check out the following highlighted code, we will see that we have cast the ray a bit longer than the sprite collider:
if (Physics2D.Raycast (origin, hitDirection, distance, layerMask.value)) {
  _isGrounded = true;
} else if (Physics2D.Raycast (rightOrigin, hitDirection, distance, layerMask.value)) {
  _isGrounded = true;
} else if (Physics2D.Raycast (leftOrigin, hitDirection, distance, layerMask.value)) {
  _isGrounded = true;
}
From the highlighted code, we draw
Raycast from the middle of our character downward by 0.58 units. Why don't we set it to 0.5? We set it this way to make our character stay on the edge of the floor surface. If we set it to 0.5, we will see that the character will not hit the ground. This is because of the way Box Collider 2D and Polygon Collider 2D detect other collider objects in Unity, as we can see in the following screenshot:
One last thing for Gizmos: if we want to see our gizmos in the game scene, we can click on the Gizmos tab on the top-right corner of the game scene:
