

Now, it's time to download the kernel sources and then configure and build them. This step is needed for several reasons: the first one is that we need a kernel for our ESPRESSObin in order to boot an OS, and the second one is that we need a configured kernel sources tree to compile our drivers into.
Configuring and building the kernel
Getting ready
Since our ESPRESSObin is now supported into vanilla kernel since the 4.11 release, we can get Linux sources by using the following git command:
$ git clone git://git.kernel.org/pub/scm/linux/kernel/git/torvalds/linux.git
This command will take a lot of time to finish so I would suggest you take a break by drinking your favorite cup of coffee (as real programmers should do).
When finished, we can enter into the linux directory to see the Linux sources:
$ cd linux/
$ ls
arch CREDITS firmware ipc lib mm scripts usr
block crypto fs Kbuild LICENSES net security virt
certs Documentation include Kconfig MAINTAINERS README sound
COPYING drivers init kernel Makefile samples tools
These sources are related to the latest kernel release that could be unstable, so to be sure that we're using a stable kernel release (or a long-term release), let's extract release 4.18, which is the current stable release at time of writing this chapter, as follows:
$ git checkout -b v4.18 v4.18
How to do it...
Before starting the compilation, we have to configure the kernel and our compiling environment.
- The last task is quite easy and it consists of executing the following environment variables assignments:
$ export ARCH=arm64
$ export CROSS_COMPILE=aarch64-linux-gnu-
- Then, we can select the ESPRESSObin standard kernel configuration by simply using the following command:
$ make defconfig
Depending on the kernel release you're using, the default configuration file may be also called mvebu_defconfig or either mvebu_v5_defconfig or mvebu_v7_defconfig. So, please take a look into the linux/arch/arm64/configs/ directory in order to see which file is present that best suits your needs.
In my system, I have the following:
$ ls linux/arch/arm64/configs/
defconfig
In my system, I have the following:
$ ls linux/arch/arm64/configs/
defconfig
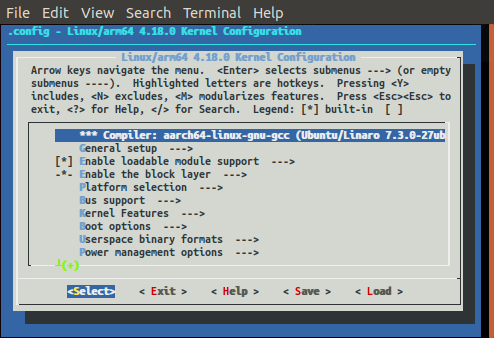
- If we wish to modify this default configuration, we can execute the make menuconfig command, which will show us a pretty menu where we can enter our modifications in order to fit our needs. The following screenshot shows how the kernel configuration menu appears on the Terminal:
- Before continuing, we must be sure that the Distributed Switch Architecture (DSA) is enabled into the kernel, otherwise we're not able to use the Ethernet ports at all! This is because the ESPRESSObin has a complex (and really powerful) internal network switch that must be managed by using this special support.
For further information regarding the DSA, you can start reading the linux/Documentation/networking/dsa/dsa.txt file, located in the kernel sources we're currently working on.
- To enable DSA support, just navigate into the kernel menu at Networking support. Go to Networking options and, at the end, enable the entry Distributed Switch Architecture support. After that, we have to go back to the menu's top level and then select these entries: Device Drivers | Network device support | Distributed Switch Architecture drivers and then enable Marvell 88E6xxx Ethernet switch fabric support, which is the ESPRESSObin's on-board switch chip.
Remember that, to enable a kernel feature as a module or a built-in, you need to highlight the desired feature and then press the spacebar until the character inside the <> characters changes to * (which means built-in, that is, <*>) or to M (which means module, that is, <M>).
Note that, to enable DSA as a built-in instead of as a module, we have to disable 802.1d Ethernet Bridging support (that is, the entry just above).
- Well, after all kernel settings are in place, we can start the kernel compilation by using the following make command:
$ make Image dtbs modules
Again, as the downloading command, this command will need a lot of time to finish, so let me suggest you take another break. However, in order to speed up the compilation process, you may try using the -j option argument in order to tell make to use several simultaneous process to compile the code. For example, on my machine, having eight CPU threads, I use the following command:
$ make -j8 Image dtbs modules
So, let's try using the following lscpu command to get how many CPUs your system has:
lscpu | grep '^CPU(s):'
CPU(s): 8
Alternatively, on Ubuntu/Debian, there's also the pre-installed nproc utility, so the following command also does the trick:
$ make -j$(nproc)
$ make -j8 Image dtbs modules
So, let's try using the following lscpu command to get how many CPUs your system has:
lscpu | grep '^CPU(s):'
CPU(s): 8
Alternatively, on Ubuntu/Debian, there's also the pre-installed nproc utility, so the following command also does the trick:
$ make -j$(nproc)
When finished, we should have the kernel image into the arch/arm64/boot/Image file and the device tree binary into the arch/arm64/boot/dts/marvell/armada-3720-espressobin.dtb file, which are ready to be transferred into the microSD we're going to build in the next recipe, Setting up the target machine.
See also
- For further information regarding available ESPRESSObin's kernel releases and how to get them and compile and install them, just take a look at ESPRESSObin's wiki pages at http://wiki.espressobin.net/tiki-index.php?page=Build+From+Source+-+Kernel.