
Motion 5 gives us several options to bring in the material we want to work with. Some of this material can be from Motion's own library.
For these recipes, we're going to use the File Browser to load in our material. Think of it as a gateway to our system and its files displayed graphically.
If it's your first time to Motion, here's a brief breakdown of the interface:
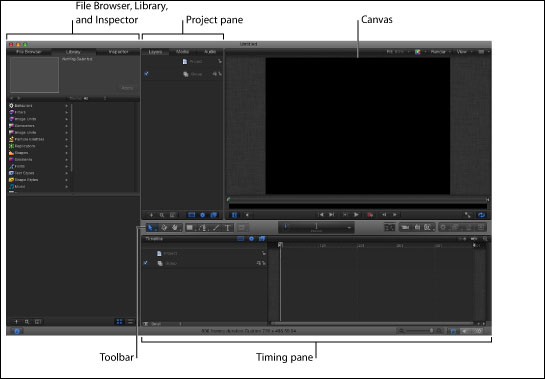
The Motion workspace can be broken down into the following sections:
File Browser, Library, and Inspector: The left-hand side of the Motion interface contains three areas—File Browser, Library, and Inspector. You can click on the corresponding tab to see each area or use a keyboard shortcut. The File Browser is where you view the clips from your system and import them into your project. The Library allows us to see behaviors, effects, and tons of content directly within Motion that we can utilize for our projects. The Inspector is similar to the Inspector in FCP X. It allows us to change the parameters of a selected item.
Toolbar: This contains tools for creating content and manipulating elements in your project. There are tools for creating shapes, manipulating cameras, and adding behaviors for automatic animation.
Canvas: This allows you to view the current frame your playhead is on. You can also manipulate layers visible in the Canvas. The Canvas contains playback and view controls for both 2D, as well as 3D workflows.
The Project pane: This pane contains the Layers, Media, and Audio tab, which display items in your project. You can view each tab by clicking on it or using a keyboard shortcut. The Layers list shows all elements (that is, still images, film clips, filters, behaviors) used in your composition; the Media list shows all external images, clips, and audio files you imported to your current project; and the Audio tab displays all the sound files you imported in your project.
The Timing pane: This pane allows you to make changes to your elements over the span of your project. It contains three unique areas—the Timeline, Audio Timeline, and the Keyframe Editor.
Before we begin, locate a clip on your system you would like to import into Motion or feel free to use a clip that comes with some of the later recipes. Launch Motion and choose a project based on the setting of your clip.
Follow these steps to import files to the Canvas:
With a blank Motion project open, navigate to the File Browser by clicking it on the left-hand side of the interface, or press Command + 1.
Locate the movie file on you system that matches your project's settings.
With the clip selected, drag it from the File Browser straight to the Canvas window but don't release your mouse.
By default, as you hold your clip you should see yellow lines appear. These are called dynamic guides. You can turn them on and off by going to View | Overlays | Dynamic Guides. These guides can help you align your video directly to the center of the Canvas.
Wait until you see both the vertical and horizontal guides. When you do, release your mouse as shown in the following screenshot:

If your video seems too big, press Shift + Z to fit it into the Canvas window.
This is how we can import files to the Layers tab:
With a blank Motion project open, navigate to the File Browser by clicking it on the left-hand side of the interface, or press Command + 1.
Locate the movie file on your system that matches your project's settings.
With the clip selected, drag it from the File Browser straight on top of the empty group in the Layers tab.
Wait for the plus icon and release your mouse, as shown in the following screenshot:

The video should appear directly centered in your Canvas window, If your video seems too big, press Shift + Z with the Canvas window selected to make it fit.
Follow these steps to import files into the Timeline:
With a blank Motion project open, navigate to the File Browser by clicking it on the left-hand side of the interface, or press Command + 1.
Locate the movie file on you system that matches your project's settings.
With the clip selected, drag it from the File Browser straight to the Timeline. Press the Shift key to help it snap to the playhead, but don't release the mouse.
Eventually a menu will appear asking us whether we want to composite or insert our images into the Timeline. Since there is nothing in our project, both options do the same thing. Choose Composite, as shown in the following screenshot:

The video should appear directly centered in your Canvas window. If your video seems too big, press Shift + Z with the Canvas window selected to make it fit.
Your playhead acts as where you position things in time. Keep track of where it is.
The playhead is your friend. It shows you which frame you're currently viewing in the Canvas. It also acts as the location to which any file will go when you bring it into the project based on the default settings. Be aware of where your playhead is and know at what time your media starts. You can also change Motion's Preferences setting to always have layers created on the first frame of the project.
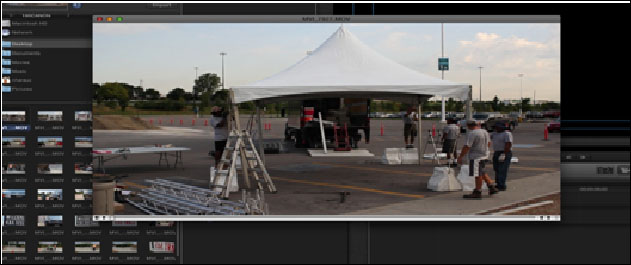
You can choose to change between icon and list view in the File Browser as you navigate your system. The following screenshot shows the view being currently set to icon. Simply click on the icon at the bottom of the window to switch between the views; you can also search and add folders in it too.

To preview a clip in the File Browser, simply single-click the file and a small preview will play in the upper-left hand corner. For a bigger preview, double-click the file to bring up a floating window, as shown in the following screenshot: