

We need to enable the GPIO peripherals in our Raspbian installation to get started. In order to download the required tools and set things in motion, the Raspberry Pi needs to be connected to the Internet.
The GPIO pin is a pin that is available from the Raspberry Pi's processor that enables interfacing input and output devices to the Raspberry Pi. In this section, we will talk about setting up the GPIO for interfacing an output device. There is a 26-pin interface (40 in Model B+) available on the Raspberry Pi and about 17 of those 26 pins are GPIO pins (26 of them in Model B+) while the others are miscellaneous pins such as power. The pins are driven by a 3.3 V rail and each GPIO pin is rated for about 17 mA and the total current draw not exceeding 50 mA.
We also need to know the GPIO peripherals available to conduct our experiment. The following figure shows the GPIO maps of the Raspberry Pi Rev 1 and Rev 2:
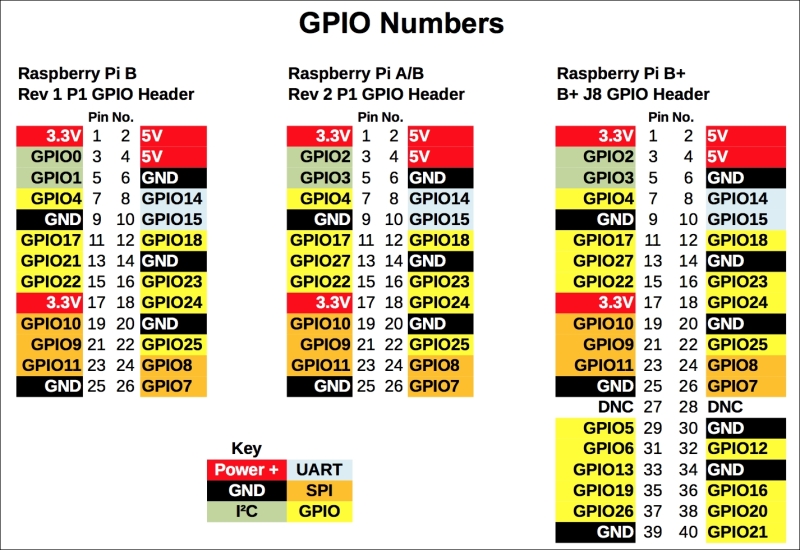
GPIO map for Models A, B, and B+. (Image published with permission from Raspi.tv)
The letter P1 shown in the following image corresponds to P1-1 of the GPIO map. P1-1 corresponds to the first pin on the left in the front row, while P1-2 corresponds to the first pin on the left in the back row.

The Raspberry Pi GPIO peripheral
In this book, we will be mostly using Python programming language. Python is a very simple and easy language to learn. We may wander off to other programming languages from time to time, but we will mostly stick to Python. With this in mind, let's get started.
There are a lot of libraries available to access the GPIO peripheral. The easiest to install and use is the quick2wire python API. The API is used to control the GPIO peripherals and I2C devices connected to the Raspberry Pi.
Note
There are different libraries such as the RPi.GPIO, Pi4J, and so on. We are using the quick2wire API in this example as a beginner might find it easy to use. You are welcome to use other libraries of your choice. The quick2wire-gpio-admin tool enables controlling the GPIO pins without root access.
One disadvantage of using the quick2wire module is that it provides access only to GPIO pins 0 through 7.
The terminal can be located in the left corner of the desktop and has been highlighted in the following screenshot:
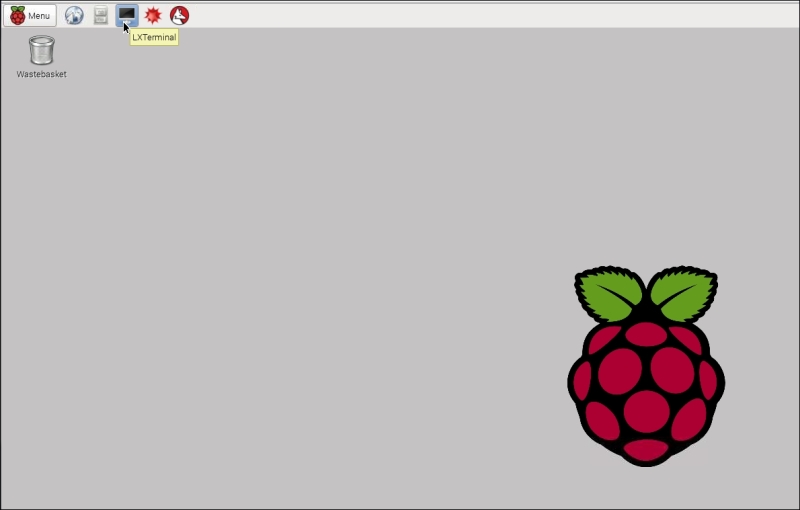
A Command-line terminal on the Raspbian desktop
The quick2wire library installation is based on a post on the quick2wire website (http://quick2wire.com/articles/how-to-add-quick2wire-as-a-raspbian-software-source/). In order to install the quick2wire-python library, the repository needs to be added to
/etc/apt/sources.list.In the command line, the repository is added by using the
nanotext editor:sudo nano /etc/apt/sources.listThe following lines need to be added to the file:
# Quick2Wire Software
deb http://dist.quick2wire.com/raspbian wheezy main
deb-src http://dist.quick2wire.com/raspbian wheezy main
The file can be saved by typing CTRL + X. The file can also be saved by pressing Y key while exiting the editor.
Alternatively, the lines can be added using a graphical text editor such as, leafpad and saving it:
sudo leafpad /etc/apt/sources.list
In order to ensure that the packages are downloaded from the quick2wire repository, we need to authenticate the packages using a key available from quick2wire:
wget https://raw.githubusercontent.com/quick2wire/quick2wire-software-users/master/[email protected]
sudo apt-key add
[email protected]
The cache is updated and the latest software packages can be downloaded as follows:
sudo apt-get update
sudo apt-get upgrade
The quick2wire tool is installed as follows:
sudo apt-get install quick2wire-gpio-admin
sudo apt-get install quick2wire-python3-api