

As the name implies, Support Library provides support for the latest APIs on older versions of the Android OS. This brings many of the latest features, such as Fragments, to the earlier OS releases.
Additional information can be found in the appropriate section on the official Android Developer site at http://developer.android.com/tools/extras/support-library.html.
Before following the next sections you need to install all the tools that allow you to write, compile, and install programs into your Android device or emulator.
The standard way is to install the Android SDK and in particular the Android Developer Tool, a plugin for the Eclipse IDE. It provides integration with the SDK and a bunch of utilities to help with your development.
In order to install this tool, follow the instructions in the original documentation that you can find at http://developer.android.com/tools/help/adt.html.
Let's install the library:
Launch the Android SDK Manager from Eclipse, selecting Window | Android SDK Manager, as shown in the following screenshot:

You will be presented with the list of all available packages (installed or not). Scroll down until you reach the Extras section and select Android Support Library; now you can click on the install packages button in the lower-right corner and wait several minutes (the time depends on the quality of your Internet connection):

The support library files will be downloaded to the Android SDK folder. The JAR file to add to the project is <AndroidSDK>\extras\android\support\v4\android-support-v4.jar.
Let us reference this library from your Android project:
Copy the Support Library into the
libsdirectory at the root of your project (create it if doesn't exist).Open your project in Eclipse and select the element corresponding to the Support Library from Package explorer. Right-click and select Build Path | Add to build path from the menu.
The final step is to check if the setup is working correctly. To do this, add the following import to a project and verify that there are no errors in Eclipse:
import android.support.v4.app.FragmentActivity;
Build the project:

If there are no build errors, everything is ok.
An Android application is first of all a Java application, and like all these kinds of applications, it needs to know where to look for the classes used in your code; this is simply done by adding the library of your choice to the build path. Normally in Java, the libraries' path is indicated by the JAVAPATH environmental variable, but since Eclipse uses its system, the details are more subtle but the concepts are the same.
Now let's talk about some other options, or possibly some pieces of general information that are relevant to this task.
To better understand about the compatibility package, it's helpful to know a bit about Android's history.
The Android platform was born in 2003, as the product of a company which at first was known as Android Inc. and which was acquired by Google in 2005. Its direct competitors were and are still today the iOS platform by Apple and the RIM, know as Blackberry. Technically speaking, its core is an operating system using a Linux Kernel, aimed to be installed on devices with very different hardware (mainly mobile devices, but today it is also used in general embedded systems like, for example, the game console OUYA that features a modified version of Android 4.0).
Like any software that has been around for a while, many changes happened to the functionality and many versions came out, each with a name of a dessert:
Apple Pie (API level 1)
Banana Bread (API level 2)
1.5 – Cupcake (API level 3)
1.6 – Donut (API level 4)
2.0-2.1x – Eclair (API level 5 to 7)
2.2 – Froyo (API level 8)
2.3 – Gingerbread (API level 9 and 10)
3.0-3.2 – Honeycomb (API level 11 to 13)
4.0 – Ice Cream Sandwich (API level 14 and 15)
4.1 – Jelly Bean (API level 16)
Like in many other software projects, the names, as well as the themes, are in alphabetical order (another project that follows this approach is the Ubuntu distribution).
The API level written in the parenthesis is the main point about this compatibility package. Each version of software introduces or removes features and bugs. In its lifetime, an operating system such as Android aims to add more fantastic innovations while avoiding breaking pre-installed applications in older versions, but also aims to make available to these older versions the same features with a process technically called backporting.
For more information about the API levels, carefully read the official documentation available at http://developer.android.com/guide/topics/manifest/uses-sdk-element.html#ApiLevels.
All that you will read in the following sections is thought to address these problems, using backporting; in particular, to specifically address the backward compatibility issues with version 3.0 of the Android operating system—the version named Honeycomb.
Version 3.0 was first intended to be installed on tablets, and in general, on devices with large screens. Android is a platform that from the beginning was intended to be used on devices with very different characteristics (think a system where an application must be usable on VGA screens, with or without physical keyboards, with a camera, and so on); with the release of 3.0, all this was improved with specific APIs thought to extend and make developing applications easier, and also to create new patterns with the graphical user interface.
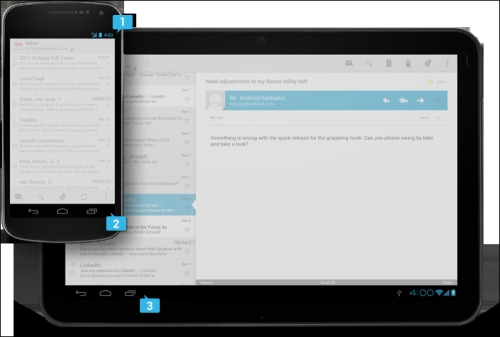
The more important innovation was the introduction of the Fragment class. Earlier, the only main class in developing the Android applications was Activity, a class that provides the user with a screen in order to accomplish a specific task, but that was too coarse grain and not re-usable enough to be used in the applications with large screens such as a tablet. With the introduction of the Fragment class to be used as the basic block, it is now possible to create responsive mobile design; that is, producing content adapting to the context and optimizing the block's placement, using reflowing or a combination of each Fragment inside the main Activity.
These are concepts inspired by the so called responsive web design, where developers build web pages that adapt to the viewport's size; the preeminent book about this argument is Responsive Web Design, Ethan Marcotte.
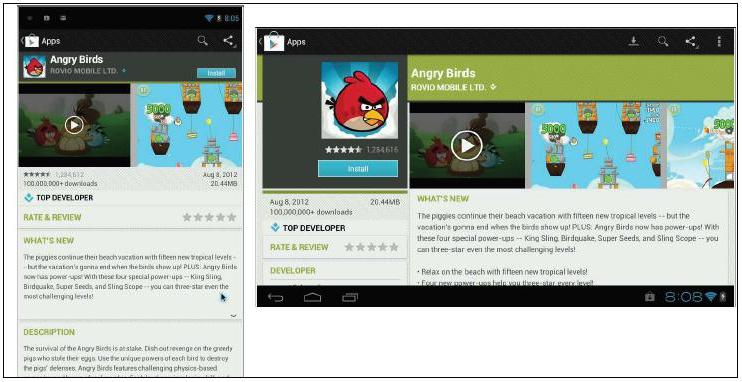
If all this seems a bit complicated, allow me to make a simple example using a real application. The following image is the composition of two screenshots of the same application (Google Play, the Android Market) with two different screen resolutions; you can see how the information about the developer and the information about the application is placed side by side on the tablet version, where as in the phone version they are just shown one below the other.
It's not the only possibility to create a so-called multi-paned layout; you can stretch, compress, stack, or expand the Fragment depending on your plan. On the Android's site, it's available as a guide worth following—in the design section of the site. It is available at http://developer.android.com/design/patterns/multi-pane-layouts.html.
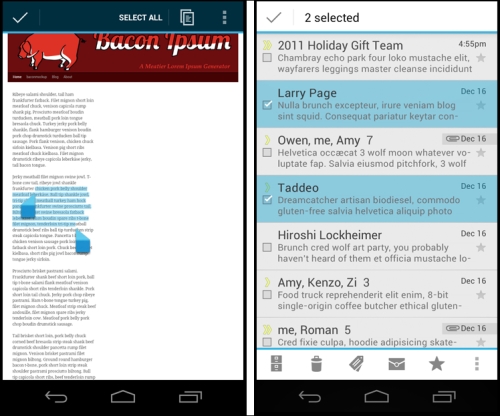
Another important element introduced in Google's platform is the UI pattern named ActionBar—a piece of interface at the top of an application where the more important menu's buttons are visualized in order to be easily accessible.
Also a new contextual menu is available in the action bar. When, for example, one or more items in a list are selected (such as, the Gmail application), the appearance of the bar changes and shows new buttons related to the actions available for the selected items.
For sake of completeness, let me list other new capabilities introduced with Honeycomb (as previously said, look into the official documentation for a better understanding of them):
Copy and Paste: A clipboard-based framework
Loaders: Load data asynchronously
Drag and Drop: Permits the moving of data between views
Property animation framework: Supersedes the old Animation package, allowing the animation of almost everything into an application
Hardware acceleration: From API level 11, the graphic pipeline uses dedicated hardware when it is present
Support for encrypted storage
Not all the things listed here are backported with the Support Library. In particular, there is no official way to implement the new animation framework in a backward compatible way (libraries that do this do exist though).
Unfortunately, the Support Library does not support all these features of previous versions of the OS. Most notably, the official Google Support Library does not support the action bar.
Fortunately, for Android developers, there is an open-source project called ActionBarSherlock, which does a fantastic job of bringing the ActionBar API back to Android 1.6 (API level 4). We will discuss more on this in the ActionBar section.