Setting up a local development environment
Since this book covers all major operating system platforms, before we start to learn more about PhoneGap and its useful features we need to prepare the development environment. The PhoneGap website (http://phonegap.com/install/) has instructions on how to install it, which should be fairly easy to achieve. However, in reality, each platform requires us to install additional libraries and simulators to be able to run them for different mobile platforms.
There are two ways to develop PhoneGap applications. Until PhoneGap introduced the command-line interface (CLI), the only way was to develop plugins for the integrated development environment (IDE), such as Xcode or Eclipse. With the introduction of the CLI, it was possible to develop PhoneGap mobile applications with PhoneGap SDK inside your favorite text editor or integrated developer environment. In this book, we are going to use the latter option; since most developers have different opinions about editors, it is better to stay neutral on this topic.
However, for this book I will be using Sublime Text 3 (http://www.sublimetext.com/3), a plain text editor that is one of the most popular choices nowadays and has numerous plugins and extensions to work with. Since it supports Windows, Mac OS, and Linux, it won't be included in the installation process for a specific operating system. On the provided link, you can download the text editor and install it with the provided information. Sublime Text 3 can be used for free for as long as you like (you will be prompted to buy it from time to time); this is a fully working editor without any limits. But I would strongly advise you to get the full version and support the people behind it since they have done a great job and it only costs $70 and doesn't have restrictions on the number of machines for a single user.
There is a great free alternative to Sublime Text called Atom editor, which is open source and available at the following page: https://atom.io/. It will be sufficient to do the work but it doesn't come with lot of plugins like Sublime Text.
In the following pages, there will be instructions on how to cover the installation process for the three most popular operating systems that developers are using: Windows, Mac OS, and Ubuntu. For other Linux distributions, it should not be too hard to adapt the Ubuntu installation process, especially if you are using Debian. Let us get started.
In the beginning, PhoneGap started as a way to create iOS applications with JavaScript and HTML to create a fully functional iOS application without writing a single line of code in Objective-C. To get started for Mac OS, there are few more steps than the instructions on the PhoneGap website (http://phonegap.com/install/) are telling us to perform. We will need to install simulators for supported mobile devices. On this platform, we will install support for iOS and Android development. For installation purposes, it is assumed that this is being installed as a clean installation so, if you already have some of the libraries installed, it is advisable to update them to the latest version to make sure they are working properly. For Mac OS, the latest operating system version (Yosemite) will be used.
The easiest way to install the various Unix tools and open source software onto Mac OS X is via a package manager but unfortunately OS X does not come with one; however, there are some alternatives that we can use instead. We are going to use Homebrew (http://brew.sh/).
If you already have your own package manager preference or you want to compile it from the source code, you are encouraged to use the latest version for the library.
Before installing Homebrew, we need to install Xcode (https://itunes.apple.com/au/app/xcode/id497799835?mt=12) so we can build and run applications in the iOS simulator:
To install the Xcode component, perform the following steps:
- Download the image and then drag the
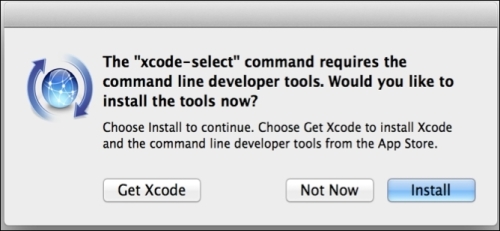
Xcode icon into the Applications folder. Before proceeding with the next step, you need to open Xcode and agree to the license, as it needs to install additional components: - After the components are installed, you need to install the Xcode command line tools with the following command:
- This will open the following prompt to install the required tools. Select Install to install the required libraries, and wait until everything is successfully installed:
- To download and install Homebrew, run the following installation script on the command line. It will ask you for a few details before proceeding, but you can leave the default values in use, unless you have a specific reason to change them, then wait for the script to finish:
- After successful installation of Homebrew, please run the following command to check if the installation was successful:
- Before installing any additional libraries through Homebrew, let us run
update to get a list of the latest versions of the libraries: - Since PhoneGap is a Node.js application, we will need to install a working version of Node.js. With Homebrew, the process of installing additional libraries is easy; just run the following command:
- To be able to build and run applications in the Android simulator, you need to install the full Android software development kit (SDK) by running the following command:
- Add the Android SDK path to be used with PhoneGap with the following commands:
- At the end of the file, add the following line:
- Save and close the file and run the following to reload the newest updates:
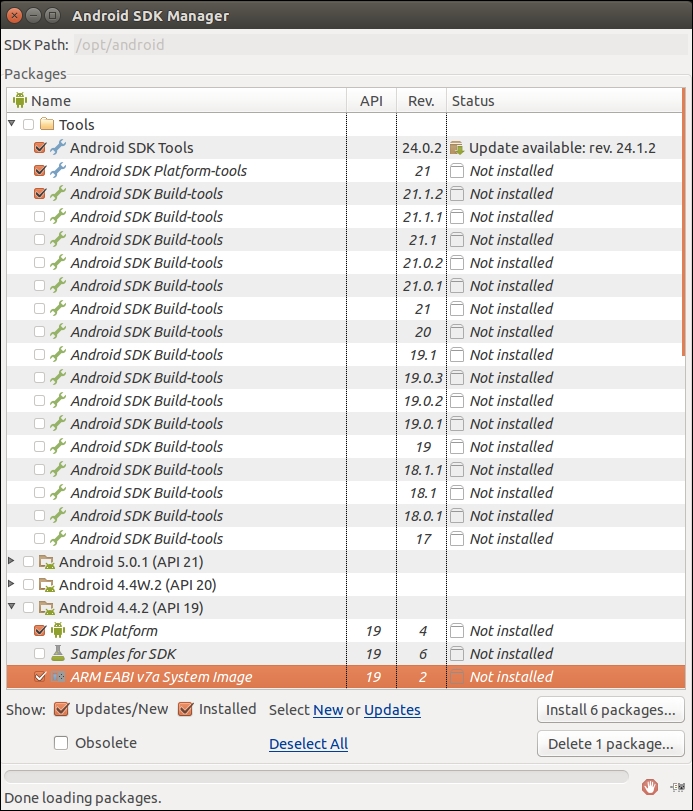
- The following command will launch the Android SDK manager window and you should see the recommended libraries already preselected:
- Click the Install 2 packages button and accept all the agreements for the required libraries. Then press the Install button:
- When it's finished, quit the Android SDK Manager application.
- Besides Android SDK, we need to install Apache Ant in order to be able to build and run the applications inside Android Simulator. Run the following command:
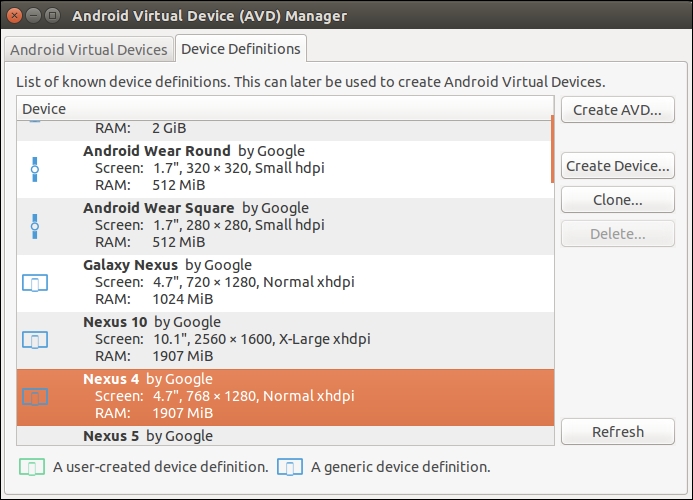
- In order to emulate an Android device, we need to first create a virtual device. Run the following command to set up the default Android virtual device:
- This will launch the Android Virtual Device Manager. Click the Device Definitions tab and select a sample device. From the list select the Nexus 5 profile, and press the Create AVD button as shown in the following screenshot:
- Fill out the device profile and click OK:
- Close the Android Virtual Device Manager window.
- Next we need to install the required libraries (to be able to build and run applications in the iOS simulator) by installing the Node.js library to control the iOS simulator directly from the command line:
- When all the required libraries and tools are installed, install PhoneGap with the following command:
- To verify we can build and launch applications in both simulators, let us create and run a quick sample application by running the following command:
- This creates a basic sample application. Next we need to verify it works on the Android and iOS simulator.
- For iOS we need to open the iOS simulator and run the application. Run the following command:
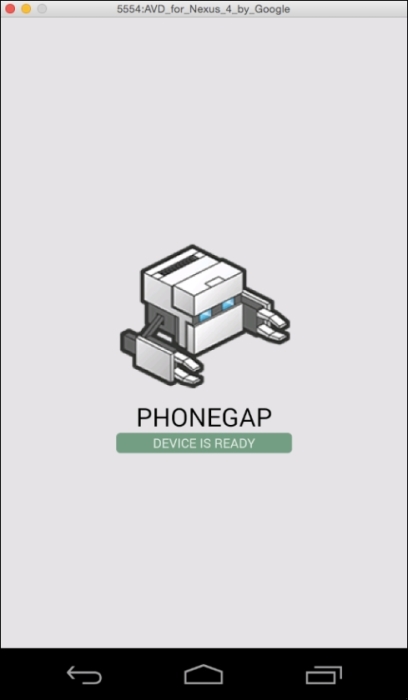
- To test if everything is working well on Android, we are going to run the following command, which should run Android Device Simulator as we selected before:
Linux is well known for having multiple distributions that have different ways of installing new libraries on it. For this book, we are going to use one of the most popular distributions: Ubuntu. Ubuntu is built on top of Debian so installing on both of them shouldn't be much different. As for the other distributions, it shouldn't be too hard to adapt the following commands for these environments. Perform the following steps:
- First we need to fully update Ubuntu to avoid any issues while installing the required libraries:
- Next we install some libraries that are required to finish the installation:
- Since PhoneGap is a Node.js application, we will need to install the latest working version of Node.js. Make sure you install Node.js and not node, which is a different library:
- While that's all you need to do to install Node.js, there is a small detail that you need to take care of. When Ubuntu installs the package, it names the Node.js executable
nodejs. The problem is that many applications, including PhoneGap, expect the executable to be named node. To fix this inconsistency, simply create a symlink named node that points to Node.js as follows: - Next we need to install additional libraries for Node.js:
- Finally, we can install the PhoneGap library by running the following command:
- Now we need to install the Ant tool, required to build and run Android applications:
- Since Android uses the Java language, we will need to install Java JRE and Java JDK, which supports it:
- Now it is time to install the actual Android SDK. Run the following command:
- Let us move the content of the Android SDKs to a more appropriate location:
- Now we need to set up paths to be executable from anywhere inside the terminal. Let us open the
vi editor: - Enter the following lines at the end of the file:
- To use the command in the same terminal, you need to run the following command:
- Now that we have set up the Android SDK environment, we need to run the configuration application to download the required libraries and emulators. Run the following command:
- Execute Android from the shell. This is a good first test to make sure you've done everything right up to now. If you get an error, rerun through the preceding steps and make sure that you've installed all the requirements and added your environment variables correctly.
If there is no error, you should see that executing Android opens up a kind of package manager that you can use to install different Android components. By default, a certain number of these will be pre-selected for installation. Leave them as is and, in addition, tick the box next to the entry named API 4.4.2 (API 19). Once you've done that, download and install everything by accepting the license, as shown in the following screenshot:
- Next we need to confirm installation of the requested packages, by clicking on Install:
- The last step before trying it out is to create an Android emulator that will emulate a working Android device on your computer. By default no emulator is set, so we need to set it manually by running the following command:
- After opening the window, we should see an empty list. Switch to the Device Definitions tab and press Create AVD:
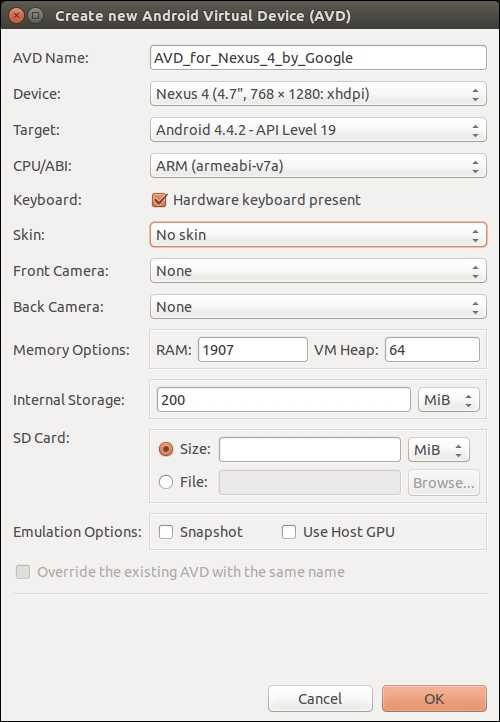
- For our emulator, we will use the following settings:
- After we have installed all the required libraries and the emulator required to run the Android app, we can finally create our first test application by running the following command:
- To verify everything is working fine, you need to run the emulator:
If you want to develop and test applications for Windows phones, you will need to have a working Windows computer to hand because you can only run them there.
There are multiple versions of the Windows operating system but it should be fairly easy to use any of them by carrying out the following instructions, since most of the libraries and applications are available as an installer. Thus, you can simply go ahead with the installation process and the only thing you need to do manually is to set the environment variables to be reachable from any command prompt.
The easiest way is to create a Development directory in your home directory (C:\Users\yourusername\Development). For ease, you might want to drag that folder into the Favorites list in Explorer, too. We will add all the source code we work on to the examples there.
Let us start with the stable Java SE Development Kit. Perform the following steps:
- Download the latest available version that works on your computer from http://www.oracle.com/technetwork/java/javase/downloads/index.html.
- Run the downloaded file and go through the following steps:
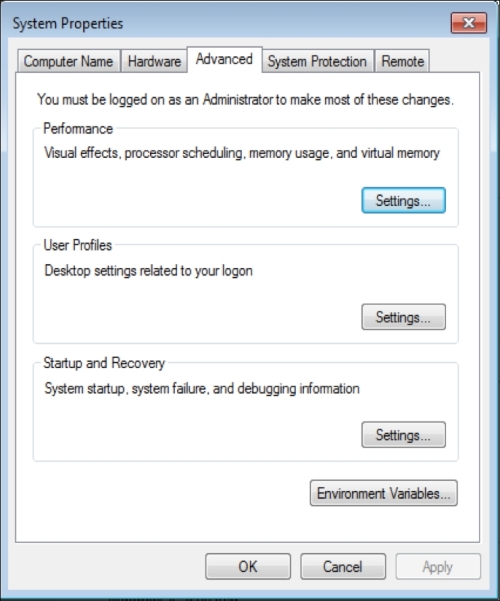
- You need to make sure that you have the following paths set in your Advanced System Properties Environment Variables.
- You need to set the path to be visible so it can be run as a command from the command prompt. Navigate to Control Panel | System and Security | System. There you need to click on the Advanced tab, as shown in the following screenshot:
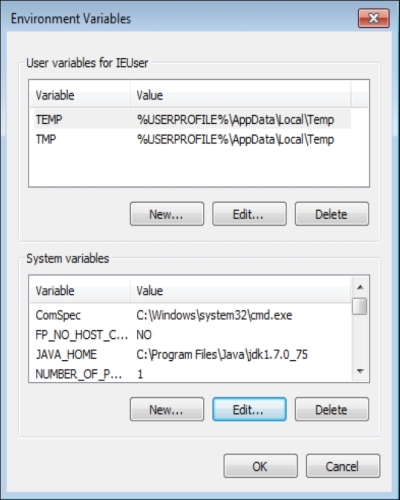
You will need to press the Environment Variables button and update system variables with the following data:
- Create a new system variable:
JAVA_HOME with value: C:\Program Files\Java\jdk1.7.0_75
- Next we need to edit an existing variable:
Path and add the following value ;%JAVA_HOME%\bin
- Add the preceding line at the end of the remaining paths and make sure it is preceded by a
; (semicolon). It is important not to forget it: - You can test it by running the following command:
- In the command prompt, if you see the regular Java help text printout response then the Java environment is all set. Close the command prompt.
- Next we need to download Android SDK for Windows, which is available as an automated installer. Download the latest SDK version from: https://developer.android.com/sdk/index.html.
- Make sure you do not use the default proposed folder since you might have some problems with accessing folder content in the following steps. Instead, set the installation location to
C:\Android\android-sdk. - We now need to go back to add an additional environment variable in the Android SDK location as we did before for Java SDK.
- First we add a new system variable:
ANDROID_HOME with value C:\Android\android-sdk
- Next we need to edit the existing variable:
Path and append additional value ;%ANDROID_HOME%\platform-tools;%ANDROID_HOME%\tools
- Again, do not forget to add a
; (semicolon) at the beginning. - Next we need to open another command prompt to check whether it is installed properly. Run the following command:
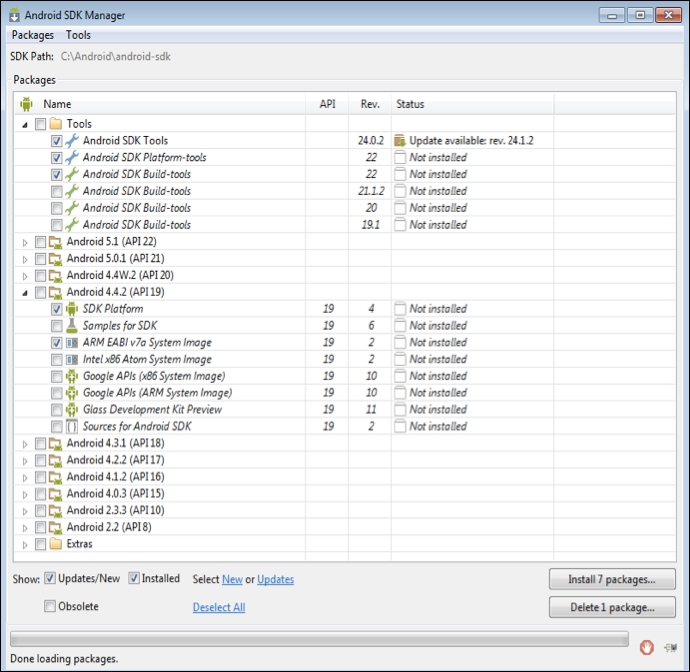
- This will open the Android SDK Manager, where we will need to select which Android version to download; this is going to be used inside the emulator:
- After selecting the packages ticked in the screenshot, you need to click Install 7 packages and wait until they are installed.
We need to install the git command (used for many libraries) and later plugins that we will require to make it work with PhoneGap. Perform the following steps:
- Download and install the git installer from http://git-scm.com/download/win.
- You should open the installer, follow the instructions, and select the predefined values. After installation, repeat the same process with system variables and add the variable
GIT_HOME with a value C:\Program Files\git. Add additional information to the existing PATH by appending: ;%GIT_HOME%\bin. - Again, to test whether it is working, run the
git command in the newly opened command prompt. - Ant is a tool that is required by Android to build all the code into the Android application package. You need to download and install Ant from: http://www.us.apache.org/dist/ant/binaries/. Select the latest version that has the .zip extension.
- Unzip the content into the folder
C:\Android\apache-ant-1.9.4. - Again set the system variables with the creation of a new variable
ANT_HOME with the value C:\Android\apache-ant-1.9.4. Update the existing Path variable PATH by appending ;%ANT_HOME%\bin. - In the next step, we will install the latest version of Node.js from the http://nodejs.org as an installer. After it is downloaded, run the downloaded file, which will guide you through the process. The Installer should set all the path variables you need to run it. To confirm the installation worked, run the
node command in the command prompt. It will open the node console, which you can close by pressing Ctrl + C twice. - The last step is to install the PhoneGap library by running the following command at the command prompt:
- To verify we have installed PhoneGap properly, we simply run the
phonegap command at the command prompt; this should return details about PhoneGap. - There is one last thing we need to do before running the test project. We need to create Android Emulator Start by running the following command:
- By default, there are no emulators, so we need to create one before starting. Press Create… which will open a window to create a new emulator. Enter the following settings and press OK:
- A new emulator should be listed. Close the application.
- To verify we can build and launch the application in the simulator, let us create and run a quick sample application by running the following command:
- This creates a basic sample application, so next we need to run it to verify it works on the Android simulator.
- To test that everything is working well, we are going to run the following command that should run Android Device Simulator, as selected before:
- You should see it running an example.


 Free Chapter