

To use the CoreOS virtual machine, you need to have VirtualBox, Vagrant, and git installed on your computer.
In the following examples, we will install CoreOS on our local computer, which will serve as a virtual machine on VirtualBox.
Okay, let's get started!
Let's clone this project and get it running.
In your terminal (from now on, we will use just the terminal phrase and use $ to label the terminal prompt), type the following command:
$ git clone https://github.com/coreos/coreos-vagrant/
This will clone from the GitHub repository to the coreos-vagrant folder on your computer.
To start even a single host, we need to provide some config parameters in the cloud-config format via the user data file.
In your terminal, type this:
$ cd coreos-vagrant
$ mv user-data.sample user-data
The user data should have content like this (the coreos-vagrant Github repository is constantly changing, so you might see a bit of different content when you clone the repository):
#cloud-config
coreos:
  etcd2:
    #generate a new token for each unique cluster from https://discovery.etcd.io/new
    #discovery: https://discovery.etcd.io/<token>
    # multi-region and multi-cloud deployments need to use $public_ipv4
    advertise-client-urls: http://$public_ipv4:2379
    initial-advertise-peer-urls: http://$private_ipv4:2380
    # listen on both the official ports and the legacy ports
    # legacy ports can be omitted if your application doesn't depend on them
    listen-client-urls: http://0.0.0.0:2379,http://0.0.0.0:4001
    listen-peer-urls: http://$private_ipv4:2380,http://$private_ipv4:7001
  fleet:
    public-ip: $public_ipv4
  flannel:
    interface: $public_ipv4
  units:
    - name: etcd2.service
      command: start
    - name: fleet.service
      command: start
    - name: docker-tcp.socket
      command: start
      enable: true
      content: |
        [Unit]
        Description=Docker Socket for the API

        [Socket]
        ListenStream=2375
        Service=docker.service
        BindIPv6Only=both
        [Install]
        WantedBy=sockets.target
Replace the text between the etcd2: and fleet: lines to look this:
  etcd2:
    name: core-01
    initial-advertise-peer-urls: http://$private_ipv4:2380
    listen-peer-urls: http://$private_ipv4:2380,http://$private_ipv4:7001
    initial-cluster-token: core-01_etcd
    initial-cluster: core-01=http://$private_ipv4:2380
    initial-cluster-state: new
    advertise-client-urls: http://$public_ipv4:2379,http://$public_ipv4:4001
    listen-client-urls: http://0.0.0.0:2379,http://0.0.0.0:4001
  fleet:
Note
You can also download the latest user-data file from https://github.com/rimusz/coreos-essentials-book/blob/master/Chapter1/user-data.
This should be enough to bootstrap a single-host CoreOS VM with etcd, fleet, and docker running there.
We will cover cloud-config, etcd and fleet in more detail in later chapters.
It's now time to boot our CoreOS VM and log in to its console using ssh.
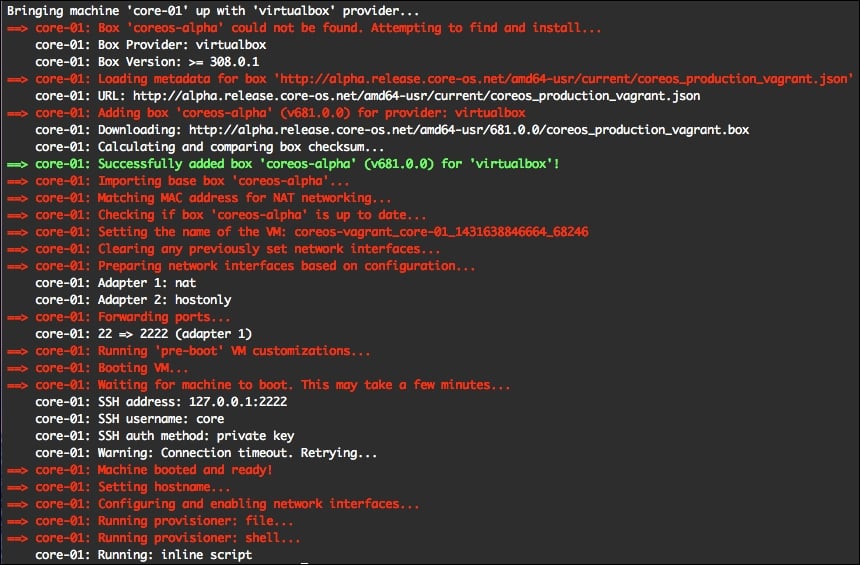
Let's boot our first CoreOS VM host. To do so, using the terminal, type the following command:
$ vagrant up
This will trigger vagrant to download the latest CoreOS alpha (this is the default channel set in the config.rb file, and it can easily be changed to beta, or stable) channel image and the lunch VM instance.
You should see something like this as the output in your terminal:
CoreOS VM has booted up, so let's open the ssh connection to our new VM using the following command:
$ vagrant ssh
It should show something like this:
CoreOS alpha (some version)
core@core-01 ~ $
Tip
Downloading the example code
You can download the example code files from your account at http://www.packtpub.com for all the Packt Publishing books you have purchased. If you purchased this book elsewhere, you can visit http://www.packtpub.com/support and register to have the files e-mailed directly to you.
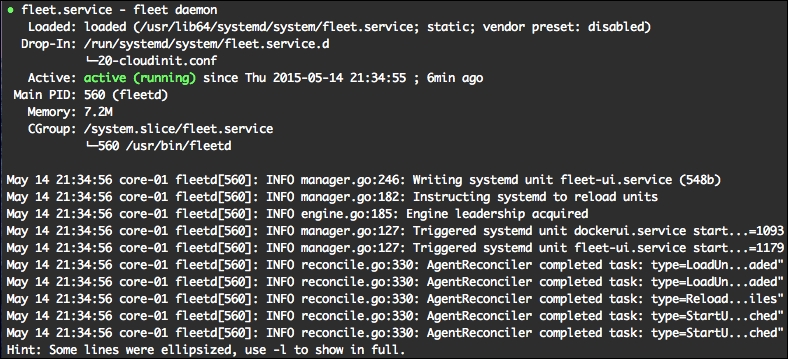
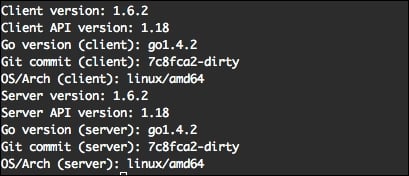
Perfect! Let's verify that etcd, fleet, and docker are running there. Here are the commands required and the corresponding screenshots of the output:
$ systemctl status etcd2

To check the status of fleet, type this:
$ systemctl status fleet
To check the status of docker, type the following command:
$ docker version
Lovely! Everything looks fine. Thus, we've got our first CoreOS VM up and running in VirtualBox.