Book Image

Railo 3 Beginner's Guide

By : Mark Drew , Gert Franz, Paul Klinkenberg, Jordan Michaels
Book Image

Railo 3 Beginner's Guide

By: Mark Drew , Gert Franz, Paul Klinkenberg, Jordan Michaels

Overview of this book

<p>Railo Server is one of the quickest ways to start developing complex web applications online. Widely considered as the fastest CFML (ColdFusion Markup Language) engine, Railo allows you to create dynamic web pages that can change depending on user input, database lookups, or even the time of day.</p> <p>Railo 3 Beginner's Guide will show you how to get up and running with Railo, as well as developing your web applications with the greatest of ease. You will learn how to install Railo and the basics of CFML to allow you to gradually build up your knowledge, and your dynamic web applications, as the book progresses.</p> <p>Using Packt’s Beginner's Guide approach, this book will guide you, with step-by-step instructions, through installing the Railo Server on various environments. You will learn how to use caches, resources, Event Gateways and special scripting functions that will allow you to create webpages with limitless functionality. You will even explore methods of extending Railo by adding your own tags to the server and building custom extensions. Railo 3 Beginner's Guide is a must for anyone getting to grips with Railo Server.</p>
Table of Contents (16 chapters)
Railo 3
Credits
About the Authors
About the Reviewers
www.PacktPub.com
Preface

Time for action - adding a site to IIS7


To add a Railo-enabled site to IIS7, just carry out the following steps:

  1. 1. Create your site in IIS. This part is no different than what you would normally do to create a site in IIS.

  2. 2. In the IIS site that you want to connect, create a virtual directory in your new site named jakarta and point it to your connector directory, which is usually at c:\railo\connector.

  3. 3. Next, go to your Start menu. Click on the Railo folder, and then click on the Tomcat Host Config link. This will open the Tomcat's server.xml file in Notepad, so you can edit it.

  4. 4. Notice the comments in the server.xml file. Add an additional Host entry to the file that states your domain name and where your files are located for that domain.

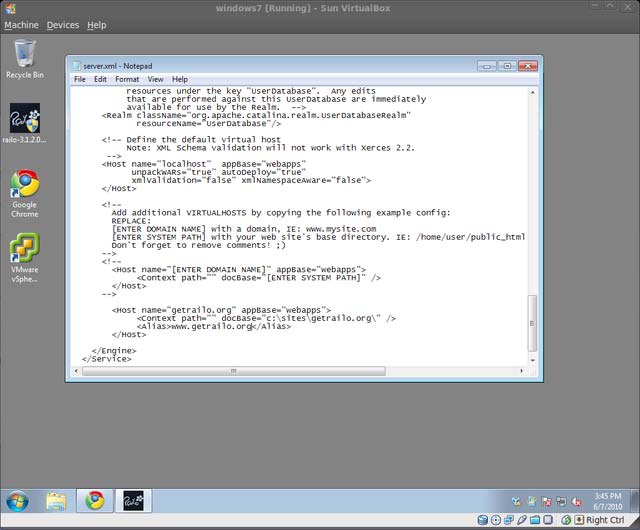
  5. 5. Now that you've set up IIS and configured your new host in Tomcat, you need to restart Tomcat for your changes to take effect. You can do this using the Tomcat Service Control option in the Railo Start menu folder.