
Network namespaces allow you to create isolated views of the network. A namespace has a unique routing table that can differ entirely from the default routing table on the host. In addition, you can map interfaces from the physical host into namespaces for use within the namespace. The behavior of network namespaces closely mimics that of Virtual Routing and Forwarding (VRF) instances, which are available in most modern networking hardware. In this recipe, we'll learn the basics of network namespaces. We'll walk through the process of creating the namespace and discuss how to use different types of interfaces within a network namespace. Finally, we'll show how to connect multiple namespaces together.
In order to view and manipulate networking settings, you'll want to ensure that you have the iproute2 toolset installed. If not present on the system, it can be installed using the following command:
sudo apt-get install iproute2
In order to make network changes to the host, you'll also need root-level access. This recipe will continue the lab topology from the previous recipe. All of the prerequisites mentioned earlier still apply.
The concept of network namespaces is best demonstrated through an example, so let's jump right back to the lab topology from the previous recipes:
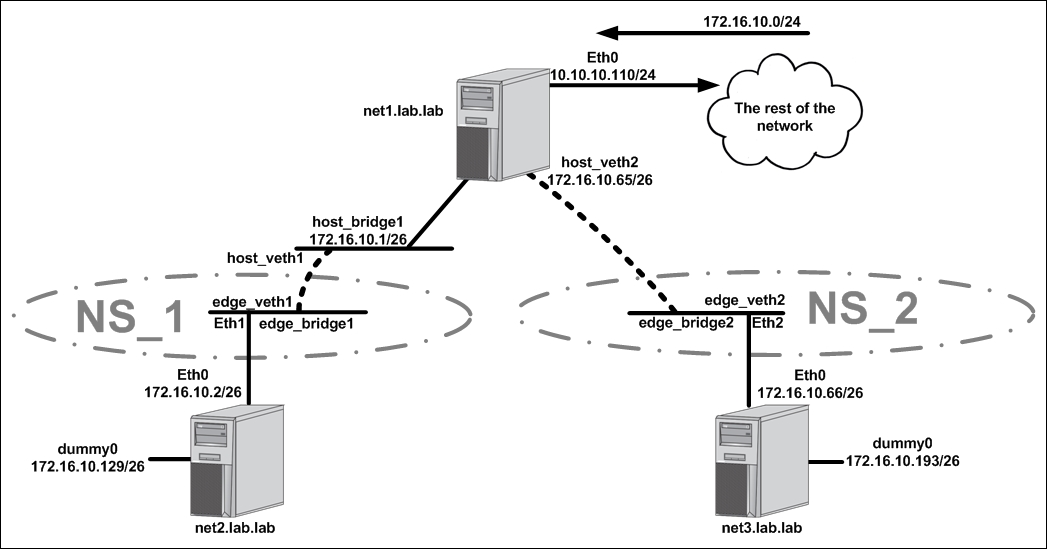
This diagram is the same topology we used in the last recipe, with one significant difference. We have the addition of two namespaces, NS_1 and NS_2. Each namespace encompasses certain interfaces on the host net1:
NS_1:
edge_bridge1eth1edge_veth1
NS_2:
edge_bridge2eth2edge_veth2
Take note of where the boundary for the namespaces falls. In either case, the boundary falls on a physical interface (the net1 host's eth1 and eth2) or directly in the middle of a VETH pair. As we'll see shortly, VETH pairs can bridge between namespaces making them an ideal tool for connecting network namespaces together.
To begin the reconfiguration, let's start by defining the namespaces, and then adding interfaces to the namespace. Defining a namespace is rather straightforward. We use the ip netns add subcommand:
user@net1:~$ sudo ip netns add ns_1
user@net1:~$ sudo ip netns add ns_2
Namespaces can then be viewed by using the ip netns list command:
user@net1:~$ ip netns list
ns_2
ns_1
user@net1:~$
Once the namespaces are created, we can allocate the specific interfaces we identified as being part of each namespace. In most cases, this means telling an existing interface which namespace it belongs to. However, not all interfaces can be moved into a network namespace. Bridges for instances can live in network namespaces but need to be instantiated from within the name space. To do this, we can use the ip netns exec subcommand to run the command from within the namespace. For instance, to create the edge bridges in each namespace, we would run these two commands:
user@net1:~$ sudo ip netns exec ns_1 ip link add \
edge_bridge1 type bridge
user@net1:~$ sudo ip netns exec ns_2 ip link add \
edge_bridge2 type bridge
Let's break that command into two pieces:
sudo ip nent exec ns_1: This tells the host you want to run a command inside a specific namespace, in this casens_1ip link add edge_bridge1 type bridge: As we saw in earlier recipes, we execute the command to build a bridge and give it a name, in this case,edge_bridge1.
Using this same syntax, we can now examine the network configuration of a specific namespace. For instance, we could look at the interfaces with sudo ip netns exec ns_1 ip link show:
user@net1:~$ sudo ip netns exec ns_1 ip link show
1: lo: <LOOPBACK> mtu 65536 qdisc noop state DOWN mode DEFAULT group default
    link/loopback 00:00:00:00:00:00 brd 00:00:00:00:00:00
2: edge_bridge1: <BROADCAST,MULTICAST> mtu 1500 qdisc noop state DOWN mode DEFAULT group default
    link/ether 26:43:4e:a6:30:91 brd ff:ff:ff:ff:ff:ff
user@net1:~$
As we expected, we see the bridge we instantiated inside the namespace. The other two interface types that the diagram shows in the namespace are of types that can be dynamically allocated into the namespace. To do that, we use the ip link set command:
user@net1:~$ sudo ip link set dev eth1 netns ns_1
user@net1:~$ sudo ip link set dev edge_veth1 netns ns_1
user@net1:~$ sudo ip link set dev eth2 netns ns_2
user@net1:~$ sudo ip link set dev edge_veth2 netns ns_2
Now if we look at the available host interfaces, we should note that the interfaces we moved no longer exist in the default namespace:
user@net1:~$ ip link show
1: lo: <LOOPBACK,UP,LOWER_UP> mtu 65536 qdisc noqueue state UNKNOWN mode DEFAULT group default
    link/loopback 00:00:00:00:00:00 brd 00:00:00:00:00:00
2: eth0: <BROADCAST,MULTICAST,UP,LOWER_UP> mtu 1500 qdisc pfifo_fast state UP mode DEFAULT group default qlen 1000
    link/ether 00:0c:29:2d:dd:79 brd ff:ff:ff:ff:ff:ff
5: host_bridge1: <NO-CARRIER,BROADCAST,MULTICAST,UP> mtu 1500 qdisc noqueue state DOWN mode DEFAULT group default
    link/ether 56:cc:26:4c:76:f6 brd ff:ff:ff:ff:ff:ff
7: edge_bridge1: <NO-CARRIER,BROADCAST,MULTICAST,UP> mtu 1500 qdisc noqueue state DOWN mode DEFAULT group default
    link/ether 00:00:00:00:00:00 brd ff:ff:ff:ff:ff:ff
8: edge_bridge2: <NO-CARRIER,BROADCAST,MULTICAST,UP> mtu 1500 qdisc noqueue state DOWN mode DEFAULT group default
    link/ether 00:00:00:00:00:00 brd ff:ff:ff:ff:ff:ff
10: host_veth1@if9: <NO-CARRIER,BROADCAST,MULTICAST,UP> mtu 1500 qdisc pfifo_fast master host_bridge1 state LOWERLAYERDOWN mode DEFAULT group default qlen 1000
    link/ether 56:cc:26:4c:76:f6 brd ff:ff:ff:ff:ff:ff
12: host_veth2@if11: <NO-CARRIER,BROADCAST,MULTICAST,UP> mtu 1500 qdisc pfifo_fast state LOWERLAYERDOWN mode DEFAULT group default qlen 1000
    link/ether 2a:8b:54:81:36:31 brd ff:ff:ff:ff:ff:ff
user@net1:~$
Note
You likely noticed that edge_bridge1 and edge_bridge2 still exist in this output since we never deleted them. This is interesting because they now also exist inside the namespaces ns_1 and ns_2. It's important to point out that since the namespaces are totally isolated even the interface names can overlap.
Now that all of the interfaces are in the right namespace, all that's left to do is to apply standard bridge mapping and turn up the interfaces. Since we had to recreate the bridge interfaces in each namespace, we'll need to reattach the interfaces to each bridge. This is done just like you would normally; we just run the command within the namespace:
user@net1:~$ sudo ip netns exec ns_1 ip link set \
dev edge_veth1 master edge_bridge1
user@net1:~$ sudo ip netns exec ns_1 ip link set \
dev eth1 master edge_bridge1
user@net1:~$ sudo ip netns exec ns_2 ip link set \
dev edge_veth2 master edge_bridge2
user@net1:~$ sudo ip netns exec ns_2 ip link set \
dev eth2 master edge_bridge2
Once we have all of the interfaces in the right namespace and attached to the right bridges, all that's left is to bring them all up:
user@net1:~$ sudo ip netns exec ns_1 ip link set edge_bridge1 up
user@net1:~$ sudo ip netns exec ns_1 ip link set edge_veth1 up
user@net1:~$ sudo ip netns exec ns_1 ip link set eth1 up
user@net1:~$ sudo ip netns exec ns_2 ip link set edge_bridge2 up
user@net1:~$ sudo ip netns exec ns_2 ip link set edge_veth2 up
user@net1:~$ sudo ip netns exec ns_2 ip link set eth2 up
After the interfaces come up, we should once again have connectivity to all of the networks attached to all three hosts.
While this example of namespaces only moved layer 2 type constructs into a namespace, they also support layer 3 routing with unique routing table instances per namespace. For instance, if we look at the routing table of one of the namespaces we'll see that it's completely empty:
user@net1:~$ sudo ip netns exec ns_1 ip route
user@net1:~$
This is because we don't have any interfaces with IP addresses defined in the namespace. This demonstrates that both layer 2 and layer 3 constructs are isolated within a namespace. That's one major area where network namespaces and VRF instances differ. VRF instances only account for layer 3 configuration, whereas network namespaces isolate both layer 2 and layer 3 constructs. We'll see an example of layer 3 isolation with network namespaces in Chapter 3, User-Defined Networks, when we discuss the process Docker uses for networking containers.