JUnit is a unit testing framework for Java. It allows developers to unit test the code elegantly. Apparently, TestNG is cleaner than JUnit, but JUnit is far more popular than TestNG. JUnit has a better mocking framework support such as Mockito, which offers a custom JUnit 4 runner.
The latest version of JUnit (4.11) can be downloaded from https://github.com/junit-team/junit/wiki/Download-and-Install.
JUnit 4 is an annotation-based, flexible framework. Its predecessor has many downsides. The following are the advantages of JUnit 4 over its predecessor:
- Instead of inheriting from
junit.framework.Testcase, any class can be a test class - The
setUp and tearDown methods are replaced by the @before and @after annotations - Any public method annotated as
@test can be a test method
In this chapter, we will use
Eclipse to execute the JUnit tests; in the following chapters, we will be using Ant, Maven, and Gradle to execute tools. Eclipse is an integrated development environment, and can be used to develop applications in Java. It can be downloaded from http://www.eclipse.org/downloads/. As of today, the latest IDE version is KEPLER (4.3).
Note
Since 2006, Eclipse releases a project annually. It started with the name Callisto (starts with a C). Lexicographically, Eclipse project names go like C, E, G, H, I, J, K, and L.
In 2014, they will release the Luna (which starts with L) version. Between 2006 and now, they released Europa (E), Ganymede (G), Galileo (G), Helios (H), Indigo (I), Juno (J), and Kepler (K).
In the following section, we will set up Eclipse and execute our first JUnit test.
You can skip this section if you know how to install Eclipse and add JUnit JAR to the classpath project. The following are the steps to set up Eclipse:
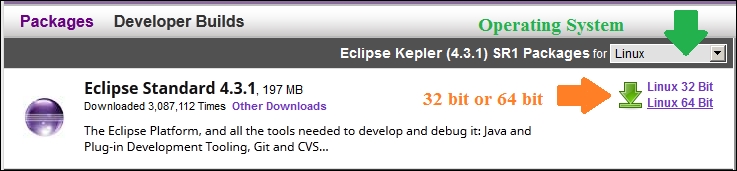
- Visit http://www.eclipse.org/downloads/. From the dropdown, select the operating system—Windows, Mac, or Linux—and then click on the hardware architecture hyperlink, that is, 32 Bit or 64 Bit, and download the binary, as shown in the following screenshot:
- Extract the binary and launch Eclipse, for example, click on
Eclipse.exe in Windows to launch Eclipse. - Create a new workspace (for example, in Windows, enter
C:\dev\junit or in Linux or Mac enter /user/local/junit; Eclipse will create the directories). Once the workspace is open, press Ctrl + N or navigate to File | New; it will open a wizard. Select Java Project and click on Next. Enter JUnitTests as the project name and click on Finish. This will create a Java project named JUnitTests. - Download the
junit.jar and hamcrest-core.jar packages from https://github.com/junit-team/junit/wiki/Download-and-Install and copy the jars to the JUnitTests project folder. - You can add the JAR to the
classpath project in two ways; either right-click on both JAR, select Build Path, and then click on Add to build path. Or, right-click on the project and select the Properties menu item. Click on Java build path on the left-hand side and open the Libraries tab. Then, click on the Add JARs... button, and it will open a pop-up window. Expand the JUnitTests project from the pop up, select the two JAR (junit.jar and hamcrest-core.jar), and add them to Libraries. We are now ready with the Eclipse setup.
Running the first unit test
JUnit 4 is an annotation-based framework. It doesn't force you to extend the TestCase class. Any Java class can act as a test. In this section, we will uncover the JUnit 4 annotations, assertions, and exceptions.
We will examine the annotations before writing our first test.
The @Test annotation represents a test. Any public method can be annotated with the@Test annotation with @Test to make it a test method. There's no need to start the method name with test.
We need data to verify a piece of code. For example, if a method takes a list of students and sorts them based on the marks obtained, then we have to build a list of students to test the method. This is called data setup. To perform the data setup, JUnit 3 defines a setUp()method in the TestCase class. A test class can override the setUp() method. The method signature is as follows:
JUnit 4 provides a @Before annotation. If we annotate any public void method of any name with
@Before, then that method gets executed before every test execution.
Similarly, any method annotated with @After gets executed after each test method execution. JUnit 3 has a tearDown() method for this purpose.
JUnit 4 provides two more annotations: @BeforeClass and
@AfterClass. They are executed only once per test class. The @BeforeClass and @AfterClass annotations can be used with any public static void methods. The @BeforeClass annotation is executed before the first test and the @AfterClass annotation is executed after the last test. The following example explains the annotation usage and the execution sequence of the annotated methods.
Let's write our first test by performing the following steps:
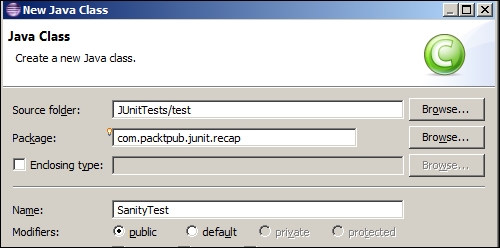
- We will create a test class under a test source package. Create a Source folder named
test and create a SanityTest.java Java class under package com.packtpub.junit.recap.It is a good practice to create test classes with a Test suffix. So, a MyClass class will have a MyClassTest test class. Some code coverage tools ignore tests if they don't end with a Test suffix.
- Add the following code to the
SanityTest class:Tip
Downloading the example code
You can download the example code files for all Packt books you have purchased from your account at http://www.packtpub.com. If you purchased this book elsewhere, you can visit http://www.packtpub.com/support and register to have the files e-mailed directly to you.
In the preceding class, we created six methods. Two test methods are annotated with @Test. Note that two methods (beforeClass and afterClass) are static and the other four are nonstatic. A static method annotated with @BeforeClass is invoked only once, that is, before the test class is instantiated, and @AfterClass is invoked after the class is done with all the execution.
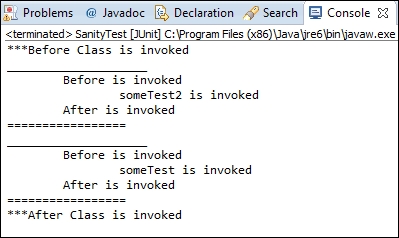
- Run the test. Press Alt + Shift + X and T or navigate to Run | Run As | JUnit Test. You will see the following console (
System.out.println) output:Check whether the before and after methods are executed before and after every test run. However, the order of the test method execution may vary. In some runs, someTest may be executed before someTest2 or vice versa. The afterClass and beforeClass methods are executed only once.
Congratulations! We successfully ran our first JUnit 4 test.
Note
@Before and @After can be applied to any public void methods. @AfterClass and @BeforeClass can be applied to only public static void methods.
Verifying test conditions with Assertion
Assertion is a tool (a predicate) used to verify a programming assumption (expectation) with an actual outcome of a program implementation; for example, a programmer can expect that the addition of two positive numbers will result in a positive number. So, he or she can write a program to add two numbers and assert the expected result with the actual result.
The org.junit.Assert package provides static overloaded methods to assert expected and actual values for all primitive types, objects, and arrays.
The following are the useful assert methods:
assertTrue(condition) or assertTrue(failure message, condition): If the condition becomes false, the assertion fails and AssertionError is thrown. When a failure message is passed, the failure message is thrown.assertFalse(condition) or assertFalse(failure message, condition): If the condition becomes true, the assertion fails and AssertionError is thrown.assertNull: This checks whether the object is null, otherwise throws AssertionError if the argument is not null.assertNotNull: This checks whether the argument is not null; otherwise, it throws AssertionError.assertEquals(string message, object expected, object actual), or assertEquals(object expected, object actual), or assertEquals(primitive expected, primitive actual): This method exhibits an interesting behavior if primitive values are passed and then the values are compared. If objects are passed, then the equals() method is invoked. Moreover, if the actual value doesn't match the expected value, AssertionError is thrown.assertSame(object expected, object actual): This supports only objects and checks the object reference using the == operator. If two different objects are passed, then AssertionError is thrown.assertNotSame: This is just the opposite of assertSame. It fails when the two argument references are the same.Note
Sometimes double can lead to surprising results due to the representation that Java uses to store doubles. Any operation on a double value can lead to an unexpected result. Assert doesn't rely on double comparison; so, assertEquals(double expected, double actual) is deprecated.
Declare a double variable sum = .999+ .98. The sum variable should add the values and store 1.98, but when you print the value in your machine, you will get 1.9889999999999999 as the output. So, if you assert sum with a double value 1.98, the test will fail.
The assert method provides an overloaded method for the double value assertion, that is, assertEquals(double expected, double actual, double delta). During comparison, if the difference between the expected and the actual value is less than the delta value, the result is considered passed.
For monetary calculations, it is recommended to use BigDecimal instead of doubles.
We will use the assert methods in the test as follows:
- Create a
AssertTest test class under com.packtpub.junit.recap. Add the following lines to the class:In the preceding code, assertTrueAndFalseTest sends true to assertTrue and false to assertFalse. So, the test should not fail.
In assertNullAndNotNullTest, we are passing null to assertNull and a non-null String to assertNotNull; so, this test should not fail.
Run the tests. They should be green.
- We will examine
assertEquals and add the following test and static import the assertEquals method:In the preceding code, we defined two Integer objects, i and j, and they are initialized with 5. Now, when we pass them to assertEquals, the test passes, as the assertEquals method calls i.equals(j) and not i == j. Hence, only the values are compared, not the references.
The assertEquals method works on all primitive types and objects. To verify a double value, either use the overloaded assertEquals(actual, expected, delta) method or just use BigDecimal instead of using Double.
- Add a test to verify the
assertNotSame behavior and static import the assertNotSame method:The assertNotSame method fails only when the expected object and the actual object refers to the same memory location. Here, i and j hold the same value but the memory references are different.
- Add a test to verify the
assertSame behavior and static import the assertSame method:The assertSame method passes only when the expected object and the actual object refer to the same memory location. Here, i and j hold the same value and refer to the same location.
Working with exception handling
To test an error condition, exception handling feature is important. For example, an API needs three objects; if any argument is null, then the API should throw an exception. This can be easily tested. If the API doesn't throw an exception, the test will fail.
The @Test annotation takes the expected=<<Exception class name>>.class argument.
If the expected exception class doesn't match the exception thrown from the code, the test fails. Consider the following code:
This is only one solution. There are several other methods that are generally considered to be better solutions. Utilizing @Rule in JUnit 4.8+ and assigning ExpectedException is a stronger solution because you can inspect the message as well as the type. We have covered @Rule in the Working with JUnit 4++ section of this chapter.
Exploring the @RunWith annotation
Test runners execute the JUnit tests. Eclipse has a built-in native graphical runner. JUnit 4 provides tools to define the suite to be run and to display its results.
When a class is annotated with @RunWith or the class extends a class annotated with @RunWith, JUnit will invoke the class that it references to run the tests on that class, instead of using the built-in runner. The @RunWith annotation is used to change the nature of the test class. It can be used to run a test as a parameterized test or even a Spring test, or it can be a Mockito runner to initialize the mock objects annotated with a @Mock annotation.
The @RunWith annotation takes an argument. The argument must be a class extended from org.junit.runner.Runner.
JUnit4.class is an example of a runner. This class aliases the current default JUnit 4 class runner.
Suite is a standard runner that allows us to build a suite that contains tests from many packages. The following is an example of @RunWith:


 Free Chapter