

We need to create a simple web application project using Maven.
Execute the following command in your Maven command prompt:
mvn archetype:generate -DgroupId=com.packtpub.spring -DartifactId=spring-mongo -DarchetypeArtifactId=maven-archetype-webappCreate a simple Maven project with a web application archetype. Add the latest
4.0.2.RELEASEspring dependency.The following is an extract from the
pom.xmlfile. These are the mandatory dependencies to be added to thepom.xmlfile.<!-- Spring dependencies --> <dependency> <groupId>org.mongodb</groupId> <artifactId>mongo-java-driver</artifactId> <version>2.9.1</version> </dependency> <dependency> <groupId>org.springframework.data</groupId> <artifactId>spring-data-mongodb</artifactId> <version>1.2.0.RELEASE</version> </dependency> <dependency> <groupId>org.springframework.data</groupId> <artifactId>spring-data-mongodb</artifactId> <version>1.2.0.RELEASE</version> </dependency> <dependency> <groupId>org.springframework</groupId> <artifactId>spring-core</artifactId> <version>${spring.version}</}</version> <scope>runtime</scope> </dependency> <dependency> <groupId>org.springframework</groupId> <artifactId>spring-context</artifactId> <version>4.0.2.RELEASE </version> <scope>runtime</scope> </dependency> <dependency> <groupId>org.springframework</groupId> <artifactId>spring-context-support</artifactId> <version>4.0.2.RELEASE </version> <scope>runtime</scope> </dependency> <dependency> <groupId>org.springframework</groupId> <artifactId>spring-beans</artifactId> <version>4.0.2.RELEASE </version> <scope>runtime</scope> </dependency> <dependency> <groupId>org.springframework</groupId> <artifactId>spring-web</artifactId> <version>4.0.2.RELEASE </version> <scope>runtime</scope> </dependency> <dependency> <groupId>org.springframework</groupId> <artifactId>spring-webmvc</artifactId> <version>4.0.2.RELEASE </version> <scope>runtime</scope> </dependency>
The following table contains the classes used to develop a simple CRUD application. The request flows from controller to model and back. The Repository classes are marked with the @Repository annotation and connect to MongoDB using the mongoTemplate class.
|
Controller |
Model |
JSP |
Bean |
|---|---|---|---|
|
|
|
|
|
|
|
|
|
|
|
|
|
|
|
The following are the steps are for the implementation of the Spring4MongoDB_Chapter1 application:
Create a web-based Maven project with the name
Spring4MongoDB_Chapter1.Import the project into Eclipse for the implementation. I have used Eclipse Juno.
We need to create the controller to map the requests.
The controller request is mapped to the GET and POST methods, as shown in the following table:
|
Request |
Request Method |
Model Attributes |
|---|---|---|
|
|
|
|
|
|
|
|
|
|
|
|
|
|
|
|
|
|
|
|
|
|
|
|
Following is the implementation of ProductController.java. We have used the @Controller annotation to indicate that the ProductController.java class is a controller class. The @Autowired annotation ties the ProductRepository class with the ProductController.java file.
The property
productList is a list of type Product that holds the products that are to be displayed on screen. The @PostConstruct annotation will call the method decorated by it. Once the constructor of the class is called and all properties are set, and before any business methods are called, it's worthy to note as it's only called once.
@Controller
public class ProductController {
  @Autowired
  private ProductRepository respository;
  private List <Product>productList;
  public ProductController() {
    super();
  }
  @PostConstruct
  public void init(){
    this.productList=respository.getAllObjects();
  }
  //to get the list of products
  @RequestMapping(value="/product", method = RequestMethod.GET)
  public String getaddproduct(Model model) {
    model.addAttribute("productList", productList);
    model.addAttribute("productAttribute", new Product());
    return "product";
  }
  //to save the product
  @RequestMapping(value="/product/save", method = RequestMethod.POST)
  public String addproduct(@ModelAttribute Product prod,Model model) {
    if(StringUtils.hasText(prod.getProdid())) {
      respository.updateObject(prod);
    } else {
      respository.saveObject(prod);
    }
    this.productList=respository.getAllObjects();
    model.addAttribute("productList", productList);
    return "product";
  }
  //to update the edited product
  @RequestMapping(value="/product/update", method = RequestMethod.POST)
  public String updatecustomer(@ModelAttribute Product prod,Model model) {
    respository.updateObject(prod);
    this.productList=respository.getAllObjects();
    model.addAttribute("productList", productList);
    return "product";
  }
  //to edit a product based on ID
  @RequestMapping(value = "/product/geteditproduct", method = RequestMethod.GET)
  public String geteditproduct(
  @RequestParam(value = "prodid", required = true) String prodid,
  Model model) {
    model.addAttribute("productList", productList);
    model.addAttribute("productAttribute", respository.getObject(prodid));
    return "editproduct";
  }
  //to delete a product based on ID
  @RequestMapping(value="/product/deleteproduct", method = RequestMethod.GET)
  public String deleteproduct(
  @RequestParam(value = "prodid", required = true) String prodid,Model model) {
    respository.deleteObject(prodid);
    this.productList=respository.getAllObjects();
    model.addAttribute("productList", this.productList);
    return "product";
  }
  //to get all the products
  @RequestMapping(value = "/product/getallproducts", method = RequestMethod.GET)
  public String getallproducts(Model model) {
    this.productList=respository.getAllObjects();
    model.addAttribute("productList", this.productList);
    return "allproducts";
  }
}
The Product.java file has an @Document annotation and an @ID annotation, which is identified as a MongoDB collection that maps the Product entity to product collection in MongoDB.
@Document
public class Product {
  /*Bean class product with getter and setters*/
  @Id
  private String prodid;
  private Double price;
  private String name;
  public Product() {
    super();
  }
  public String getProdid() {
    return prodid;
  }
  public void setProdid(String prod_id) {
    this.prodid = prod_id;
  }
  public Double getPrice() {
    return price;
  }
  public void setPrice(Double price) {
    this.price = price;
  }
  public String getName() {
    return name;
  }
  public void setName(String name) {
    this.name = name;
  }
}
The ProducRepository.java file has @Repository annotation. This is the persistence layer, and tells spring that this class performs operations on the database. The connection to Mongo is set up in Mongo template.
ProductRepository.java
@Repository
public class ProductRepository {
@Autowired
MongoTemplate mongoTemplate;
public void setMongoTemplate(MongoTemplate mongoTemplate) {
this.mongoTemplate = mongoTemplate;
}
public List<Product> getAllObjects() {
return mongoTemplate.findAll(Product.class);
}
/**
* Saves a {@link Product}.
*/
public void saveObject(Product Product) {
Product.setProdid(UUID.randomUUID().toString());
mongoTemplate.insert(Product);
}
/**
* Gets a {@link Product} for a particular id.
*/
public Product getObject(String id) {
return mongoTemplate.findOne(new Query(Criteria.where("_id").is(id)),
Product.class);
}
/**
* Updates a {@link Product} name for a particular id.
*/
public void updateObject(Product object) {
Query query = new Query();
query.addCriteria(Criteria.where("_id").is(object.getProdid()));
Product prod_tempObj = mongoTemplate.findOne(query, Product.class);
System.out.println("cust_tempObj - " + prod_tempObj);
//modify and update with save()
prod_tempObj.setName(object.getName());
prod_tempObj.setPrice(object.getPrice());
mongoTemplate.save(prod_tempObj);
}
/**
* Delete a {@link Product} for a particular id.
*/
public void deleteObject(String id) {
mongoTemplate.remove(new Query(Criteria.where("_id").is(id)),Product.class);
}
/**
* Create a {@link Product} collection if the collection does not already
* exists
*/
public void createCollection() {
if (!mongoTemplate.collectionExists(Product.class)) {
mongoTemplate.createCollection(Product.class);
}
}
/**
* Drops the {@link Product} collection if the collection does already exists
*/
public void dropCollection() {
if (mongoTemplate.collectionExists(Product.class)) {
mongoTemplate.dropCollection(Product.class);
}
}
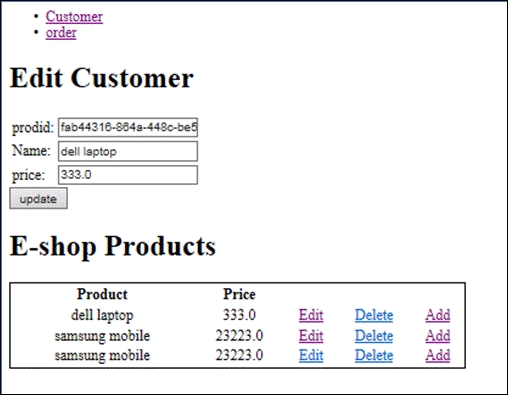
}The .jsp file displays the products available and allows the user to perform CRUD operations on the
Product bean. The following screenshot is the output of editing product information using the product ObjectId stored in MongoDB.
Product.jsp file
This file serves as a view layer to the user. This has the product creation form and includes a file that lists all the products stored in MongoDB.
<%@ taglib uri="http://java.sun.com/jsp/jstl/core" prefix="c" %>
<%@ taglib uri="http://www.springframework.org/tags/form" prefix="form" %>
<%@ page language="java" contentType="text/html; charset=UTF-8"
pageEncoding="UTF-8"%>
<!DOCTYPE html PUBLIC "-//W3C//DTD HTML 4.01 Transitional//EN" "http://www.w3.org/TR/html4/loose.dtd">
<html>
<head>
<meta http-equiv="Content-Type" content="text/html; charset=UTF-8">
<title>Register Product</title>
</head>
<body>
<h1>Register Product</h1>
<ul>
<li><a href="/Spring4MongoDB_Chapter1/customer">Customer</a>
</li>
<li>r<a href="/Spring4MongoDB_Chapter1/order">Product</a>
</li></ul>
<form method="post" action="/Spring4MongoDB_Chapter1/product/save">
<table>
<tr>
<td> Name:</td>
<td><input type=text name="name"/></td>
</tr>
<tr>
<td>Price</td>
<td><input type=text name="price"/></td>
</tr>
</table>
<input type="hidden" name="prod_id" >
<input type="submit" value="Save" />
</form>
<%@ include file="allproducts.jsp" %>
</body>
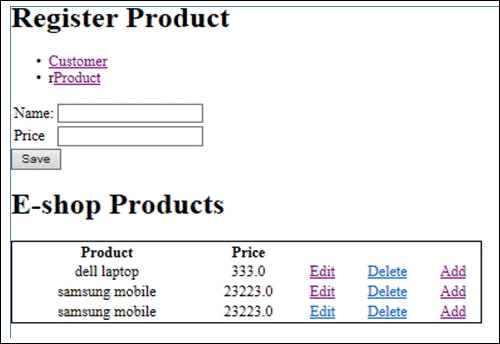
</html>If all goes well, you should see the following screen, where you can play around with products. The following screenshot is the output of the Register Product and list Product functionality using Spring and MongoDB.
The following dispatcher-servlet.xml file shows the configuration for component scan and MongoDB template. It also shows the MongoDB database name configuration.
dispatcher-servlet.xml
<?xml version="1.0" encoding="UTF-8"?>
<beans xmlns="http://www.springframework.org/schema/beans"
  xmlns:xsi="http://www.w3.org/2001/XMLSchema-instance"
  xmlns:context="http://www.springframework.org/schema/context"
  xmlns:mongo="http://www.springframework.org/schema/data/mongo"
  xmlns:p="http://www.springframework.org/schema/p"
  xsi:schemaLocation="http://www.springframework.org/schema/beans
  http://www.springframework.org/schema/beans/spring-beans-4.0.xsd
  http://www.springframework.org/schema/data/mongo
  http://www.springframework.org/schema/data/mongo/spring-mongo-1.0.xsd

  http://www.springframework.org/schema/context
  http://www.springframework.org/schema/context/spring-context-4.0.xsd">

  <context:component-scan base-package="com.packt" />

  <!-- Factory bean that creates the Mongo instance -->
    <bean id="mongo" class="org.springframework.data.mongodb.core.MongoFactoryBean">
      <property name="host" value="localhost" />
    </bean>
    <mongo:mongo host="127.0.0.1" port="27017" />
    <mongo:db-factory dbname="eshopdb" />

  <bean id="mongoTemplate" class="org.springframework.data.mongodb.core.MongoTemplate">
    <constructor-arg name="mongoDbFactory" ref="mongoDbFactory" />
  </bean>

  <!-- Use this post processor to translate any MongoExceptions thrown in @Repository annotated classes -->
    <bean class="org.springframework.dao.annotation.PersistenceExceptionTranslationPostProcessor" />
    <bean id="jspViewResolver" class="org.springframework.web.servlet.view.InternalResourceViewResolver"
      p:prefix="/WEB-INF/myviews/"
      p:suffix=".jsp" />

</beans>
You can see that the mongoDbFactory bean has been configured with MongoDB database details. You will also observe that mongoTemplate has also been configured. The property of the mongoTemplate bean is mongoDbFactory bean, and so when the template is called the connection gets established.
Just run the following commands in the MongoDB database in order to test the Order use case: