
The instructions are for Windows users. Note that to run Spark Version 2 and above, Java Version 8 and above, Scala Version 2.11, Simple Build Tool (SBT) version that is at least 0.13.8 is a prerequisite. The code for the Iris project depends on Spark 2.3.1, the latest distribution at the time of writing this chapter. This version was released on December 1, 2017. Implementations in subsequent chapters would likely be based on Spark 2.3.0, released February 28, 2017. Spark 2.3.0 is a major update version that comes with fixes to over 1,400 tickets.
The Spark 2.0 brought with it a raft of improvements. The introduction of the dataframe as the fundamental abstraction of data is one such improvement. Readers will find that the dataframe abstraction and its supporting APIs enhance their data science and analysis tasks, not to mention this powerful feature's improved performance over Resilient Distributed Datasets (RDDs). Support for RDDs is very much available in the latest Spark release as well.
A note on hardware before jumping to prerequisites. The hardware infrastructure I use throughout in this chapter comprises of a 64-bit Windows Dell 8700 machine running Windows 10 with Intel(R) Core(TM) i7-4770 CPU @ 3.40 GHz and an installed memory of 32 GB.
In this subsection, we document three software prerequisites that must be in place before installing Spark.
Note
At the time of this writing, my prerequisite software setup consisted of JDK 8, Scala 2.11.12, and SBT 0.13.8, respectively. The following list is a minimal, recommended setup (note that you are free to try a higher JDK 8 version and Scala 2.12.x).
Here is the required prerequisite list for this chapter:
- Java SE Development Kit 8
- Scala 2.11.12
- SBT 0.13.8 or above
If you are like me, dedicating an entire box with the sole ambition of evolving your own Spark big data ecosystem is not a bad idea. With that in mind, start with an appropriate machine (with ample space and at least 8 GB of memory), running your preferred OS, and install the preceding mentioned prerequisites listed in order. What about lower versions of the JDK, you may ask? Indeed, lower versions of the JDK are not compatible with Spark 2.3.1.
Note
While I will not go into the JDK installation process here, here are a couple of notes. Download Java 8 (http://www.oracle.com/technetwork/java/javase/downloads/jdk8-downloads-2133151.html) and once the installer is done installing the Java folder, do not forget to set up two new system environment variables—the JAVA_HOME environment variable pointing to the root folder of your Java installation, and the JAVA_HOME/bin in your system path environment variable.
After setting the system JAVA_HOME environment, here is how to do a quick sanity check by listing the value of JAVA_HOME on the command line:
C:\Users\Ilango\Documents\Packt-Book-Writing-Project\DevProjects\Chapter1>echo %JAVA_HOME%
C:\Program Files\Java\jdk1.8.0_102
Now what remains is to do another quick check to be certain you installed the JDK flawlessly. Issue the following commands on your command line or Terminal.
Note that this screen only represents the Windows command line:
C:\Users\Ilango\Documents\Packt\DevProjects\Chapter1>java -version
java version "1.8.0_131"
Java(TM) SE Runtime Environment (build 1.8.0_131-b11)
Java HotSpot(TM) 64-Bit Server VM (build 25.131-b11, mixed mode)

C:\Users\Ilango\Documents\Packt\DevProjects\Chapter1>javac -version
javac 1.8.0_102
At this point, if your sanity checks passed, the next step is to install Scala. The following brief steps outline that process. The Scala download page at https://archive.ics.uci.edu/ml/datasets/iris documents many ways to install Scala (for different OS environments). However, we only list three methods to install Scala.
Note
Before diving into the Scala installation, a quick note here. While the latest stable version of Scala is 2.12.4, I prefer a slightly older version, version 2.11.12, which is the version I will use in this chapter. You may download it athttp://scala-lang.org/download/2.11.12.html. Whether you prefer version 2.12 or 2.11, the choice is yours to make, as long as the version is not anything below 2.11.x. The following installation methods listed will get you started down that path.
Scala can be installed through the following methods:
- Install Scala: Locate the section titled
Other ways to install Scalaat http://scala-lang.org/download/ and download the Scala binaries from there. Then you can install Scala by following the instructions at http://scala-lang.org/download/install.html. Install SBT from https://www.scala-sbt.org/download.htmland follow the setup instructions at https://www.scala-sbt.org/1.0/docs/Setup.html. - Scala in the IntelliJ IDE: Instructions are given at https://docs.scala-lang.org/getting-started-intellij-track/getting-started-with-scala-in-intellij.html.
- Scala in the IntelliJ IDE with SBT: This is another handy way to play with Scala. Instructions are given at https://docs.scala-lang.org/getting-started-intellij-track/getting-started-with-scala-in-intellij.html.
Note
The acronym SBT that just appeared in the preceding list is short for Simple Build Tool. Indeed, you will run into references to SBT fairly often throughout this book.
Take up the item from the first method of the preceding list and work through the (mostly self-explanatory) instructions. Finally, if you forgot to set environment variables, do set up a brand new SCALA_HOME system environment variable (like JAVA_HOME), or simply update an existing SCALA_HOME. Naturally, the SCALA_HOME/bin entry is added to the path environment variable.
Note
You do not necessarily need Scala installed system-wide. The SBT environment gives us access to its own Scala environment anyway. However, having a system-wide Scala installation allows you to quickly implement Scala code rather than spinning up an entire SBT project.
Let us review what we have accomplished so far. We installed Scala by working through the first method Scala installation.
To confirm that we did install Scala, let's run a basic test:
C:\Users\Ilango\Documents\Packt\DevProjects\Chapter1>scala -version
Scala code runner version 2.11.12 -- Copyright 2002-2017, LAMP/EPFL
The preceding code listing confirms that our most basic Scala installation went off without a hitch. This paves the way for a system-wide SBT installation. Once again, it comes down to setting up the SBT_HOME system environment variable and setting $SBT_HOME/bin in the path. This is the most fundamental bridge to cross. Next, let's run a sanity check to verify that SBT is all set up. Open up a command-line window or Terminal. We installed SBT 0.13.17, as shown in the following code:
C:\Users\Ilango\Documents\Packt\DevProjects\Chapter1>sbt sbtVersion
Java HotSpot(TM) 64-Bit Server VM warning: ignoring option MaxPermSize=256m; support was removed in 8.0
[info] Loading project definition from C:\Users\Ilango\Documents\Packt\DevProjects\Chapter1\project
[info] Set current project to Chapter1 (in build file:/C:/Users/Ilango/Documents/Packt/DevProjects/Chapter1/)
[info] 0.13.17
We are left with method two and method three. These are left as an exercise for the reader. Method three will let us take advantage of all the nice features that an IDE like IntelliJ has.
Shortly, the approach we will take in developing our pipeline involves taking an existing SBT project and importing it into IntelliJ, or we just create the SBT project in IntelliJ.
What's next? The Spark installation of course. Read all about it in the upcoming section.
In this section, we set up a Spark development environment in standalone deploy mode. To get started with Spark and start developing quickly, Spark's shell is the way to go.
The Spark binary download offers developers two components:
- The Spark's shell
- A standalone cluster
Once the binary is downloaded and extracted (instructions will follow), the Spark shell and standalone Scala application will let you spin up a standalone cluster in standalone cluster mode.
This cluster is self-contained and private because it is local to one machine. The Spark shell allows you to easily configure this standalone cluster. Not only does it give you quick access to an interactive Scala shell, but also lets you develop a Spark application that you can deploy into the cluster (lending it the name standalone deploy mode), right in the Scala shell.
In this mode, the cluster's driver node and worker nodes reside on the same machine, not to mention the fact that our Spark application will take up all the cores available on that machine by default. The important feature of this mode that makes all this possible is the interactive (Spark) Scala shell.
Note
Spark 2.3 is the latest version. It comes with over 1,400 fixes. A Spark 2.3 installation on Java 8 might be the first thing to do before we get started on our next project in Chapter 2, Build a Breast Cancer Prognosis Pipeline with the Power of Spark and Scala.
Without further ado, let's get started setting up Spark in standalone deploy mode. The following sequence of instructions are helpful:
- System checks: First make sure you have at least 8 GB of memory, leaving at least 75% of this memory for Spark. Mine has 32 GB. Once the system checks pass, download the Spark 2.3.1 binary from here: http://spark.apache.org/downloads.html.
- You will need a decompression utility capable of extracting the
.tar.gzand.gzarchives because Windows does not have native support for these archives. 7-Zip is a suitable program for this. You can obtain it from http://7-zip.org/download.html. - Choose the package type prebuilt for Apache Hadoop 2.7 and later and download
spark--2.2.1-bin-hadoop2.7.tgz. - Extract the package to someplace convenient, which will become your Spark root folder. For example, my Spark root folder is:
C:\spark-2.2.1-bin-hadoop2.7. - Now, set up the environment variable,
SPARK_HOMEpointing to the Spark root folder. We would also need a path entry in thePATHvariable to point toSPARK_HOME/bin. - Next, set up the environment variable,
HADOOP_HOME, to, say,C:\Hadoop, and create a new path entry for Spark by pointing it to thebinfolder of the Spark home directory. Now, launchspark-shelllike this:
spark-shell --master local[2]What happens next might frustrate Windows users. If you are one of those users, you will run into the following error. The following screenshot is a representation of this problem:

Error message on Windows
To get around this issue, you may proceed with the following steps:
- Create a new folder as
C\tmp\hive. - Then get the missing
WINUTILS.exebinary from here: https://github.com/steveloughran/winutils. Drop this intoC\Hadoop\bin.
The preceding step 2 is necessary because the Spark download does not contain the WINUTILS.exe that is required to run Hadoop. That, then, is the source of the java.io.IOException.
With that knowledge, open up the Command Prompt window in administrator mode and execute the newly downloaded WINUTILS.EXE like this:
winutils.exe chmod -R 777 C:\tmp\hiveNext, issue the spark-shell command. This time around, Spark's interactive development environment launches normally, spinning up its own SparkContext instance sc and a SparkSession spark session, respectively. While the sc feature is a powerful entry point to the underlying local standalone cluster, spark is the main entry point to Spark's data processing APIs.
The following is the output from the spark-shell command.SparkContext is made available to you as sc and the Spark session is available to you as spark:
C:\Users\Ilango\Documents\Packt\DevProjects\Chapter1>spark-shell --master local[2]
Spark context Web UI available at http://192.168.56.1:4040
Spark context available as 'sc' (master = local[2], app id = local-1520484594646).
Spark session available as 'spark'.
Welcome to
 ____ __
 / __/__ ___ _____/ /__
 _\ \/ _ \/ _ `/ __/ '_/
 /___/ .__/\_,_/_/ /_/\_\ version 2.2.1
/_/
Using Scala version 2.11.8 (Java HotSpot(TM) 64-Bit Server VM, Java 1.8.0_102)
Type in expressions to have them evaluated.
Type :help for more information.
scala>
The local[2] option in the spark-shell launch shown earlier lets us run Spark locally with 2 threads.
Before diving into the next topic in this section, it is a good idea to understand the following Spark shell development environment features that make development and data analysis possible:
SparkSessionSparkBuilderSparkContextSparkConf
TheSparkSession API (https://spark.apache.org/docs/2.2.1/api/scala/index.html#org.apache.spark.sql.SparkSession) describes SparkSession as a programmatic access entry point to Spark's dataset and dataframe APIs, respectively.
What is SparkBuilder? The SparkBuilder companion object contains a builder method, which, when invoked, allows us to retrieve an existing SparkSession or even create one. We will now obtain our SparkSession instance in a two-step process, as follows:
- Import the
SparkSessionclass. - Invoke the
buildermethod withgetOrCreateon the resultingbuilder:
scala> import org.apache.spark.sql.SparkSession
import org.apache.spark.sql.SparkSession

scala> lazy val session: SparkSession = SparkSession.builder().getOrCreate()
res7: org.apache.spark.sql.SparkSession = org.apache.spark.sql.SparkSession@6f68756d
The SparkContext API (https://spark.apache.org/docs/2.2.1/api/scala/index.html#org.apache.spark.SparkContext) describes SparkContext as a first-line entry point for setting or configuring Spark cluster properties (RDDs, accumulators, broadcast variables, and much more) affecting the cluster's functionality. One way this configuration happens is by passing in a SparkConf instance as a SparkContext constructor parameter. One SparkContext exists per JVM instance.
In a sense, SparkContext is also how a Spark driver application connects to a cluster through, for example, Hadoop's Yarn ResourceManager (RM).
Let's inspect our Spark environment now. We will start by launching the Spark shell. That said, a typical Spark shell interactive environment screen has its own SparkSession available as spark, whose value we try to read off in the code block as follows:
scala> spark
res21: org.apache.spark.sql.SparkSession = org.apache.spark.sql.SparkSession@6f68756d
The Spark shell also boasts of its own SparkContext instance sc, which is associated with SparkSession spark. In the following code, sc returns SparkContext:
scala> sc
res5: org.apache.spark.SparkContext = org.apache.spark.SparkContext@553ce348
sc can do more. In the following code, invoking the version method on sc gives us the version of Spark running in our cluster:
scala> sc.version
res2: String = 2.2.1
scala> spark
res3: org.apache.spark.sql.SparkSession = org.apache.spark.sql.SparkSession@6f68756d
Since sc represents a connection to the Spark cluster, it holds a special object called SparkConf, holding cluster configuration properties in an Array. Invoking the getConf method on the SparkContext yields SparkConf, whose getAll method (shown as follows) yields an Array of cluster (or connection) properties, as shown in the following code:
scala> sc.getConf.getAll
res17: Array[(String, String)] = Array((spark.driver.port,51576), (spark.debug.maxToStringFields,25), (spark.jars,""), (spark.repl.class.outputDir,C:\Users\Ilango\AppData\Local\Temp\spark-47fee33b-4c60-49d0-93aa-3e3242bee7a3\repl-e5a1acbd-6eb9-4183-8c10-656ac22f71c2), (spark.executor.id,driver), (spark.submit.deployMode,client), (spark.driver.host,192.168.56.1), (spark.app.id,local-1520484594646), (spark.master,local[2]), (spark.home,C:\spark-2.2.1-bin-hadoop2.7\bin\..))
Note
There may be references to sqlContext and sqlContext.implicits._ in the Spark shell. What is sqlContext? As of Spark 2 and the preceding versions, sqlContext is deprecated and SparkSession.builder is used instead to return a SparkSession instance, which we reiterate is the entry point to programming Spark with the dataset and dataframe API. Hence, we are going to ignore those sqlContext instances and focus onSparkSession instead.
Note that spark.app.name bears the default name spark-shell. Let's assign a different name to the app-name property as Iris-Pipeline. We do this by invoking the setAppName method and passing to it the new app name, as follows:
scala> sc.getConf.setAppName("Iris-Pipeline")
res22: org.apache.spark.SparkConf = org.apache.spark.SparkConf@e8ce5b1
To check if the configuration change took effect, let's invoke the getAll method again. The following output should reflect that change. It simply illustrates how SparkContext can be used to modify our cluster environment:
scala> sc.conf.getAll
res20: Array[(String, String)] = Array((spark.driver.port,51576), (spark.app.name,Spark shell), (spark.sql.catalogImplementation,hive), (spark.repl.class.uri,spark://192.168.56.1:51576/classes), (spark.debug.maxToStringFields,150), (spark.jars,""), (spark.repl.class.outputDir,C:\Users\Ilango\AppData\Local\Temp\spark-47fee33b-4c60-49d0-93aa-3e3242bee7a3\repl-e5a1acbd-6eb9-4183-8c10-656ac22f71c2), (spark.executor.id,driver), (spark.submit.deployMode,client), (spark.driver.host,192.168.56.1), (spark.app.id,local-1520484594646), (spark.master,local[2]), (spark.home,C:\spark-2.2.1-bin-hadoop2.7\bin\..))
The spark.app.name property just had its value updated to the new name. Our goal in the next section is to use spark-shell to analyze data in an interactive fashion.
We will develop a simple Scala program in the Spark shell's interactive Scala shell. We will restate our goal, which is that we want to be able to analyze data interactively. That dataset—an externalcomma-separated values (CSV) file called iris.csv—resides in the same folder where spark-shell is launched from.
This program, which could just as well be written in a regular Scala Read Eval Print Loop (REPL) shell, reads a file, and prints out its contents, getting a data analysis task done. However, what is important here is that the Spark shell is flexible in that it also allows you to write Scala code that will allow you to easily connect your data with various Spark APIs and derive abstractions, such as dataframes or RDDs, in some useful way. More about DataFrame and Dataset to follow:
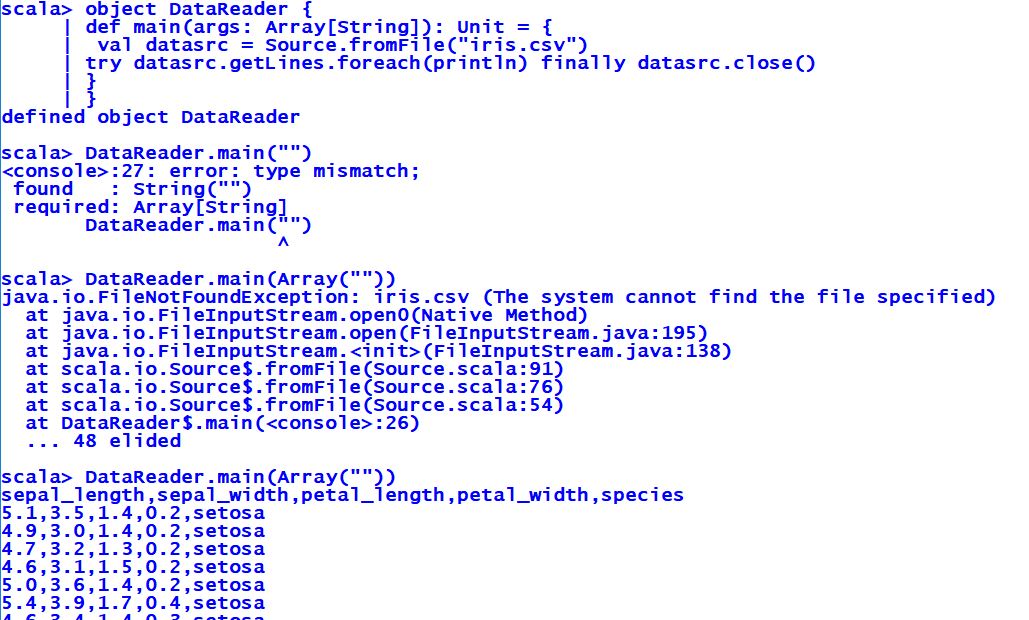
Reading iris.csv with source
In the preceding program, nothing fancy is happening. We are trying to read a file called iris.csv using the Source class. We import the Source.scala file from the scala.io package and from there on, we create an object called DataReader and a main method inside it. Inside the main method, we invoke the fromFile method of the companion object Source. The fromFile method takes in a string representation of the dataset file path as an argument and returns a BufferedSource instance, which we assign to a val that we name datasrc. By the way, the API for Source can be found at https://www.scala-lang.org/api/current/scala/io/Source.html.
On the BufferedSource handle, we then invoke the getLines method that returns an iterator, which in turn invokes foreach that will print out all the lines in iris.csv minus the newline characters. We wrap all of this code in a try and a catch and a finally. The finally construct exists for a reason and that has to do with the fact that we need to close the BufferedSource instance datasrc after it is done working on the file.
Initially, we ran into a FileNotFoundException because the dataset file iris.csv was not found. The CSV file is then dropped in, the program is run, and the output is what we expect.
That wasn't so hard. In the next subsection, the goal is to read our iris.csv file and derive Dataset or DataFrame out of it.
The Spark API for https://spark.apache.org/docs/2.2.1/api/scala/index.html#org.apache.spark.sql.Dataset has it that a DataFrame is Dataset[Row] and that Dataset contains a view called DataFrame. Falling back to the description of Dataset in the Spark documentation, we can redefine Dataset as a Spark abstraction of distributed collections holding data items. That said, Dataset[Row] contains rows. Row could be an abstraction representing a row from the raw file dataset.
We need to read the iris.csv file and transform it into DataFrame. That is the stated goal of this subsection and that is exactly what we shall accomplish very soon.
With all this in mind, lets get down to building DataFrame. We start by invoking the read method on spark, ourSparkSession:
scala> val dfReader1 = spark.read
dfReader1: org.apache.spark.sql.DataFrameReader = org.apache.spark.sql.DataFrameReader@66df362c
The read() invoke produced DataFrameReaderdfReader1, which according to https://spark.apache.org/docs/2.2.1/api/scala/index.html#org.apache.spark.sql.DataFrameReader is an interface to load a dataset from external storage systems.
Next, we will inform Spark that our data is in CSV format. This is done by invoking the format method with a com.databricks.spark.csv argument that Spark recognizes:
scala> val dfReader2 = dfReader1.format("com.databricks.spark.csv")
dfReader2: org.apache.spark.sql.DataFrameReader = org.apache.spark.sql.DataFrameReader@66df362c
The format method simply returned DataFrameReader again. The iris.csv file contains header. We could specify this as an input option:
scala> val dfReader3 = dfReader2.option("header", true)
dfReader3: org.apache.spark.sql.DataFrameReader = org.apache.spark.sql.DataFrameReader@66df362c
That returned our same old DataFrameReader.
What we need next is a way to identify the schema for us. Invoking the option method again with a key inferSchema and a value of true lets Spark infer the schema automatically for us:
scala> val dfReader4 = dfReader3.option("inferSchema",true)
dfReader4: org.apache.spark.sql.DataFrameReader = org.apache.spark.sql.DataFrameReader@66df362c
Let's load our input now:
scala> val dFrame = dfReader4.load("iris.csv")
dFrame: org.apache.spark.sql.DataFrame = [Id: int, SepalLengthCm: double ... 4 more fields]
DataFrameReader transformed our input CSV into DataFrame! This was exactly what we set out to do.
With our DataFrame being a view on Dataset[Row], all the methods on Dataset are available.
For now, we want to see what this dataset has in it. The raw file had 150 columns in it. Therefore, we want Spark to:
- Return the row count in our dataset
- Display the top 20 rows of our dataset
Next, we will invoke the count method. We want to reaffirm the number of rows contained in the dataset:
scala> dFrame.count
res1: Long = 150
We just invoked the count method on our DataFrame. That returned the number 150, which is right.
Next, we will bring together all of the code developed in this section into one line of code:
scala> val irisDataFrame = spark.read.format("com.databricks.spark.csv").option("header",true).option("inferSchema", true).load("iris.csv").show
We just created DataFrameirisDataFrame . If you want to view the DataFrame, just invoke the show method on it. This will return the first 20 rows of the irisDataFrame DataFrame:
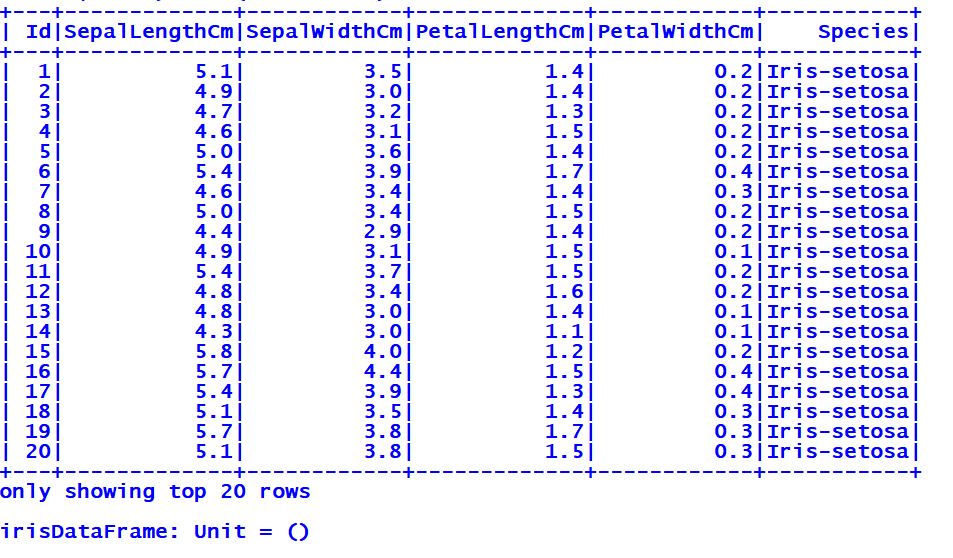
First 20 rows of the Iris dataset
At this point, type :quit or Ctrl + D to exit the Spark shell. This wraps up this section, but opens a segue to the next, where we take things to the next level. Instead of relying on spark-shell to develop a larger program, we will create our Iris prediction pipeline program in an SBT project. This is the focus of the next section.