Book Image

Hands-On Reactive Programming with Python

By : Romain Picard
Book Image

Hands-On Reactive Programming with Python

By: Romain Picard

Overview of this book

Reactive programming is central to many concurrent systems, but it’s famous for its steep learning curve, which makes most developers feel like they're hitting a wall. With this book, you will get to grips with reactive programming by steadily exploring various concepts This hands-on guide gets you started with Reactive Programming (RP) in Python. You will learn abouta the principles and benefits of using RP, which can be leveraged to build powerful concurrent applications. As you progress through the chapters, you will be introduced to the paradigm of Functional and Reactive Programming (FaRP), observables and observers, and concurrency and parallelism. The book will then take you through the implementation of an audio transcoding server and introduce you to a library that helps in the writing of FaRP code. You will understand how to use third-party services and dynamically reconfigure an application. By the end of the book, you will also have learned how to deploy and scale your applications with Docker and Traefik and explore the significant potential behind the reactive streams concept, and you'll have got to grips with a comprehensive set of best practices.
Table of Contents (16 chapters)

Marble diagrams

The ReactiveX project is composed of several hundreds of operators, and the Python implementation contains about 140 of them. When writing ReactiveX code, especially in the early days, you should regularly refer to the operator's documentation. Do not hesitate to read through it to find the most adapted operator for your needs. This is a good way to discover operators that you may use later, and you may find an operator doing exactly what you want to implement.

Unfortunately, this documentation is often difficult to understand. A representative of this situation is the FlatMap (http://reactivex.io/documentation/operators/flatmap.html) operator description:

"Transform the items emitted by an Observable into Observables, then flatten the emissions from those into a single Observable"

This simple description is—obviously—correct, but may not be easy to comprehend. This is why there is also a more detailed explanation on how the operator works. In the case of the flat_map operator, the behavior is to take an observable as input and apply a transformation on each item of this observable. The transformation is done by a function also provided as an input of the operator. This function is called for each item emitted by the input observable and returns an observable at each execution (that is, for each item). Finally, flat_map merges all the observables returned by the transformation function in a single output observable.

This is a very detailed description of how the operator works, but even when you are used to the ReactiveX terminology, you need to spend some time carefully reading each word of the documentation to understand what it means. Marble diagrams are a clever application of the a figure is worth a thousand words idiom. They represent graphically an example of the behavior of an operator. All operators are documented with their descriptions, and a marble diagram. Most of the time, the marble diagram allows you to understand the behavior of the operator without even having to read the documentation.

Figure 1.7 shows the structure of a marble diagram. A marble diagram is composed of three parts: input timelines, a transformation description, and output timelines:

Figure 1.7: Marble diagram

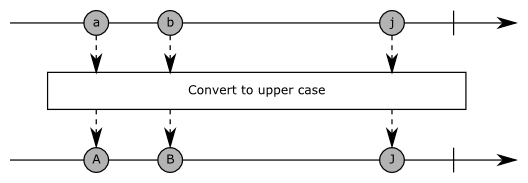
A timeline represents an observable state according to the time that goes on. It is drawn as an arrow going from left to right. Each item emitted on the observable is drawn as a circle. The official documentation uses different shapes and colors to represent items. In this book, we will only use circles with labels. Depending on the operator, there may be one or several input timelines.

Below the input timeline is the transformation description drawn as a rectangle. Some brief information about the transformation being performed is printed inside this rectangle. There are dashed arrows between the input timeline items and the transformation description each time the transformation is applied to an item or some items.

Finally, below the transformation description are the output timelines. They represent the result observables of the operator. In the example of Figure 1.7 each input letter is transformed to uppercase, so a becomes A, b becomes B, and j becomes J. Just like input timelines, most of the time there is only one output timeline. But some operators may return several observables, and some return observables of observables. This is shown in the following figure, in which for each item a new observable is generated, emitting the next three letters:

Figure 1.8: Observable of observable

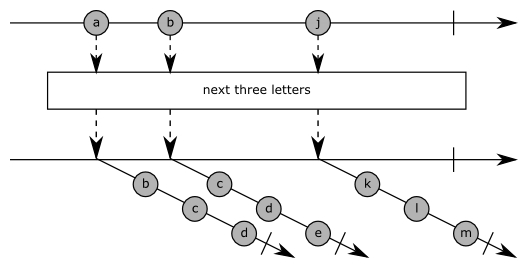
An observable of observables is an observable that emits items that are themselves observables. While this may surprise at first, this is just one level of composition; an observable can convey items of any type, including observables. So, at some point you may work with several layers of observables being composed this way. Such observables are called higher order observables in this book, borrowing the naming convention used for higher order functions.

The last thing to understand in marble diagrams is the way timelines can end. An observable lifetime ends either on completion (that is, on success) or on error. These are respectively represented as a vertical line and as a cross, as shown in the following figure:

Figure 1.9: The end of an observable. On the left an observable that completes successfully and on the right an Observable that terminates in an error

The map operator

Let's see a real example with the map operator. This operator takes a source observable as input and returns an observable as output. It applies a function to each item of the source observable, and emits the result of this function on the output observable. Hopefully, its marble diagram, shown in the following figure, should make the description much more clear:

Figure 1.10: The map operator

The marble diagram shows an input timeline with three integer items: 1, 12, and 7. The transformation is described with syntax similar to that of the Python lambda. Note that the official ReactiveX documentation uses the JavaScript arrow function notation, because it uses marble diagrams from the JavaScript implementation. In this example, the transformation is a multiplication by 3 of the source item. The output timeline contains also three items, corresponding to the input items values multiplied by 3.

The prototype of this operator is the following one:

Observable.map(self, selector)

The selector parameter is the function that will be executed on all items of the input observable.

The from_ operator

The from_ operator is the operator that was used in the previous example to create an observable from a list. The marble diagram of this operator is shown in the following figure:

Figure 1.11: The from_ operator
The name of this operator is strange because it ends with an underscore. The reason for this underscore is that from is a reserved keyword in Python, so it was not possible to name this operator as it should be; that is, from. If you dislike this notation, there is an alias named from_list. You can use it for a more Pythonic code at the expense of a longer name.

The prototype of this operator is the following one:

Observable.from_(iterable, scheduler=None)

The first parameter accepts any iterable object. This includes lists, tuples, dictionaries, and any class that implements the iterator methods __iter__ and next. The second parameter is used to provide a scheduler that will be used to emit the items of the observable. This parameter is present on all creation operators. It is useful when running in an asynchronous environment or an environment with concurrency. We will study schedulers in detail in Chapter 5, Concurrency and Paralellism in RxPY.

The from_ operator creates an observable that emits one item per entry in the iterable. It then completes the observable. Here are some examples of usage which show the items that they return:

Observable.from_(sys.argv) # argv[0], argv[1], argv[2]..., completed
Observable.from_([1, 2, 3, 4]) # 1, 2, 3, 4, completed
Observable.from_({'foo': 'fooz', 'bar': 'barz'}) # 'foo', 'bar', completed

Note that when using a dictionary, the observable contains the keys of the dictionary and not the values. This is the same behavior as a classic Python iteration on a dictionary using a for loop.