-
Book Overview & Buying
-
Table Of Contents

Java Web Internals
By :
Java Web Internals
By:
Overview of this book
Ever wondered how web servers like Tomcat process requests, or what really happens behind frameworks such as Spring? This book takes you beneath the surface of Java web development to uncover the why behind the tools you use every day. Rather than focusing solely on coding recipes, this book emphasizes the underlying concepts and design principles that govern how web servers and frameworks operate.
Starting with low-level socket programming, you’ll build a multithreaded HTTP server from the ground up and extend it into a lightweight application server capable of handling dynamic content.
Along the way, you’ll master HTTP request parsing, response generation, servlet-like request handling, and Java reflection and annotations for metaprogramming. As you progress, you’ll evolve this infrastructure into your own Java framework with embedded Tomcat, annotation-driven routing, object serialization with Jackson, and basic dependency injection modeled on Jakarta CDI.
By the end of this journey, you’ll understand the principles behind them, enabling you to reason about system design, troubleshoot complex issues, and apply these concepts across frameworks and programming languages.
*Email sign-up and proof of purchase required
Table of Contents (15 chapters)
Preface

 Free Chapter
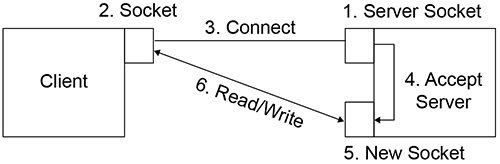
Chapter 1: Networks, Protocols, and Packets
Chapter 2: Workings of a Web Server – A Case Study
Chapter 3: Implementing a Simple Web Server
Chapter 4: Web Servers vs Application Servers
Chapter 5: Deep Dive into Simple Web Container Implementation
Chapter 6: Simple Web Container Improvements and Expansions
Chapter 7: Why Create a Web Framework
Chapter 8: Web Frameworks – The Necessary Abstraction for Professional Development
Chapter 9: Detailing the SimpleWebFramework Implementation
Chapter 10: The Emergence of Dependency Injection and Its Application in SimpleWebFramework
Chapter 11: Creating the First Application with SimpleWebFramework
Chapter 12: Unlock Your Exclusive Benefits
Other Books You May Enjoy
Index