

As mentioned previously, we concentrate on a process and apply that to our security components when we go about security testing. For this, we describe an abstract methodology here. We shall cover a number of methodologies and their components in great detail in Chapter 4, Identifying Range Architecture, where we will identify a methodology by exploring the available references for testing.
We will define our testing methodology, which consists of the following steps:
Planning
Nonintrusive target search
Intrusive target search
Data analysis
Report
This is a crucial step for professional testing, but unfortunately, it is one of the steps that is rarely given the time that is essentially required. There are a number of reasons for this; however, the most common one is the budget. Clients do not want to provide much time to a consultant to plan their testing. In fact, planning is usually given a very small portion of the time in the contract due to this reason. Another important point to note on planning is that a potential adversary will spend a lot of time on it. There are two things that a tester should tell clients with respect to this step, and that is there are two things that a professional tester cannot do that an attacker can, and they are as follows:
Six to nine months of planning
Break the law
I could break the law I suppose and go to jail but it is not something that I find appealing and as such am not going to do it. Additionally, being a certified hacker and licensed penetration tester you are bound to an oath of ethics and I am not sure but I believe that breaking the law while testing is a violation of this code of ethics.
There are many names that you will hear for nonintrusive target search. Some of these are open source intelligence, public information search, and cyber intelligence. Regardless of the name you use, they all come down to the same thing, that is, using public resources to extract information about the target or company you are researching. There are a plethora of tools that are available for this. We will briefly discuss the following tools to get an idea of the concept and those who are not familiar with them can try them out on their own:
NsLookup:
The NsLookup tool is found as a standard program in the majority of the operating systems we encounter. It is a method of querying DNS servers to determine information about a potential target. It is very simple to use and provides a great deal of information. Open a Command Prompt window on your machine and enter
nslookup www.packt.net. This will result in an output similar to that shown in the following screenshot:
You can see in the preceding screenshot that the response to our command is the IP address of the DNS server for the domain www.packt.net. You can also see that their DNS has an IPv6 address configured. If we were testing this site, we would explore this further. Alternatively, we may also use another great DNS lookup tool called dig. For now, we will leave it alone and move to the next resource.
Serversniff:
The www.serversniff.net website has a number of tools that we can use to gather information about a potential target. There are tools for IP, Crypto, Nameserver, Webserver, and so on. An example of the home page for this site is shown in the following screenshot:

There are many tools we could show, but again we just want to briefly introduce tools for each area of our security testing. Open a Command Prompt window and enter
tracert www.microsoft.com. In case you are using Microsoft Windows OS, you will observe that the command fails, as indicated in the following screenshot:
The majority of you reading this book probably know why this is blocked, and for those of you who do not, it is because Microsoft has blocked the ICMP protocol and this is what the
tracertcommand uses by default. It is simple to get past this because the server is running services and we can use that particular protocol to reach it, and in this case, that protocol is TCP. Go to the Serversniff page and navigate to IP Tools | TCP Traceroute. Then, enterwww.microsoft.comin the IP Address or Hostname box field and conduct the traceroute. You will see it will now be successful, as shown in the following screenshot:
Way Back Machine (www.archive.org):
This site is proof that anything that is ever on the Internet never leaves! There have been many assessments when a client will inform the team that they are testing a web server that is not placed into production, and when they are shown that the site has already been copied and stored, they are amazed to know that this actually does happen. I like to use the site to download some of my favorite presentations, tools, and so on that have been removed from a site and in some cases, the site no longer exists. As an example, one of the tools that is used to show a student the concept of steganography is the tool Infostego. This tool was released by Antiy Labs and it provided the student an easy-to-use tool to understand the concepts. Well if you go to their site at www.antiy.net, you will discover that there is no mention of the tool. In fact, it will not be found in any of their pages. They now concentrate more on the antivirus market. A portion from their page is shown in the following screenshot:

Now let's use the power of the Way Back Machine to find our software. Open a browser of your choice and enter
www.archive.org. The Way Back Machine is hosted here, and a sample of this site can be seen in the following screenshot:
As indicated, there are 366 billion pages archived at the time this book was written. In the URL section, enter
www.antiy.netand click on Browse History. This will result in the site searching its archives for the entered URL, and after a few moments, the results of the search will be displayed. An example of this is shown in the following screenshot:
We know we do not want to access a page that has been recently archived, so to be safe, click on 2008. This will result in the calendar being displayed, showing all of the dates in 2008 the site was archived. You can select any one that you want. An example of the archived site from December 18 is shown in the following screenshot. As you can see, the Infostego tool is available and you can even download it! Feel free to download and experiment with the tool if you like.

Shodanhq:
The Shodan site is one of the most powerful cloud scanners we can use. You are required to register with the site to be able to perform the more advanced types of queries. It is highly recommended that you register at the site as the power of the scanner and the information you can discover is quite impressive, especially after the registration. The page that is presented once you log in is shown in the following screenshot:

The preceding screenshot shows the recently shared search queries as well as the most recent searches the logged-in user has conducted. This is another tool you should explore deeply if you are performing professional security testing. For now, we will look at one example and move on as we could write an entire book just on this tool. If you are logged in as a registered user, you can enter
iphone ruin the search query window. This will return pages with iPhone in the query and mostly in Russia, but as with any tool, there will be some hits on other sites as well. An example of the results of this search is shown in the following screenshot:
An example of the results of this search is shown
Intrusive target search is the step that starts the true hacker type activity. This is when you probe and explore the target network; consequently, ensure that you have the explicitly written permission to carry out this activity with you. Never perform an intrusive target search without permission as this written authorization is the only aspect which differentiates you from the malicious hacker. Without it, you are considered a criminal.
Within this step, there are a number of components that further define the methodology, which are shown as follows:
No matter how good our skills are, we need to find systems that we can attack. This is accomplished by probing the network and looking for a response. One of the most popular tools to do this is the excellent open source tool nmap written by Fyodor. You can download nmap from www.nmap.org or you can use any number of toolkit distributions for the tool. We will use the exceptional penetration testing framework Kali Linux. You can download the distro from www.kali.org.
Regardless of which version of nmap you explore with, they all have similar, if not the same, command syntax. In a terminal or a command prompt window if you are running it on Windows OS, enter
nmap –sP <insert network IP address>. The network we are scanning is the 192.168.177.0/24 network; yours most likely will be different. An example of this ping sweep command is shown in the following screenshot:
We now have live systems on the network that we can investigate further.
Discover open ports:
Along the same lines that we have live systems, we next want to see what is open on these machines. A good analogy to a port is a door, that is, if the door is open, then I can approach the open door. There might be things that I have to do once I get to the door to gain access, but if it is open, then I know it is possible to get access, and if it is closed, then I know I cannot go through that door. This is the same as ports; if they are closed, then we cannot go into that machine using that door. We have a number of ways to check whether there are any open ports, and we will continue with the same theme and use nmap. We have machines that we have identified, so we do not have to scan the entire network as we did previously. We will only scan the machines that are currently in use.
Additionally, one of those machines that is found is our own machine; therefore, we will not scan ourselves, we could, but it is not the best plan. The targets that are live on our network are 1, 2, and 254. We can scan these by entering
nmap –sS 192.168.177.1,2,254. For those of you who want to learn more about the different types of scans, you can refer to http://nmap.org/book/man-port-scanning-techniques.html. Alternatively, you can use thenmap –hoption to display a listing of options. The first portion of the scan result is shown in the following screenshot:
Discover services:
We now have live systems and openings that are on the machine. The next step is to determine what is running on these ports we have discovered. It is imperative that we identify what is running on the machine so that we can use it as we progress deeper into our methodology. We once again turn to nmap. In most command and terminal windows, there is a history available. Hopefully, this is the case for you and you access it with the arrow keys of the keyboard. For our network, we will enter
nmap –sV 192.168.177.1. From our previous scan, we determined that the other machines have closed all their scanned ports; so to save time, we will not scan them again. An example of this scan can be seen in the following screenshot:
An example of this scan can be seen
From the results, you can now see that we have additional information about the ports that are open on the target. We could use this information to search the Internet using some of the tools we covered earlier, or we could let a tool do it for us.
Enumeration:
This is the process of extracting more information about the potential target to include the OS, usernames, machine names, and other details that we can discover. The latest release of nmap has a scripting engine that will attempt to discover a number of details and in fact, enumerate the system to some aspect. To process the enumeration with nmap, we use the
–Aoption. Enternmap –A 192.168.177.1in the command prompt. A reminder that you will have to enter your target address if it is different from ours. Also, this scan will take some time to complete and will generate a lot of traffic on the network. If you want an update, you can receive one at any time by pressing the Space bar. This command output is quite extensive, so a truncated version is shown in the following screenshot:
As the screenshot shows, you have a great deal of information about the target, and you are quite ready to start the next phase of testing. Additionally, we have the OS correctly identified; we did not have that until this step.
Identify vulnerabilities:
After we have processed the steps to this point, we have information about the services and versions of the software that are running on the machine. We could take each version and search the Internet for vulnerabilities or we could use a tool. For our purposes, we will choose the latter. There are numerous vulnerability scanners out there in the market, and the one you select is largely a matter of personal preference. The commercial tools for the most part have a lot more information than the free and open source ones, so you will have to experiment and see which one you prefer.
We will be using Nexpose vulnerability scanner from Rapid7. There is a community version of their tool that scans only a limited number of targets, but it is worth looking into. You can download Nexpose from www.rapid7.com. Once you have downloaded it, you will have to register and receive a key by e-mail to activate it. We will leave out the details on this and let you experience them on your own. Nexpose has a web interface, so once you have installed and started the tool, you have to access it. You access it by entering
https://localhost:3780. It seems to take an extraordinary amount of time to initialize, but eventually, it will present you with a login page as shown in the following screenshot:
The credentials required for login would have been created during the installation. It is quite involved to set up a scan, and as we are just detailing the process and there is an excellent quick start guide, we will just move on to the results of the scan. We will have plenty of time to explore this area as the book progresses. A result of a typical scan is shown in the following screenshot:

A result of a typical scan is shown
As you can see, the target machine is in a bad shape. One nice thing about Nexpose is the fact that as they also own metasploit; they will list the vulnerabilities that have a known exploit within metasploit.
Exploitation:
This is the step of security testing that gets all the press, and it is, in simple terms, the process of validating a discovered vulnerability. It is important to note that it is not an entirely successful process, some vulnerabilities will not have exploits and some will have exploits for a certain patch level of the OS but not for others. As we like to say, it is not an exact science, and in reality, it is a very minor part of professional security testing, but it is fun so we will briefly look at the process. We also like to say in security testing that we have to validate and verify everything a tool reports to you and this is what we try to do with exploitation. The point is that you are executing a piece of code on a client's machine and this code could cause damage. The most popular free tool for exploitation is metasploit, now owned by Rapid7. There are entire books written on this tool, so we will just show the results of running the tools and exploiting a machine here.
The options that are available are shown in the following screenshot:
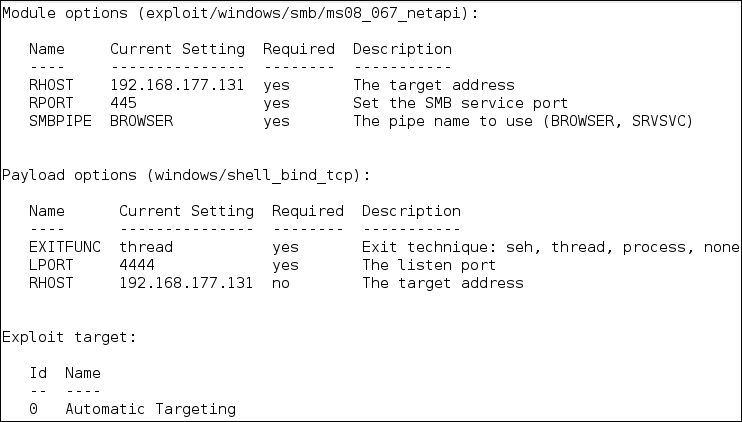
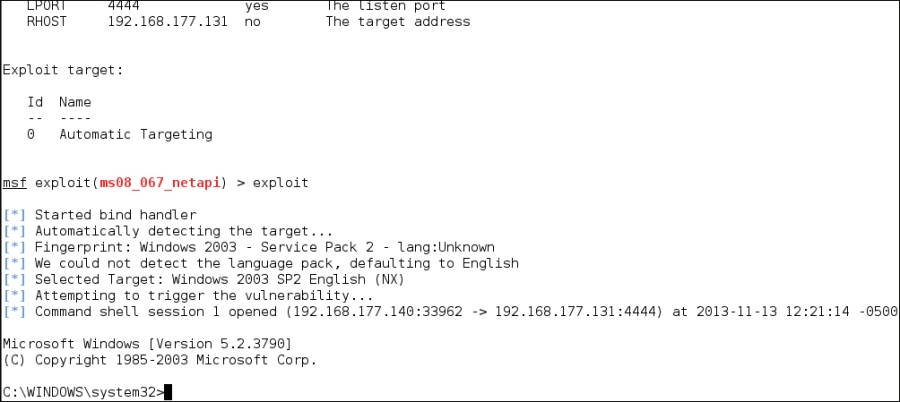
There is quite a bit of information in the options, but the option we need to cover is due to the fact that we are using the exploit for the vulnerability MS08-067, which is a vulnerability in the server service. It is one of the better options to use as it almost always works and you can exploit it over and over again. If you want to know more about this vulnerability, you can check it out at http://technet.microsoft.com/en-us/security/bulletin/ms08-067. As the options are set, we are ready to attempt the exploit and as indicated in the following screenshot, we are successful and have gained a shell on the target machine:
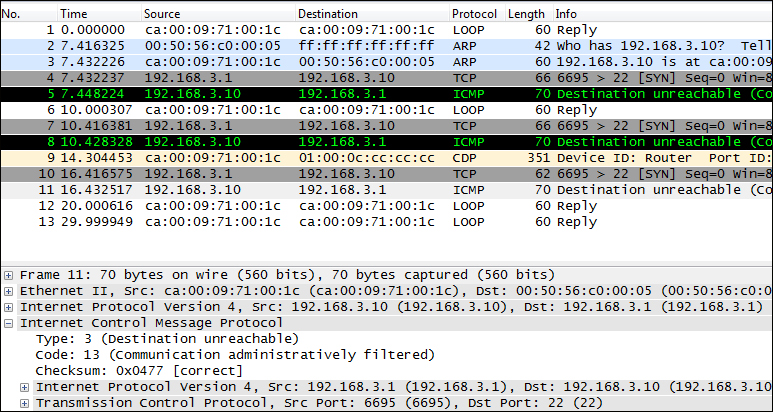
Data analysis is often overlooked and can be a time-consuming process. This is the process that takes the most time to develop. Most testers can run tools, perform manual testing and exploitation, but the real challenge is taking all of the results and analyzing them. We will look at one example of this in the next screenshot. Take a moment and review the protocol analysis capture from the Wireskark tool. As an analyst, you need to know what the protocol analyzer is showing you. Do you know what exactly is happening? Do not worry, we will tell you after the screenshot. Take a minute and see if you can determine what the tool is reporting with the packets that are shown in the following screenshot:
See if you can determine what the tool is reporting with the packets that are shown
From the previous screenshot, we observe that the machine at IP address 192.168.3.10 replies with an ICMP packet that is type 3, code 13. In other words, the reason the packet is being rejected is because the communication is administratively filtered; furthermore, this tells us that there is a router in place, and it has an Access Control List (ACL) that is blocking the packet. Moreover, it tells us that the administrator is not following best practices to absorb packets and does not reply with any error messages as that can assist an attacker. This is just one small example of the data analysis step; there are many things you will encounter and many more that you will have to analyze to determine what is taking place in the tested environment. Remember that the smarter the administrator, the more challenging pen testing can become. This is actually a good thing for security!
This is another area in testing that is often overlooked in training classes. This is unfortunate as it is one of the most important things you need to master. You have to be able to present a report of your findings to the client. These findings will assist them in improving their security posture and if they like the report, it is what they will most often share with partners and other colleagues. This is your advertisement for what separates you from the others. It showcases that not only do you know how to follow a systematic process and methodology of professional testing but also know how to put it into an output form that can serve as a reference for the clients.
At the end of the day, as professional security testers, we want to help our clients improve their security posture and this is where reporting comes in. There are many references for reports, so the only thing we will cover here is the handling of findings. There are two components we use when it comes to findings; the first is we provide a summary of findings in a table format so that the client can reference the findings early on in the report. The second is the detailed findings section. This is where we put all of the information about the finding. We rate it according to the severity, and we include the following data:
Description: This is where we provide the description of the vulnerability, specifically what it is and what is affected.
Analysis/Exposure: For this section, you want to show the client that you have done your research and not just repeating what the scanning tool told you. It is very important that you research a number of resources and write a good analysis of what the vulnerability is and an explanation of the exposure it poses to the client's site.
Recommendations: We want to provide the client a reference to the patch that will help to mitigate the risk of this vulnerability. We never tell the client not to use it. We do not know what their policy is, and it might be something they have to have, to support their business. In these situations, it is our job as consultants to recommend and help the client determine the best way to either mitigate the risk or remove it. When a patch is not available, we provide a reference to potential workarounds until the patch is available.
References: If there are references such as a Microsoft bulletin number, CVE number, and so on, then this is where we would place it.