Computer Forensics, being a broad topic, involves a variety of skills which will involve seizing electronic evidence, acquiring data from electronic evidence, data analysis, and finally developing a forensic report.
This book will help you to build up the skills you need to work in a highly technical environment. This book's ideal goal is to get you up and running with forensics tools and techniques to successfully investigate crime and corporate misconduct. You will discover ways to collect personal information about an individual from online sources. You will also learn how criminal investigations are performed online while preserving data such as e-mails, images, and videos that may be important to a case. You will further explore networking and understand Network Topologies, IP Addressing, and Network Devices. Finally, you will how to write a proper forensic report, the most exciting portion of the forensic exam process.
By the end of this book, you will have developed a clear understanding of how to acquire, analyze, and present digital evidence, like a proficient computer forensics investigator.
Once you have collected data from the scene, you return to your lab, and it is now time to start your forensic analysis. You will find yourself quickly overwhelmed by the sheer amount of data you will find in storage devices. You must promptly determine whether the information contained within the storage containers is pertinent to your investigation.
This is where the information gathering in the case information and legal issues step of the process will play an essential part.
Therefore, you must capture the five Ws of the investigation (previously mentioned in Chapter 1, Types of Computer-Based Investigations). First, associate the activity on the computer system with a specific user and identify that user as a real-life person.
If the investigation already has a live suspect identified, you correlate that suspect with the user on the computer system. We will discuss some guidelines that can be used with commercial or open-source forensic tools. The goal is to understand the process without resorting to any specific forensic tool.
Now that we have discussed what you need to consider when acquiring a dataset, we will discuss what you need to understand when analyzing the data.
Dates and time zones
Dates and time zones can cause issues for the digital forensic investigator if they forget to consider them. For example, if you only conduct exams in a specific time zone and all your seized data comes from the same time zone, the issues you face are minor. But if the data comes from multiple time zones or you travel to various time zones, they can cause some confusion if you do not consider the time zone issue.
Setting the forensic machine and tools to use universal time (UTC) as a standard frame of reference helps solve this problem. Also, ensure that you adjust any timeframe where the criminal activity occurred in UTC. It does not help that operating/file systems save metadata in different time zone formats. You also must consider that the suspect may have changed the time zone settings on the computer to hide their illicit activity. Timeline analysis is critical when conducting a forensic exam.
Next, we will need to be able to identify files we know are irrelevant, as well as instantly identify contraband images. We can do that with hash analysis.
Hash analysis
What is a hash value? A hash is a digital fingerprint for a file or piece of digital media. It is generated using a one-way cryptographic algorithm.
The standard cryptographic algorithms used in digital forensics are Message Digest 5 (MD5) and the Secure Hashing Algorithm (SHA-1). MD5 creates a 128-bit digital fingerprint, while SHA-1 produces a 160-bit digital fingerprint. Using a hashing algorithm allows using a variable input to create a fixed-length output.
If one bit changes in the variable input, it will cause a different output. Additional hashing information will be provided later in the book. Let’s see how this works in the following exercise:
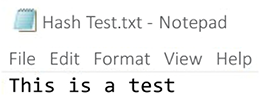
Create a text file containing the words This is a test with a filename of Hash Test.txt:
As you can see in the preceding figure, the ce114e4501d2f4e2dcea3e17b546f339 value is the MD-5 standard length output for the F:\Hash Test.txt file.
The second value, a54d88e06612d820bc3be72877c74f257b561b19, is the SHA-1 output. It doesn’t matter which forensic tool I use—these values are the digital fingerprint for this specific file.
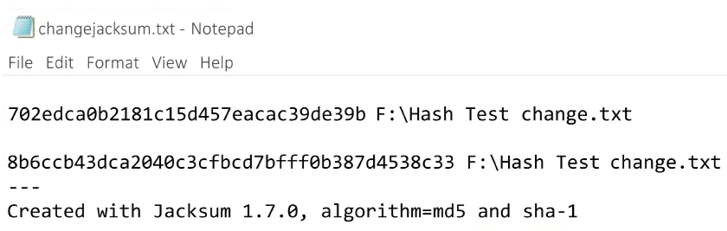
Change a single part of the contents of the file:
Figure 2.6: The change in the text
I have added an exclamation point to the end of the sentence—a very small change—but any change will change the hash values.
Use Jacksum again and you will get a totally different hash value:
Figure 2.7: The change in the Jacksum values
The MD5 value is now 702edca0b2181c15d457eacac39de39b, which is different from the original value of ce114e4501d2f4e2dcea3e17b546f339.
The standard output generated by the hashing algorithm is a one-way process. You cannot input the alphanumeric value to reverse the process to get the original dataset used in the hashing process. If you have a hash set of known illicit images, the values within that hash set cannot be used to re-create the illicit images.
There are hash sets (sets of multiple hash values) that identify known good files. These are files that are of no interest to an investigator. These can be the standard files used in an operating system or application. Using a known good hash set allows you to filter out files with no evidentiary value. On the other hand, if you have identified files of interest, such as illicit images or known documents that have been stolen, any data that may interest the investigator can also be highlighted. For the known bad files, someone needs to have access to the original file to create the hash value used to identify the file.
Using hash analysis can save you some time and effort during your investigation:
You can use it to verify the evidence has not changed.
The RDS is a large hash set to help identify known good files when conducting your examination. The RDS is freely available to law enforcement, the government, and private industries. Some files identified in the RDS may be considered malicious, such as hacking tools. The investigator still has to put the files in context to see if they were being used for an unlawful purpose. The RDS does not contain hash values of illicit data, such as illegal images.
A collision occurs when two different variable inputs result in the same fixed-length output. This means that two different files have the same hash value, which you will realize is not good for identifying evidence based on our previous discussions. However, nation-states have manipulated variable inputs to create the same fixed-length output, and they have been successful.
Does that mean hashing is dead? No, it isn’t. There have been no two different files found in the wild with the same hash value. All the collisions that have occurred have been files that have been manipulated. When independent examiners analyzed the manipulated files, they did not have any user-readable content. While there has been concern that this would negatively affect the admissibility of digital evidence, in 2009, the court case of US versus Schmidt ruled that the odds of a collision of two files were insignificant and were not an issue.
Now that we have determined the digital fingerprint, let’s make sure the files are correctly identified.
File signature analysis
Your next step is to carry out a file signature analysis to ensure the file extension matches the file type. Many file types you will find in the filesystem have been standardized and possess unique file signatures to identify themselves to the filesystem. This is not the file extension, such as a Microsoft Word document with a file extension of .doc or .docx.
A user can change the file extension to hide incriminating evidence. The intention behind carrying out a file signature analysis is to determine whether the file signature and file extension match.
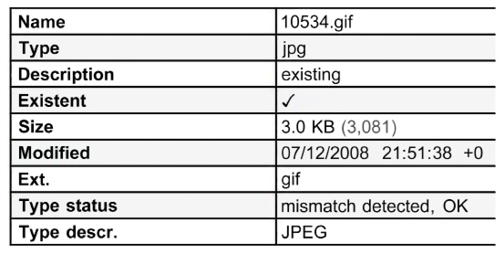
The following screenshot shows how X-Ways flags a file when the file extension does not match the file signature:
Figure 2.8: A file signature mismatch
The file extension identifies the file as a GIF, but X-Ways has identified the file as a JPEG. The next figure shows the file header for the GIF file in question:
Figure 2.9: A file header
A GIF file should have a hexadecimal 47 49 46 38 file signature, not hexadecimal FF D8 FF E0. In some cases, the mismatch is through normal usage of the filesystem and not from user interaction. You must examine the data to ensure the mismatch can be attributed to a specific user.
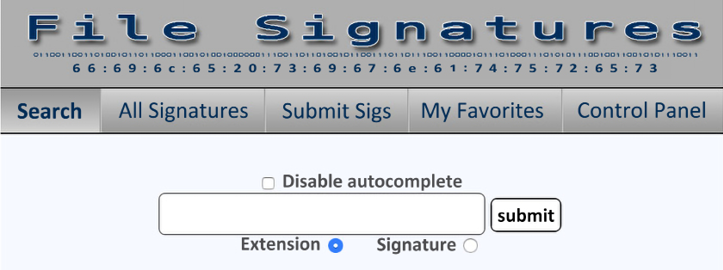
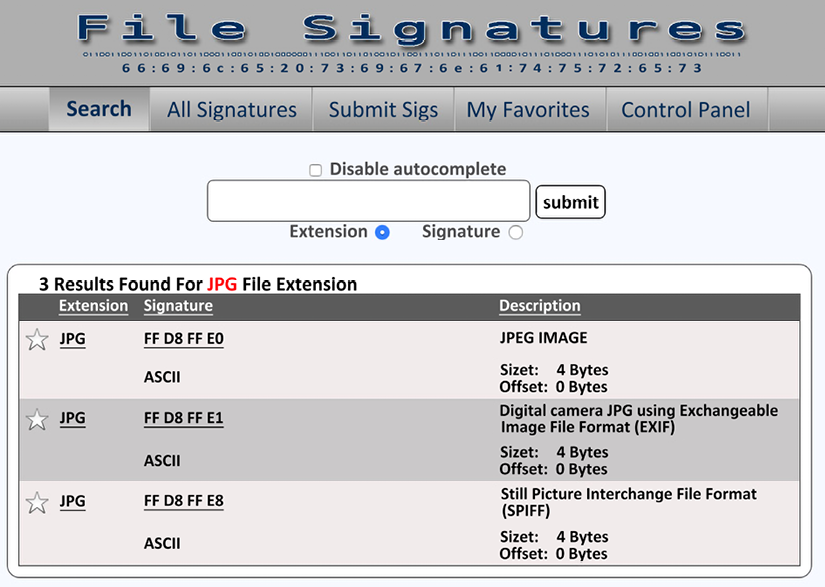
Gary Kessler has created a website that allows you to search a database based on the file extension or signature. You can refer to this website at https://filesignatures.net/:
Figure 2.10: filesignatures.net
You can search by file extension or file signature. Once you input the file extension, in this case JPG, you will be returned the file signatures associated with the JPEG standard:
Figure 2.11: The results for a JPG file signature
After we have ensured that the files have been properly identified, we need to identify any malware that may be on the system. We can do that with antivirus.
Antivirus
A common claim of innocence from a subject accused of wrongdoing that “a virus did it” has occurred in nearly every investigation I have done. Have you determined whether that is a valid claim? For example, is there malware on the system, and did it cause the behavior you are investigating without the user’s interaction or knowledge?
This is one reason we collect the volatile data to see what was occurring on the system at the time of collection. If someone else has collected the evidence and all you have is a forensic image, you can still scan that forensic image to help determine whether someone has installed malware. Several forensic tools allow you to “mount” the forensic image as a read-only drive, and you can then scan the filesystem to help determine whether there is malware installed.
Image mounting allows you to mount a forensic image as a drive or physical device. Your viewing is in read-only mode. You will find many benefits to mounting a forensic image, such as using the file explorer to view it as if it were a device attached to the computer. In addition, you can natively view different file types, use antivirus against the forensic image, share the mounted forensic image over a network, and copy files from the mounted forensic image.
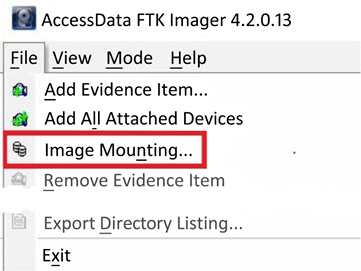
We will now cover how to mount a forensic image with FTK Imager in the following exercise:
To mount a forensic image in FTK Imager, you need to select the File menu and then select Image Mounting… from the menu, as in the following screenshot:
Figure 2.12: Image mounting
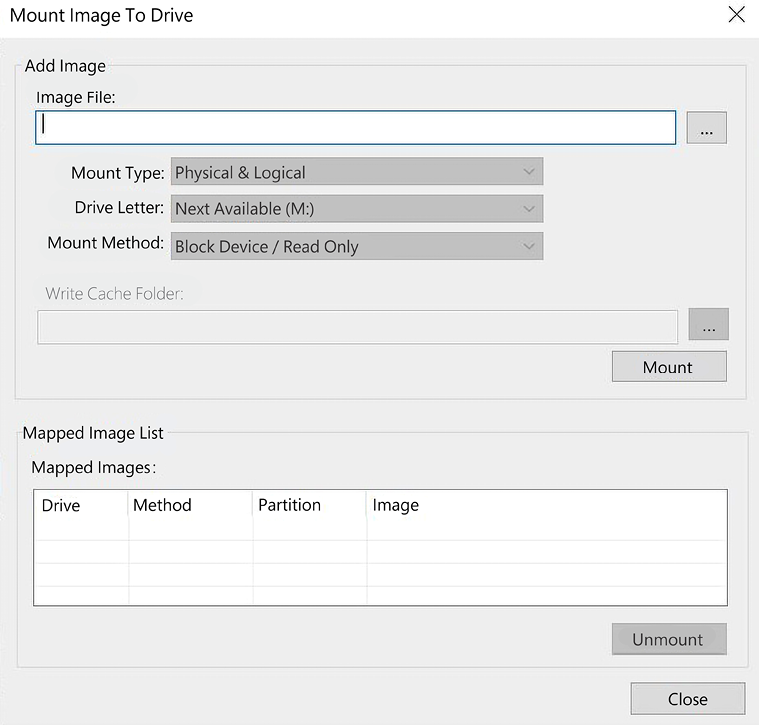
It will then present you with the Mount Image to Drive menu:
Figure 2.13: Mount the image
In the dialog box, you will have to select the forensic image you want to mount. If this is a segmented forensic, you only need to point it at the first segment:
Mount Type: You have a choice of Physical & Logical, just Physical, or just Logical. If you select Physical & Logical, the software will mount the forensic image as a physical device and mount any logical partitions.
Drive Letter: This is where you want to see the forensic image. In the previous figure, it shows that the next available drive letter is M. You can select any open drive letter you desire.
Mount Method: You have the following choices:
Block Device / Read Only: This will read the device as a block device, which means a Windows application that performs physical name querying can view the mounted device.
Block Device / Writable: No changes are made to the original evidence. It will save any changes you attempt to make in a cache file.
File System / Read-Only: The device as a read-only device that someone can view using Windows Explorer.
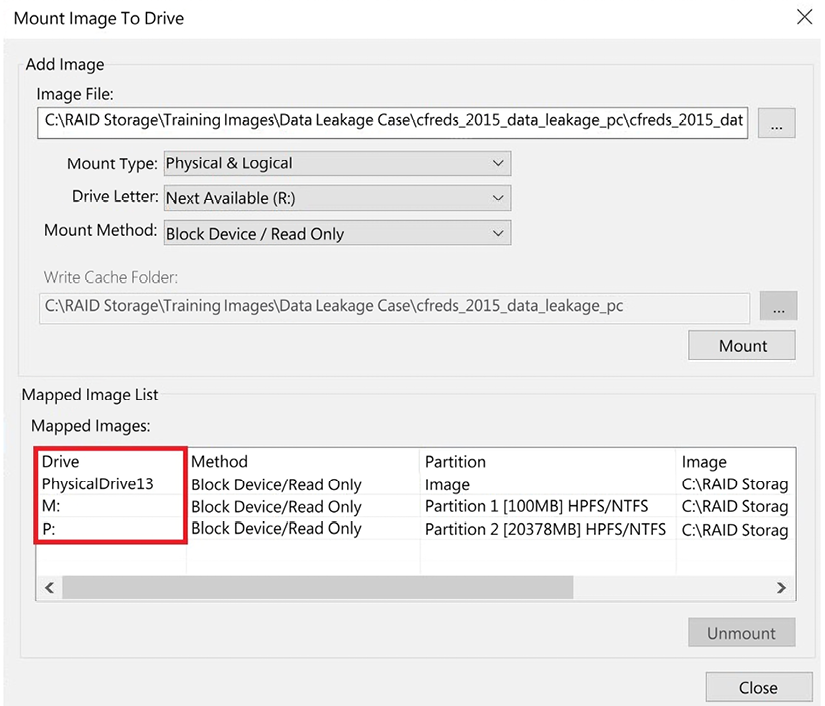
In the following screenshot, you can see we have mounted a forensic image and the forensic image has partitions in it:
Figure 2.14: A mounted image
The system has mounted the partitions as drive M and drive P. Now, you can run the antivirus of your choice against those volumes to see whether they have installed any malware.
If malware has been installed, that is still not an alibi for the suspect. Determine whether the found malware can do the actions the suspect claims. I have investigated many illicit images investigations where the accused claims the malware downloaded the images. I have yet to find any malware that searches, finds, downloads, and sorts by content the illicit images found on a subject’s computer. You still must analyze the content to determine the context of the digital evidence.
Now, you can begin your analysis of the filesystem and operating system. We will discuss the specific artifacts in the rest of this book. The OS is in place to communicate between the applications and the hardware. Some common operating systems are Microsoft Windows, Macintosh, and Linux. Almost every action conducted within an OS, whether user- or machine-generated, will leave a footprint somewhere within the OS. You want to analyze these artifacts controlled by the OS to determine whether the user committed any wrongdoing.
A filesystem is the storage mechanism for the data. A filesystem is independent of the OS. The filesystem tracks where the data is stored and what space is available. There are many filesystems, such as NTFS, HFS+, FAT 32 and Ext 4. Some formats are compatible with multiple operating systems, and some are not. For example, NTFS is utilized by Microsoft Windows as the filesystem of choice.
Once we are sure there is no malware on the system, we can then move on to report the investigation findings.
Read this chapter and the full book FREE of cost - No Credit card required!
Plus access over 8,000 other expert tech books and videos just by signing up - No commitment!
CONTINUE READING
83
Tech Concepts
36
Programming languages
73
Tech Tools
Unlimited access to the largest independent learning library in tech of over 8,000 expert-authored tech books and videos.
Innovative learning tools, including AI book assistants, code context explainers, and text-to-speech.
50+ new titles added per month and exclusive early access to books as they are being written.


 Free Chapter