

In this section, we will be covering the structure of Docker and the flow of what happens behind the scenes in this world. We will also take a look at Dockerfile and all the magic it can do. Lastly, in this section, we will look at the Docker networking/linking.
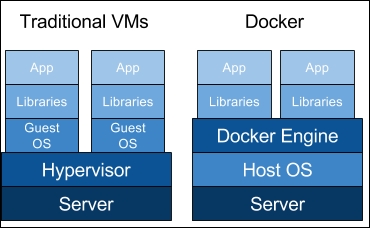
First, we must know what exactly Docker is and does. Docker is a container management system that helps easily manage Linux Containers (LXC) in an easier and universal fashion. This lets you create images in virtual environments on your laptop and run commands or operations against them. The actions you do to the containers that you run in these environments locally on your own machine will be the same commands or operations you run against them when they are running in your production environment. This helps in not having to do things differently when you go from a development environment like that on your local machine to a production environment on your server. Now, let's take a look at the differences between Docker containers and the typical virtual machine environments.
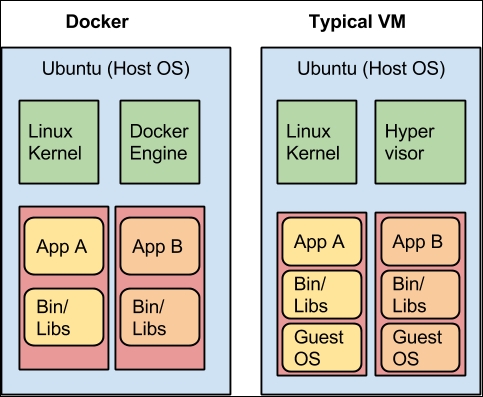
In the following illustration, we can see the typical Docker setup on the right-hand side versus the typical VM setup on the left-hand side:
This illustration gives us a lot of insight into the biggest key benefit of Docker, that is, there is no need for a complete operating system every time we need to bring up a new container, which cuts down on the overall size of containers. Docker relies on using the host OS's Linux kernel (since almost all the versions of Linux use the standard kernel models) for the OS it was built upon, such as Red Hat, CentOS, Ubuntu, and so on. For this reason, you can have almost any Linux OS as your host operating system (Ubuntu in the previous illustration) and be able to layer other OSes on top of the host. For example, in the earlier illustration, we could have Red Hat running for one app (the one on the left) and Debian running for the other app (the one on the right), but there would never be a need to actually install Red Hat or Debian on the host. Thus, another benefit of Docker is the size of images when they are born. They are not built with the largest piece: the kernel or the operating system. This makes them incredibly small, compact, and easy to ship.
Next, let's take a look at the most important file pertaining to Docker: Dockerfile. Dockerfile is the core file that contains instructions to be performed when an image is built. For example, in an Ubuntu-based system, if you want to install the Apache package, you would first do an apt-get update followed by an apt-get install -y apache2. These would be the type of instructions you would find inside a typical Dockerfile. Items such as commands, calls to other scripts, setting environmental variables, adding files, and setting permissions can all be done via Dockerfile. Dockerfile is also where you specify what image is to be used as your base image for the build. Let's take a look at a very basic Dockerfile and then go over the individual pieces that make one up and what they all do:
FROM ubuntu:latest
MAINTAINER Scott P. Gallagher <[email protected]>

RUN apt-get update && apt-get install -y apache2

ADD 000-default.conf /etc/apache2/sites-available/
RUN chown root:root /etc/apache2/sites-available/000-default.conf

EXPOSE 80
CMD ["/usr/sbin/apache2ctl", "-D", "FOREGROUND"]
These are the typical items you would find in a basic Dockerfile. The first line states the image we want to start off with when we build the container. In this example, we will be using Ubuntu; the item after the colon can be called if you want a specific version of it. In this case, I am just going to say use the latest version of Ubuntu; but you will also specify trusty, precise, raring, and so on. The second line is the line that is relevant to the maintainer of Dockerfile. In this case, I just have my information in there; well, at least, my name is there. This is for people to contact you if they have any questions or find any errors in your file. Typically, most people just include their name and e-mail address. The next line is a typical line you will see while pulling updates and packages in an Ubuntu environment. You might think they should be separate and wonder why they should be put on the same line separated by &&. Well, in the Dockerfile, it helps by only having to run one process to encompass the entire line. If you were to split it into separate lines, it would have to run one process, finish the process, then start the next process, and finish it. With this, it helps speed up the process by pairing the processes together. They still run one after another, but with more efficiency. The next two lines complement each other. The first adds your custom configurations to the path you specified and changes the owner and group owner to the root user. The EXPOSE line will expose the ports to anything external to the container and to the host it is running on. (This will, by default, expose the container externally beyond the host, unless the firewall is enabled and protecting it.) The last line is the command that is run when the container is launched. This particular command in a Dockerfile should only be used once. If it is used more than once, the last CMD in the Dockerfile will be launched upon the container that is running. This also helps emphasize the one process per container rule. The idea is to spread out the processes so that each process runs in its own container, thus the value of the containers will become more understandable. Essentially, something that runs in the foreground, such as the earlier command to keep the Apache running in the foreground. If we were to use CMD ["service apache2 start"], the container would start and then immediately stop. There is nothing to keep the container running. You can also have other instructions, such as ENV to specify the environmental variables that users can pass upon runtime. These are typically used and are useful while using shell scripts to perform actions such as specifying a database to be created in MySQL or setting permission databases. We will be covering these types of items in a later chapter, so don't worry about looking them up right now.
Another important aspect that needs to be understood is how Docker containers are networked or linked together. The way they are networked or linked together highlights another important and large benefit of Docker. When a container is created, it creates a bridge network adapter for which it is assigns an address; it is through these network adapters that the communication flows when you link containers together. Docker doesn't have the need to expose ports to link containers. Let's take a look at it with the help of the following illustration:
In the preceding illustration, we can see that the typical VM has to expose ports for others to be able to communicate with each other. This can be dangerous if you don't set up your firewalls or, in this case with MySQL, your MySQL permissions correctly. This can also cause unwanted traffic to the open ports. In the case of Docker, you can link your containers together, so there is no need to expose the ports. This adds security to your setup, as there is now a secure connection between your containers.
We've looked at the differences between Docker and typical VMs, as well as the Dockerfile structure and the components that make up the file. We also looked at how Docker containers are linked together for security purposes as opposed to typical VMs. Now, let's review the installers for Docker and the structure behind the installation once they are installed, manipulating them to ensure they are operating correctly.