

Let's start from the basics. Django is based on projects, so the first thing we will do is to create one and then test it on our browser.
To get started with Django the first thing we need to do is to create a project.
A project is just a collection of settings organized in a defined folder structure to run an instance of Django and they can be autogenerated using a Django-admin command offered by the Django package.
Note
If you are using Windows you will need to add the path of the Script folder containing the Django-admin command (C:\Python27\Script) to the environment variables.
From the command line, move into a directory where you would like to store your project and run the following command:
django-admin.py startproject jumpingintodjango
This will create a jumpingintodjango directory in your current directory.
Note
After the autogeneration of the project you should avoid renamimg the folders inside the project directory using names of built-in Python or Django components. This means that you should not use names like "django" or "test".
Now let's take a look at the directory structure that we just created:
jumpingintodjango/
  manage.py
  jumpingintodjango/
    __init__.py
    settings.py
    urls.py
    wsgi.py
Let's understand what these files are used for:
The root directory
jumpingintodjango/is just a container for the project, and its name is not used by Django. Feel free to rename it without any constraints.manage.pyis a command line utility that lets you operate on your Django project in many different ways.The inner
jumpingintodjango/directory is the Python package for your project.If you are a Python developer you already know that
jumpingintodjango/__init__.pyis an empty file that tells Python that this folder needs to be considered as the Python package.jumpingintodjango/settings.pyis for the settings/configurations for this Django project.jumpingintodjango/urls.pyis the URL configuration for this Django project. It is a clean and elegant URL scheme without any framework limitation.jumpingintodjango/wsgy.pyis the file that will be used as an entry point when you deploy this Django project to a web server that is WSGI-compatible.
If you already have experience in the development of websites with other languages like PHP, you may notice that you need a web server installed on your machine, like Apache, to run your code.
With Django you don't need that, in fact it is shipped with a built-in lightweight web server written purely in Python.
Let's run it to check if our project is able to run.
Navigate to the outer directory jumpigintodjango/ and run the following command:
python manage.py runserver
You will see the following output on the command line:
Validating models...

0 errors found
Django version 1.5, using settings 'jumpingintodjango.settings'
Development server is running at http://127.0.0.1:8000/
Quit the server with CONTROL-C
Note
This server has to be used only for development purposes. It has not been built to be a web server to be used in production environments.
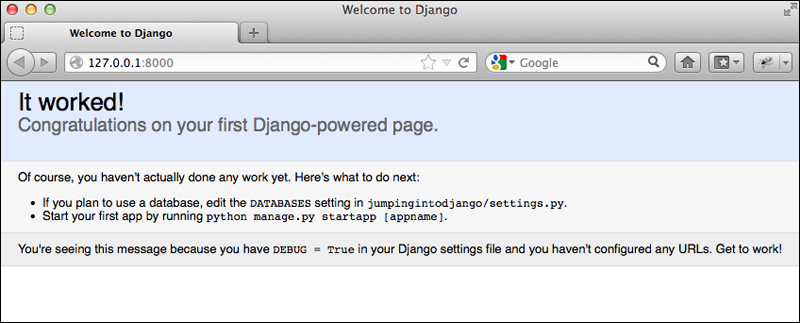
Now that the server is running, you can go to http://localhost:8000/ with your preferred web broswer. You will see a screen like the following:
The server runs by default on port 8000 and on the default local host IP 127.0.0.1. You can change this by passing the port as the first argument of the runserver command, or if you like you can also change the IP to the complete uri:port string like in the following example:
python manage.py runserver 0.0.0.0:8000
This command will expose the web server on all public IPs of your computer; this will allow you to expose the web project to other people.