
So, Forge installation is quite easy; however, creating your first Java EE 7 application will be even faster! Although, we can create rather advanced applications with Forge, for the purpose of learning, we will just use a simple schema that contains a user table, which can be built using the following command:
CREATE TABLE users (
  id serial PRIMARY KEY,
  name varchar(50),
  surname varchar(50),
  email varchar(50)
);
The first thing that we need to do is to create a new project using the project-new command. Execute the following commands from within the Forge shell:
[bin]$ project-new --named forge-demo --topLevelPackage com.packtpub.wflydevelopment.appendix –projectFolder forge-demo
Now, you have a new Forge project, which is based on a Maven project structure. Arguably, generating a new project isn't Forge's greatest value—the same can be achieved with Maven archetypes. The sweet part of Forge is that now you have the luxury of defining your own application skeleton interactively after it has already been generated. This means that you can create the project using the Maven archetype first and then extend it using Forge's intuitive suggestions.
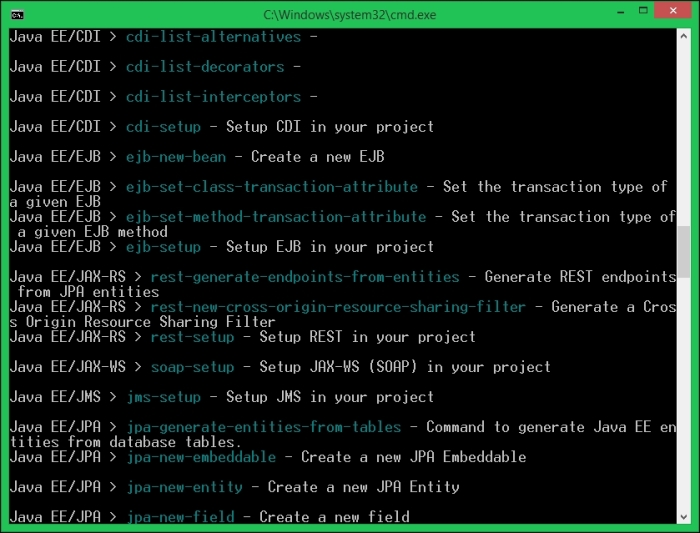
When the project is created, you can then enter command-list from the shell, as shown in the following screenshot, which enlists all the basic commands that you can use in Forge 2.12.1 Final:
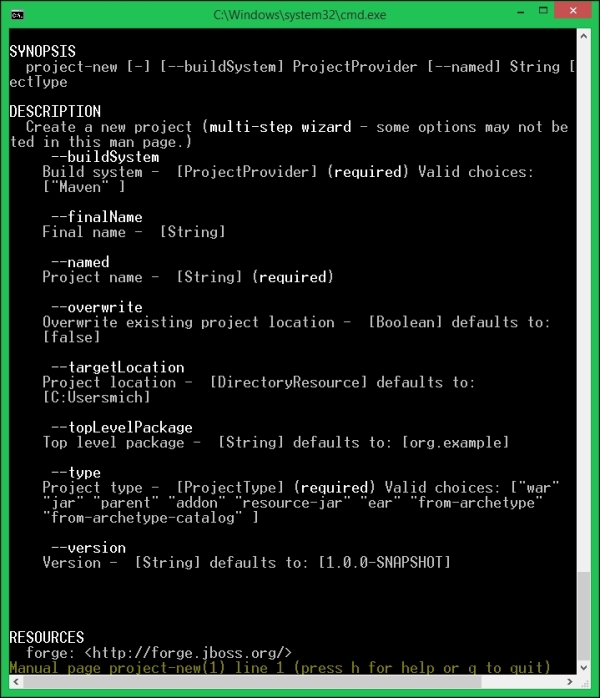
If you want to learn more about the single commands, you can use man followed by the command name, as shown in the following screenshot:
When you have learned how to get help using Forge, let's get back to our application.
In the first step, we need to specify what Java and Java EE version we want to use:
[forge-demo]$ project-set-compiler-version --sourceVersion 1.8 --targetVersion 1.8
[forge-demo]$ javaee-setup --javaEEVersion 7
***SUCCESS*** JavaEE 7 has been installed.
At this point, our project already contains Java EE 7 API dependency. Now, since we will need to reverse-engineer our database table into Java entities, the next step will be to configure the
Java Persistence API (JPA) layer for your application. This application will be based on WildFly JPA implementation, which is based on the Hibernate provider, referencing a database named Forge. This database is reachable at the Java Naming and Directory Interface (JNDI) named java:jboss/datasources/PostgreSqlDS. This is shown in the following command line:
[forge-demo]$ jpa-setup --jpaVersion 2.1 --provider HIBERNATE --container WILDFLY --dbType POSTGRES --dataSourceName java:jboss/datasources/PostgreSqlDS
The persistence.xml file was generated, and currently the console indicates that we are editing it. We can check its content by using the cat command:
[persistence.xml]$ cat .
<?xml version="1.0" encoding="UTF-8" standalone="yes"?>
<persistence xmlns="http://xmlns.jcp.org/xml/ns/persistence" xmlns:xsi="http://w
ww.w3.org/2001/XMLSchema-instance" version="2.1" xsi:schemaLocation="http://xmln
s.jcp.org/xml/ns/persistence http://xmlns.jcp.org/xml/ns/persistence/persistence
_2_1.xsd">
  <persistence-unit name="forge-demo-persistence-unit" transaction-type="JTA">
    <description>Forge Persistence Unit</description>
    <provider>org.hibernate.ejb.HibernatePersistence</provider>
    <jta-data-source>java:jboss/datasources/PostgreSqlDS</jta-data-source>
    <exclude-unlisted-classes>false</exclude-unlisted-classes>
    <properties>
      <property name="hibernate.hbm2ddl.auto" value="create-drop"/>
      <property name="hibernate.show_sql" value="true"/>
      <property name="hibernate.format_sql" value="true"/>
      <property name="hibernate.transaction.flush_before_completion" value="true
"/>
      <property name="hibernate.dialect" value="org.hibernate.dialect.PostgreSQL
Dialect"/>
    </properties>
  </persistence-unit>
</persistence>
Next, we will use the jpa-generate-entities-from-tables command in order to generate your Entity class. You will need to provide the following Java Database Connectivity (JDBC) connection information:
The JDBC URL
The username and password
The SQL dialect
The JDBC driver class name
The path in the filesystem where the JDBC driver is located
The package where the entities will be generated
You can specify all the parameters in a one-line command or complete it interactively. The final command would look like this (line breaks added for readability):
[persistence.xml]$ jpa-generate-entities-from-tables  \
--jdbcUrl jdbc:postgresql://localhost:5432/forge \
--hibernateDialect org.hibernate.dialect.PostgreSQLDialect \
--userName jboss \
--userPassword jboss \
--driverLocation c:\\forge\\postgresql-9.3-1101.jdbc41.jar \
--driverClass org.postgresql.Driver \
--databaseTables users
After completing the persistence layer, we will now create the GUI application using the scaffold command, which can be associated with several providers such as the AngularJS one. First, let's install the add-on using the following shell command (note that it should be executed in your system's shell, not in the Forge CLI):
forge --install org.jboss.forge.addon:angularjs
After the installation is complete, we need to issue three more commands. First, we will prepare the scaffolding framework:
[forge-demo]$ scaffold-setup --provider AngularJS
Our application now is a web app with AngularJS libraries. Next, we will define that we would like to generate a UI for the Users entity:
[forge-demo]$ scaffold-generate --provider AngularJS --targets com.packtpub.wflydevelopment.appendix.model.Users
Finally, we create an JAX-RS endpoint:
[forge-demo]$ rest-generate-endpoints-from-entities --targets com.packtpub.wflydevelopment.appendix.model.Users
And we are done! The application is now a complete Java EE application with REST endpoints, JPA, and an AngularJS UI.
Note
When these samples were written, JBoss Forge did not fully support all Java EE 7 dependencies. This can be fixed by manually modifying the pom.xml file of the generated project. You should just remove all the dependencies besides the one shown in the following code snippet:
<dependency>
    <groupId>javax</groupId>
    <artifactId>javaee-api</artifactId>
    <version>7.0</version>
    <scope>provided</scope>
</dependency>
Additionally, if your Users entity doesn't have an @javax.persistence.GeneratedValue annotation in its ID field, make sure you add it manually (there is currently a bug in the JPA add-on):
   @Id
   @Column(name = "id", unique = true, nullable = false)
   @GeneratedValue(strategy=GenerationType.IDENTITY)
   public int getId() {
      return this.id;
}Now, it is time to build your application using the build command, which will compile and package your application in a web application archive (forge-demo.war):
[forge-demo]$ build
***SUCCESS*** Build Success
The Maven build command has created an artifact forge-demo-1.0.0-SNAPSHOT.war in the target folder of your project. You can now either manually copy the archive into the deployments folder of your application server or use the management interfaces.
Remember that the server should have the java:jboss/datasources/PostgreSqlDS data source defined!