
WordPress is a CMS that can be installed in a few minutes with an easy setup guide. Throughout this book, we are implementing a personal portfolio management application with advanced users. This short guide is intended to help you set up your WordPress installation with necessary configurations to be compatible with the features of our application. Let's get started!
We are using WordPress 4.2.2 as the latest version available at the time of writing this book, so we have to download version 4.0 from the official website at http://wordpress.org/download/.
First, we need to create a folder for our application inside the web root directory. Then extract the contents of the downloaded zip file into the application folder. Finally, we have to provide the necessary permissions to create files inside the application folder. Make sure that you provide write permission for the wp-config.php file before starting the installation. Generally, we can use 755 permissions for directories and 644 permissions for files. You can learn more about WordPress file permissions at http://codex.wordpress.org/Hardening_WordPress#File_Permissions.
Initially, our application will be running on a local machine with the local web server. There are ways of working in the local environment:
Create a virtual host for running the application
Use a localhost for running the application
Virtual hosts, often referred to as vhosts, allow us to configure multiple websites inside a single web server. Also, we can match a custom URL to refer to our application. This method is preferred in web application development as the migration from local to real server becomes less complex.
Let's say we want to run the portfolio application as www.developerportfolio.com. All we have to do is configure a virtual host to point the application folder to www.developerportfolio.com. Once set up, this will call the local application folder instead of an actual online website.
By using an actual server URL for virtual host, we can directly export the local database into the server without changes.
The following resources will help you to set up virtual hosts on different operating systems:
Open a web browser and enter your preceding application URL to get the initial screen of the WordPress installation process, as illustrated in the following screenshot:
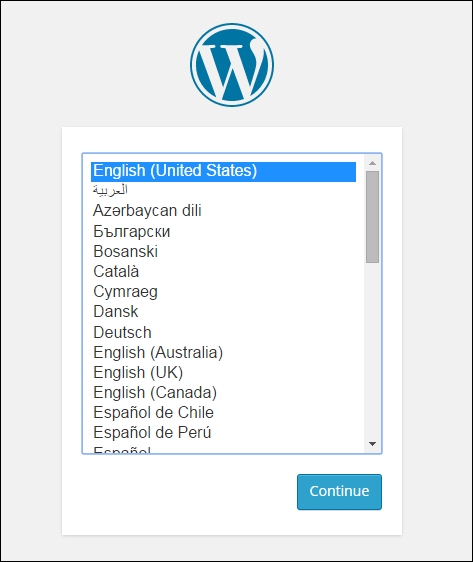
We have to select the language for the site as the initial step from WordPress Version 4.0. Select the language as English (United States) for this installation and click the Continue button. Then we have to manually create the database before starting this installation process. So, create a new database from your favorite database editor and create a database user with the necessary permission to access the database.
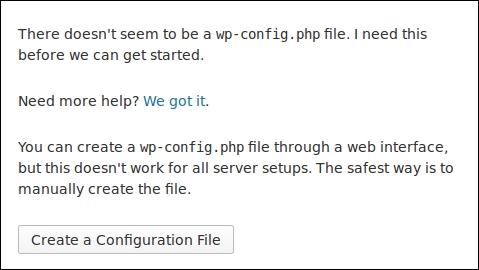
Next, click the Create a Configuration File button to load the screen shown in the following image:
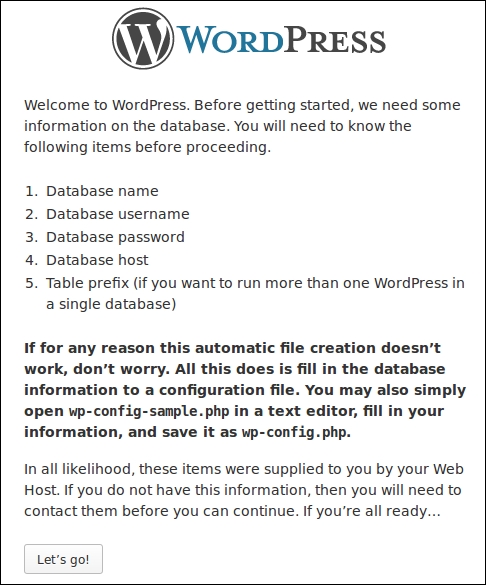
The preceding screen displays all the information needed to continue with the installation. Click the Let's go! button after reading the contents to get the next screen, as shown in the following image:
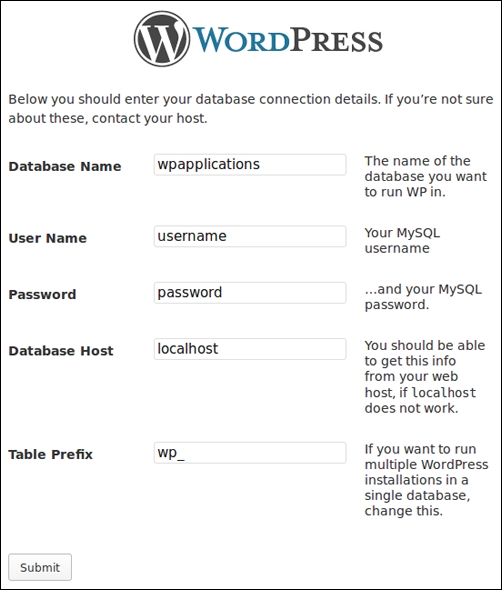
Here, we have to enter the details for connecting to the database. Use the details in the database creation process for defining the database name, user, password, and database host. Finally, we have to enter the table prefix. By default, WordPress uses wp_ as the prefix. It's ideal to set a custom prefix, such as a random string, for your tables to improve the security of your application. Once all the details are entered, hit the Submit button to get the next screen, as shown in the following image:
Note
Also, we can use the WP Better Security plugin to generate a random prefix and update the database.

Click the Run the install button to get the next screen, as shown in the following image:

Fill the form with the requested details. By default, WordPress provides a blank field for the username. Ideally, you should be using a custom username as the admin role, instead of admin as the username, to improve the security of the application. Once all the details are filled, submit the form to complete the installation, and get the following screen:

Details of your admin account will be displayed in this screen. Click the Log In button to get the login form and log into the admin area. Now, we are ready to go!
Permalinks allow you to define the custom URL structure for your posts, pages, and custom URLs using mod_rewrite.
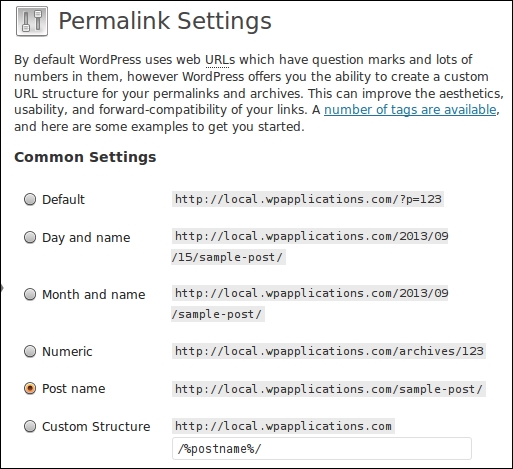
By default, WordPress uses query parameters to load posts and pages through the ID. Usually, we change the existing URL structure to provide a pretty URL. So, navigate to the Settings | Permalinks section on the admin menu, and you will find different URL structures. Select the Post name option for the URL and click on the Save button. Your screen should look something similar to the following:
We are using a free theme called Responsive for the developer portfolio management application of this book. We can download the Responsive theme from the official WordPress themes directory at http://wordpress.org/themes/responsive. Then we have to copy the extracted theme folder into the /wp-content/themes directory of our application.
Now we have to activate the theme from the WordPress admin panel. Choose Appearance | Themes from the left menu and click on the Activate link under the Responsive theme.
Now copy the wpwa-web-application plugin into the /wp-content/plugins folder. Use the Plugins section on the admin menu to activate the plugin for this book.
Now we have completed the process of configuring WordPress for our portfolio management application. Open the web browser and enter the URL as http://www.yoursite.com/user/register or http://localhost/application_folder/user/register, based on your URL structure, to load the registration page of the application. You can use the menu and forms to navigate through the site and check all the features built throughout this book.