
Integration testing tests the interactions between the individual software components in a system. It helps you uncover faults with the integrated components of a system earlier in the lifecycle. In this section, we will learn how to develop and run integration tests for a JAX-RS web application.
A typical JAX-RS web application is comprised of various software components, such as databases, the persistence layer, business service implementation, and the client interface layer. Integration tests that you write for a JAX-RS application should test the interaction between all these components when putting them together to build the complete application.
Tip
Unit testing versus integration testing:
A unit test is typically a test written by developers to verify a relatively small piece of code and it should not depend upon any other components or external resources, such as a database. They are narrow in scope.
An integration test verifies that different pieces of the system work together when they are put together to build a complete system. These tests typically require external resources like database instances or third party APIs.
JBoss Arquillian is a powerful tool for integration testing of Java EE applications. With Arquillian, you do not need to take care of setting up the environment, including the container for running integration tests. Arquillian lets you set up the container in three modes, as explained next:
A container can be any of the following types:
Servlet container: Examples of a servlet container are Tomcat and Jetty
Full-fledged Java EE application server: Examples of a full-fledged Java EE application server are JBoss AS, GlassFish, and WebLogic
Java SE Contexts and Dependency Injection(CDI) environment: Examples of Java SE contexts and dependency injection (CDI) environment are OpenEJB and Weld SE
Let's learn how to use Arquillian for building integration tests for a JAX-RS application. The following diagram illustrates the high-level architecture of the application that we use in this example:
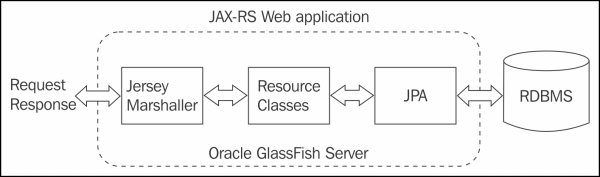
This example exposes stateless session beans as RESTful web resources, and uses Java Persistence API (JPA) for database access. We will use Maven for building this example. In reality you can use Arquillian with your favorite build tools, such as Ant, Maven, or Gradle.
The following discussion assumes that you have already created a Maven based JAX-RS application. The source structure may look as follows:
-src/
    -main/
      -java/ [Contains all application Java source files]
      -resources/ [Contains all application configuration files]
      -webapp/ [Contains all web files]
    -test/
      -java/ [Contains all test Java source files]
      -resources/ [Contains all test configuration files here]
-pom.xml [The Maven build file]
If you are not sure how to build Maven based JAX-RS applications, refer to the Building a simple RESTful web service application using NetBeans IDE section, in Chapter 3, Introducing the JAX-RS API.
Now, we will look at the steps for adding Arquillian to a Maven based JAX-RS application.
The Arquillian dependency entries in your pom.xml file may look like the following:
<dependency>
  <groupId>junit</groupId>
  <artifactId>junit</artifactId>
  <version>4.11</version>
  <scope>test</scope>
</dependency>
<dependency>
  <groupId>org.jboss.arquillian.junit</groupId>
  <artifactId>arquillian-junit-container</artifactId>
  <scope>test</scope>
</dependency>
<dependency>
  <groupId>org.jboss.arquillian.container</groupId>
  <artifactId>arquillian-glassfish-managed-3.1</artifactId>
  <version>1.0.0.Final-SNAPSHOT</version>
  <scope>test</scope>
</dependency>
<dependency>
  <groupId>org.glassfish.jersey.containers</groupId>
  <artifactId>jersey-container-servlet-core</artifactId>
  <version>2.0</version>
  <type>jar</type>
  <scope>provided</scope>
</dependency>
To use the latest release of Arquillian, point your Maven to use repository hosted on repository.jboss.org. A quick summary of the dependencies set for Arquillian are as follows:
junit and arquillian-junit-container: These are dependencies for the JUnit and Arquillian JUnit extensions, respectively.
arquillian-glassfish-managed: This represents the managed GlassFish server instance for running the integrations tests.
jersey-container-servlet-core: This dependency is used for Jersey implementation of JAX-RS API.
Arquillian uses arquillian.xml to locate and communicate with the container. Typically this file is placed in the src/test/resources folder. The following arquillian.xml file demonstrates entries for connecting to a locally installed GlassFish server, which we use in this example:
<?xml version="1.0"?>
<arquillian xmlns:xsi="http://www.w3.org/2001/XMLSchema-instance"
            xmlns="http://jboss.org/schema/arquillian"
            xsi:schemaLocation="http://jboss.org/schema/arquillian
                http://jboss.org/schema/arquillian/arquillian_1_0.xsd">
    <container qualifier="glassfish" default="true">
        <configuration>
            <property name="glassFishHome">
             D:\glassfish-4.1
            </property>
            <property name="adminHost">localhost</property>
            <property name="adminPort">4848</property>
            <property name="adminUser">admin</property>
            <property name="adminPassword">admin</property>
        </configuration>
    </container>
</arquillian>Once you have the basic infrastructure ready for running tests, you can start building test cases. Add your test classes to the src/test folder in the Maven project structure. The following annotations will help you avail of Arquillian features in your test classes:
Annotate the class with the
@org.junit.runner.RunWith(Arquillian.class)annotation. This tells JUnit to invoke Arquillian for running tests.Designate a
public staticmethod to return a deployable archive by annotating it with the@org.jboss.arquillian.container.test.api.Deploymentannotation. This method should return aorg.jboss.shrinkwrap.api.ShrinkWrap.ShrinkWraparchive. ShrinkWrap is an easy way to create deployable archives in Java, and Arquillian uses this API to build minimal deployable artifacts for running tests. You can learn more aboutShrinkWrapat http://arquillian.org/guides/shrinkwrap_introduction.Annotate all the methods that need to be tested with
@org.junit.Test.
Following is an Arquillian test class example for your quick reference. This class performs integration tests on the department resource:
//Other imports are removed for brevity
import org.junit.Test;
import org.jboss.arquillian.container.test.api.Deployment;
import org.jboss.arquillian.junit.Arquillian;
import org.jboss.arquillian.junit.InSequence;
import org.jboss.shrinkwrap.api.ShrinkWrap;
import org.jboss.shrinkwrap.api.spec.WebArchive;

@RunWith(Arquillian.class)
public class DepartmentResourceTest {

    public DepartmentResourceTest() {
    }

    //This method returns minimal files that needs to be deployed
    //for running integration test
    //@Deployment(testable=true) : Runs within container(default)
    //@Deployment(testable=false) : Runs outside of container
    @Deployment(testable=true)
    public static WebArchive createDeployment() {
        return ShrinkWrap
                .create(WebArchive.class, "arquilian-demo-test.war")
                .addClasses(Department.class,ApplicationConfig.class,
                            JPAResource.class,
                            DepartmentResource.class)
                .addAsWebInfResource("test-web.xml",
                                      "web.xml")
                .addAsResource("test-persistence.xml",
                               "META-INF/persistence.xml");
    }

    //Method to be tested
    @Test
    @InSequence(1)
    public void testAddDeptResource() {
        WebTarget target = ClientBuilder.newClient()
                .target(
        "http://localhost:8080/arquilian-demo-test/api/departments");
        // Crate a new dept.
        Department dept = new Department();
        dept.setDepartmentId(new Short((short) 10));
        dept.setDepartmentName("HR");
        Department  deptResult = target.request("application/json").
                     post(Entity.json(dept), Department.class);

        assertEquals("HR", deptResult.getDepartmentName());
    }

   //Rest of the methods are removed for brevity
}
If you have used JUnit before the preceding test class implementation, it may look familiar to you, except for a couple of methods and APIs:
The
createDeployment()method used in this example generates a web archive and deploys it to the container. You do not need to build and deploy an entire application for testing a specific API. TheShrinkWrapclass exposes APIs to create WebArchive. You can use theaddClasses()method on the WebArchive to add only the required classes in the web archive file.Use the
WebArchive::addAsWebInfResource()API to specify different configuration files for testing. For instance, in the preceding example's API, callWebArchive::addAsWebInfResource("test-web.xml", "web.xml")addstest-web.xmlto the web archive in the place ofweb.xml. This feature allows you to specify a different set of deployment descriptors and configuration files for the purpose of testing. All the test related resources, such as deployment descriptors and configuration files, are stored in thesrc/test/resourcesfolder.Tip
The complete source code for this example is available in the Packt website. You can download the example from the Packt website link that we mentioned at the beginning of this book, in the Preface section. In the downloaded source code, see the
rest-appendix-arquillianproject to a get a feel of end to end implementation.
Once all the necessary settings and test classes are ready, you can run the Arquillian tests. This process is just like running any unit tests in your project. For example, with Maven, you can use the following command:
mvn test
Arquillian takes the following steps to run tests:
When the test is run, the
@org.junit.runner.RunWith(Arquillian.class)annotation present on the test class tells JUnit to invoke Arquillian for running the tests, instead of the default runner built into JUnit.Arquillian then looks for a
public staticmethod annotated with the@org.jboss.arquillian.container.test.api.Deploymentannotation in the test class to retrieve the deployable archive.In the next step, Arquillian contacts the container configured in
arquillian.xmland deploys the archive to the container.All methods annotated with
@org.junit.Testare run now.Tip
In-depth coverage of Arquillian is beyond the scope of this book. To learn more on Arquillian, visit http://arquillian.org.
Jersey framework comes with built-in support for unit testing the JAX-RS server-side components. However this lacks many features as compared to Arquillian and is not an ideal tool for performing full fledged integration tests on Java EE components. You can learn more about the Jersey test framework at https://jersey.java.net/documentation/latest/test-framework.html.