

For the rest of this chapter, I'm going to teach you how to set up a Bootstrap boilerplate project in Harp. Moving forward, this boilerplate will be the basis for all the projects in the book. One of the great things about Harp is that you can simply copy and paste a project to create a new instance of it on your local machine. There are also some other commands that you can run to generate project scaffolding, and I welcome you to check them out at http://harpjs.com/docs/. However, for this book, we aren't going to take any shortcuts, and I'm going to show you how to manually set up a project. The best practice is to do it the hard way first so that you learn how it works. This will save you a headache down the road if you are troubleshooting a problem. The first thing you should do is navigate to a directory on your computer where you want to store your project. In the directory you created the following files and sub directories. For the time being, just leave the .json and .ejs files blank. We'll fill them in a little later. Take a look at the following image to see how your project directory should look.
Note
Note that there is a project boilerplate available for download or forking from GitHub at https://github.com/cardeo/booterator.
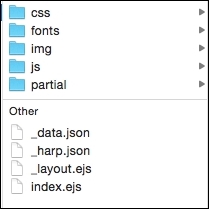
This is the root of our project, and here we'll find everything at a high level:
/css: This directory will contain all our custom CSS and the Bootstrap framework CSS files./fonts: This directory will be for holding any web fonts or icon web fonts. The directory isn't totally necessary, but I always include Font Awesome with all my projects so that I have an icon library to pull from./img: This directory will hold all the images for the project. For the boilerplate, we won't actually need any images, but we're setting this up for future projects too./js: This directory will hold any custom libraries and the Bootstrap framework's JavaScript file./partial: This directory will hold the pieces of code that we want to reuse in our templates, such as our header and footer._data.json: This is the file in which we will define any metadata that we want to use in our template. An example of this could be the page title for each web page._harp.json: This is a file for setting global properties, such as the title of the website, which is used on all pages._layout.ejs: This file is the scaffolding for our page. It includes the<head>and<body>sections of our document. At the very least, you need one layout in every Harp project. It is possible to have multiple layouts if you want to load in JavaScript libraries to only some pages.index.ejs: This file holds the actual code for our boilerplate home page. This is the body or content of the page minus the wrapping template pieces that are held in_layout.ejs.
Note
The Embedded JavaScript (EJS) template language is very similar to HTML and is therefore really easy to grasp. The advantage of using EJS is that it allows the use of elements such as variables.
Now that the root of our project is set up, let's set up the subdirectories. We'll start with the CSS directory by adding the following files. Now would be a good time to download the latest version of Bootstrap from http://getbootstrap.com if you haven't done so already. Again, just leave theme.less blank for now.

Within the components directory, create a Less file and name it _variables.less. Leave this file blank for the time being.
Note
Starting a file with an underscore in Harp will mark it as a template file that should not be a straight copy to the production directory. It is file that should be compiled into another to create a full HTML page or CSS style sheet.
Let's quickly walk through the files in the /css directory:
bootstrap.min.css: This is the Bootstrap CSS framework. When you download the Bootstrap package, there are a number of other CSS files. We don't need any of those files; we only need the minified version of the framework./components: This is a directory for storing the Bootstrap component's Less files. If you are customizing a Bootstrap component, you should create a Less file for it and enter the custom CSS.theme.less: This is the master file for our CSS. All our components should be imported into this file so that upon compilation, it will be a singletheme.cssfile for our project.
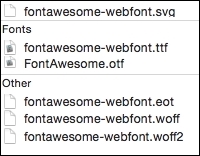
Bootstrap comes with Glyphicons out of the box, which is fine. I, however, prefer to use font awesome because their license is more flexible. To add font awesome to your project, head to http://fontawesome.io and download the package. Unzip it into your computer after downloading and copy the contents of the /fonts directory to your project's /fonts directory. Next, go to the /css folder and copy font-awesome.min.css to your project's /css directory. For now, that's all you need to do; we'll hook up everything else a little later. The /fonts directory should now look like this:
For our boilerplate, all that we need to do is copy bootstrap.min.js to our /js directory. Like the Bootstrap CSS, there are a few JavaScript files included in the download package. You can ignore the other files as we won't need them.
The last directory that we need to set up is our partials. If you come from the PHP world, note that partials are includes. They are little snippets of code that are reused across all or many of your pages, such as your header, footer, and navigation. Partials are one of the best features of Harp because you can update these template pieces in one place when changes occur, instead of updating on every page! For now, create two files in your /partial directory, called _header.ejs and _footer.ejs.
Now that we've finished setting up the basic structure of our project, we can move on to actually filling in some code for our .json and .ejs files.
I'm going to start with _harp.json before _data.json. This is because the first file deals with the global settings for our project. In this case, we're going to use _harp.json to set up a global variable that will map to the website name for our project. Later on, we'll insert this variable into our layout so that it appears on every page of our website. Enter the following code and save it:
{
  "globals": {
    "siteTitle": "My Bootstrap Boilerplate"
  }
}
What we've done here is set up a global variable named siteTitle and set its value to My Bootstrap Boilerplate. Once we insert this variable into our layout, the title will be shown on every page of our project.
Note
This is only a fraction of what you can do here. Check out http://harpjs.com/docs/development/globals to learn more about globals.
If _harp.json
applies to all the pages in our website, _data.json contains page-specific data for our project. In this case, I'm going to set up a variable that can be used to insert the page name for each page of my project:
{
  "index": {
    "pageTitle": "Home"
  }
}
Here's how this data works:
The
indexrefers to the name of myejstemplate that I want to target. Currently, we have only one, calledindex.ejs.The
pageTitleis a variable I created for the title of each of my pages. We'll need to insert this variable into the layout later on.Finally, I entered a value of
Homefor my variable.
Again, there is more that you can do with metadata in Harp, but at this point, this is all that we need. To learn more about Harp metadata, visit http://harpjs.com/docs/development/metadata.
As I mentioned previously, _layout.ejs is the wrapper file for my index.ejs page template. Layouts can be reused, and pages will always default to using _layout.ejs unless you tell them otherwise. If you want to create a second layout for use on a specific page, you simply have to create a new file called something like _layout-two.ejs. Then, in your _data.json file, you have to add a second line to your template declaration that points to the new layout:
{
  "index": {
    "pageTitle": "Home",
    "layout": "_layout-two"
  }
}Now, that's an example of how to use multiple layouts. For our boilerplate, we'll need only one layout. A layout file can be written in mostly normal HTML, but we need to insert a yield property to tell Harp where to insert the content from the page file (index.ejs). We also need to insert the variables that we defined in _harp.json and _data.json. Open up your _layout.ejs file in the root of the project and insert the following <head> code:
<!DOCTYPE html>
<html lang="en">
<head>
  <meta charset="utf-8">
  <meta http-equiv="X-UA-Compatible" content="IE=edge">
  <meta name="viewport" content="width=device-width, initial-scale=1">
  <title><%- pageTitle %> | <%- siteTitle %></title>

  <link rel="stylesheet" type="text/css" href="css/bootstrap.min.css">
  <link rel="stylesheet" type="text/css" href="css/font-awesome.min.css">
  <link rel="stylesheet" type="text/css" href="css/theme.css">

  <!-- HTML5 shim and Respond.js for IE8 support of HTML5 elements and media queries -->
  <!-- WARNING: Respond.js doesn't work if you view the page via file:// -->
  <!--[if lt IE 9]>
    <script src="https://oss.maxcdn.com/html5shiv/3.7.2/html5shiv.min.js"></script>
    <script src="https://oss.maxcdn.com/respond/1.4.2/respond.min.js"></script>
  <![endif]-->
</head>
The preceding code is the standard Bootstrap header with some small changes:
Always load the Bootstrap CSS first, as you may want to overwrite something in your theme
Include the font awesome CSS file so that you can use the icons in your projects
Insert your theme CSS file, which will contain all your custom CSS
If you look at the <title> tag in <head>, you'll notice a couple of variables. These are the two variables that we set up in _harp.json and _data.json. On compiling, pageTitle and siteTitle will be inserted into the page layout. Depending on the page, the proper pageTitle variable will be inserted.
Now that we have the <head> element of our layout set up, let's enter the code for <body>:
<body>
  <%- partial("partial/_header") %>

  <%- yield %>

  <%- partial("partial/_footer") %>

  <!-- javascript //-->
  <script src="//ajax.googleapis.com/ajax/libs/jquery/1.11.1/jquery.min.js"></script>
  <script src="js/bootstrap.min.js" type="text/javascript"></script>
</body>
</html>
Now, the <body> code is going to look a little different from what we are used to with Bootstrap and HTML. Let me go through each part of the layout:
The
headerpartial will include our header code, which we haven't set up yet.The yield tag is the marker for loading in the contents of our pages. In this case, it will load
index.ejs.Like the header, the footer partial will be included wherever the tag is inserted.
At the bottom, I've included jQuery and a link to the Bootstrap JavaScript framework that is in our project.
To set up the header, we need to edit the _header.ejs file that we created earlier in this chapter. Head to the /partial directory and open up _header.ejs. Then paste the following in the Bootstrap navbar code:
<nav class="navbar navbar-default" role="navigation">
  <div class="container-fluid">
    <div class="navbar-header">
      <button type="button" class="navbar-toggle collapsed" data-toggle="collapse" data-target="#navbar1">
        <span class="sr-only">Toggle navigation</span>
        <span class="icon-bar"></span>
        <span class="icon-bar"></span>
        <span class="icon-bar"></span>
      </button>
     <a href="index.html" class="navbar-brand"><%- siteTitle %></a>
    </div>

    <div class="collapse navbar-collapse" id="navbar1">
      <ul class="nav navbar-nav">
       <li><a href="index.html">Home</a></li>
      </ul>
    </div>
  </div>
</nav>
The code for the header is pretty straightforward, except for one thing; it's your standard Bootstrap navbar. One more thing that is different is that I've used the siteTitle global variable again so that siteTitle will automatically be inserted into the navbar brand for each page upon compilation. This is a simple example of how you can reuse variables in your templates.
Next, open up the _footer.ejs file, which is in the same /partial directory. Here, we'll just want to insert some super simple footer code that can be used as a placeholder. Notice how I'm wrapping my footer in a container-fluid class. It's a good idea to componentize the pieces of your theme so that they are easily interchangeable and don't rely on markup in other components or partials:
<div class="container-fluid">
<div class="row">
<div class="col-lg-12">
© 2015 Matt Lambert
</div>
</div>
</div>As you can see, it is super simple! The last template or HTML/EJS work that we need to do is set up the body of our page, which lives inside of index.ejs. For our boilerplate, let's create a super simple piece of page content:
<div class="container-fluid">
<div class="row">
<div class="col-lg-12">
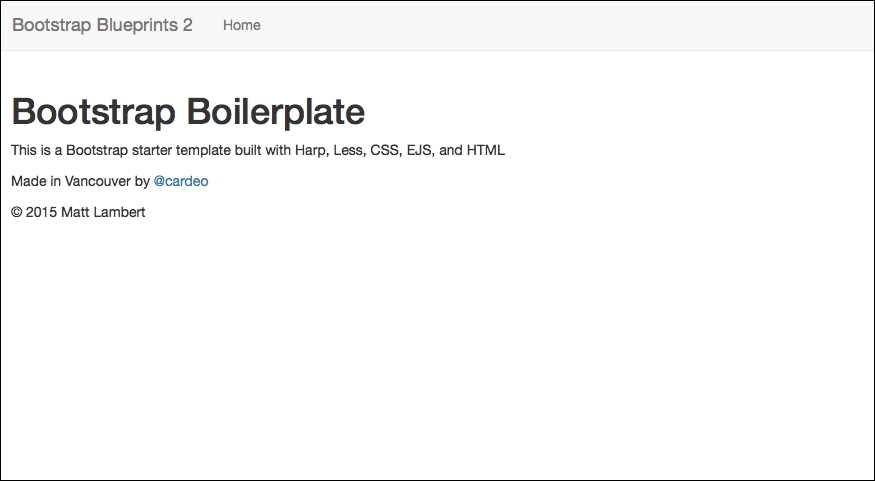
<h1>Bootstrap Boilerplate</h1>
<p>This is a Bootstrap starter template built with Harp, Less, CSS, EJS, and HTML</p>
<p>Made in Vancouver by <a href="http://twitter.com/cardeo">@cardeo</a></p>
</div>
</div>
</div>This chunk of code should be self-explanatory. I've purposely kept it simple so that you can easily see where the lines between page templates and partials are. Now that the base of our project is set up, let's compile and preview it!
Now that our initial project is set up, it's time to compile it and test it out to make sure that everything works. When we compile our project for the first time, Harp creates a directory in the root of our project, called /www. Within this directory, it will dump all the compiled HTML, CSS, and JavaScript files. When you are ready to publish your project, simply upload the contents of this directory to your server. See how simple and clean it is? Your development and production files live in the same project directory but are totally separate.
Note
You should never manually edit any of the files in your /www directory. If you do, on the next compilation, any changes you make will be overwritten.
The compilation of your project is done from the command line or terminal app. If you have closed it, open it again and navigate to your project directory. Once you get there, run the following command:
$ harp compile
If all goes well, a new line should appear in the terminal. If there is an error, Harp will give you an error message with a clue to the problem. Let's assume that all has gone well and everything has worked fine. Go to your project directory and look for the /www directory. If it's there, it means that the compile worked fine.
The next thing you'll want to do is actually test your project in a browser. To do this, we can use Harp's built-in web server to test the website locally. This is a great feature because you can test drive your project locally without having to upload it to the Internet. To fire up the server, enter the following command in the terminal from your project directory:
$ harp server --port 9000
This will deploy your project locally on port 9000. Open up a web browser and go to http://localhost:9000 to view the website.
Your page should look like this:
Now that you have the server running, you can take advantage of one of Harp's other awesome features. Every time you make a change to a template file, CSS file, and so on, you don't have to recompile your project. You can simply save the file and refresh the browser, and you'll see the updated version. This will save you so much time! One thing to remember, however, is to make sure you compile when you're done so that the changes are applied to the /www directory.
I encourage you to memorize the preceding commands, but if you want something easier to remember, you can use $ harp server www to run the local server. The only problem with this command, however, is that I've found it to be a bit buggy. It will start the server but updates to templates in the background won't always be picked up. A more reliable method is to manually declare which port to use when you fire up the server. Now that our project is all set up and running, it's time to set up our Less configuration to theme our project.