

Our application is beginning to get a little more real now. In the previous chapter, we added some APIs and client-side interfaces to them.
Microservices have become very hot in the last few years, primarily because they reduce the developmental and support weight of a very large or monolithic application. By breaking apart these monoliths, microservices enable a more agile and concurrent development. They can allow separate teams to work on separate parts of the application without worrying too much about conflicts, backwards compatibility issues, or stepping on the toes of other parts of the application.
In this chapter, we'll introduce microservices and explore how Go can work within them, to enable them and even drive their central mechanisms.
To sum this all up, we will be covering the following aspects:
- Introducing the microservice approach
- Pros and cons of utilizing microservices
- Understanding the heart of microservices
- Communicating between microservices
- Putting a message on the wire
- Reading from another service
If you've not yet encountered the term microservice or explored its meaning in depth, we can very quickly demystify it. Microservices are, in essence, independent functions of an overall application being broken apart and made accessible via some universally known protocol.
The microservice approach is, usually, utilized to break apart a very large monolithic application.
Imagine your standard web application in the mid-2000s. When new functionality is needed, let's say a function that emails new users, it's added directly to the codebase and integrated with the rest of the application.
As the application grows, so does the necessary test coverage. So, it increases the potential for critical errors too. In this scenario, a critical error doesn't just bring down that component, in this case the e-mailing system; it takes down the entire application.
This can be a nightmare to track down, patch, and re-deploy, and it's exactly the type of nightmare that microservices were designed to address.
If the e-mailing part of the application is separated into its own app, it has a level of isolation and insulation that makes finding problems much easier. It also means that the entire stack doesn't fall down just because someone introduced a critical error into one small part of the whole app, as shown in the following figure:
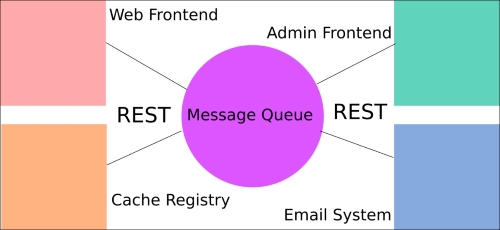
Consider the following basic example architecture, where an application is split into four separate concepts, which represent their own applications in the microservices framework.
Once, every single piece existed in its own application; now they are broken apart into smaller and more manageable systems. Communication between the applications happens via a message queue utilizing REST API endpoints.
If microservices seem like a panacea at this point, we should also note that this approach does not come without its own set of issues. Whether the tradeoff is worth it or not depends heavily on an overall organizational approach.
As mentioned earlier, stability and error detection comprise a big production-level win for microservices. But if you think of the flip side of applications not breaking, it could also mean that issues go hidden for longer than they otherwise would. It's hard to ignore the entire site being down, but it could be hours before anyone realizes that e-mails have not been sent, unless some very robust logging is in place.
But there are other big pros to microservices. For one, utilizing an external standard communication protocol (REST, for example) means that you're not locked into a single language.
If, for example, some part of your application can be written better in Node than in Go, you can do that without having to rewrite an entire application. This is a frequent temptation for developers: rewriting the whole thing because the new and shiny language app or feature is introduced. Well, microservices safely enable this behavior—it allows a developer or a group of developers to try something without needing to go deeper than the specific function they wish to write.
This, too, comes with a potentially negative scenario—since the application components are decoupled, so can the institutional knowledge around them be decoupled. Few developers may know enough to keep the service operating ideally. Other members of the group may lack the language knowledge to jump in and fix critical errors.
One final, but important, consideration is that microservice architecture generally means a distributed environment by default. This leads us to the biggest immediate caveat, which is the fact that this situation almost always means that eventual consistency is the name of the game.
Since every message must depend on multiple external services, you're subject to several layers of latency to get a change enacted.
You might be wondering about one thing as you consider this system to design dissonant services that work in congress: what's the communication platform? To answer this, we'll say there is an easy answer and a more intricate one.
The easy answer is REST. This is great news, as you're likely to be well versed in REST or you at least understand some portion of it from Chapter 5, Frontend Integration with RESTful APIs. There we described the basics of API communication utilizing RESTful, stateless protocols and implementing HTTP verbs as actions.
Which leads us to the more complex answer: not everything in a large or involved application can operate on REST alone. Some things require state or at least some level of long-lasting consistency.
For the latter problem, most microservice architectures are centered on a message queue as a platform for information sharing and dissemination. A message queue serves as a conduit to receive REST requests from one service and holds it until another service retrieves the request for further processing.
There are a number of approaches to communicate between microservices, as mentioned; REST endpoints provide a nice landing pad for messages. You may recall the preceding graphic, which shows a message queue as the central conduit between services. This is one of the most common ways to handle message passing and we'll use RabbitMQ to demonstrate this.
In this case, we'll show when new users register to an e-mail queue for the delivery of a message in our RabbitMQ installation, which will then be picked up by an emailing microservice.
Note
You can read more about RabbitMQ, which utilizes Advanced Message Queuing Protocol (AMQP) here: https://www.rabbitmq.com/.
To install an AMQP client for Go, we'll recommend Sean Treadway's AMQP package. You can install it with a go get command. You can get it at github.com/streadway/amqp
There are a lot of approaches to use RabbitMQ. For example, one allows multiple workers to accomplish the same thing, as a method for distributing works among available resources.
Assuredly, as a system grows, it is likely to find use for that method. But in our tiny example, we want to segregate tasks based on a specific channel. Of course, this is not analogous to Go's concurrency channels, so keep that in mind when you read about this approach.
But to explain this method, we may have separate exchanges to route our messages. In our example, we might have a log queue where messages are aggregated from all services into a single log location, or a cache expiration method that removes cached items from memory when they're deleted from the database.
In this example, though, we'll implement an e-mail queue that can take a message from any other service and use its contents to send an e-mail. This keeps all e-mail functionality outside of core and supportive services.
Recall that in Chapter 5, Frontend Integration with RESTful APIs, we added register and login methods. The one we're most interested in here is RegisterPOST(), where we allowed users to register to our site and then comment on our posts.
It's not uncommon for newly registered users to get an e-mail, either for confirmation of identity or for a simple welcome message. We'll do the latter here, but adding confirmation is trivial; it's just a matter of producing a key, delivering via e-mail and then enabling the user once the link is hit.
Since we're using an external package, the first thing we need to do is import it.
Here's how we do it:
import (
  "bufio"
  "crypto/rand"
  "crypto/sha1"
  "database/sql"
  "encoding/base64"
  "encoding/json"
  "fmt"
  _ "github.com/go-sql-driver/mysql"
  "github.com/gorilla/mux"
  "github.com/gorilla/sessions"
  "github.com/streadway/amqp"
  "html/template"
  "io"
  "log"
  "net/http"
  "regexp"
  "text/template"
  "time"
)
Note that here we've included text/template, which is not strictly necessary since we have html/template, but we've noted here in case you wish to use it in a separate process. We have also included bufio, which we'll use as part of the same templating process.
For the sake of sending an e-mail, it will be helpful to have a message and a title for the e-mail, so let's declare these. In a production environment, we'd probably have a separate language file, but we don't have much else to show at this point:
var WelcomeTitle = "You've successfully registered!"
var WelcomeEmail = "Welcome to our CMS, {{Email}}!  We're glad you could join us."
These simply represent the e-mail variables we need to utilize when we have a successful registration.
Since we're putting a message on the wire and yielding some responsibility for the application's logic to another service, for now we'll only need to ensure that our message has been received by RabbitMQ.
Next, we'll need to connect to the queue, which we can pass either by reference or reconnect with each message. Generally, you'll want to keep the connection in the queue for a long time, but you may choose to reconnect and close your connection each time while testing.
In order to do so, we'll add our MQ host information to our constants:
const (
  DBHost  = "127.0.0.1"
  DBPort  = ":3306"
  DBUser  = "root"
  DBPass  = ""
  DBDbase = "cms"
  PORT    = ":8080"
  MQHost  = "127.0.0.1"
  MQPort  = ":5672"
)
When we create a connection, we'll use the somewhat familiar TCP Dial() method, which returns an MQ connection. Here is our function for connecting:
func MQConnect() (*amqp.Connection, *amqp.Channel, error) {
  url := "amqp://" + MQHost + MQPort
  conn, err := amqp.Dial(url)
  if err != nil {
    return nil, nil, err
  }
  channel, err := conn.Channel()
  if err != nil {
    return nil, nil, err
  }
  if _, err := channel.QueueDeclare("", false, true, false, false, nil); err != nil {
    return nil, nil, err
  }
  return conn, channel, nil
}
We can choose to pass the connection by reference or sustain it as a global with all applicable caveats considered here.
Tip
You can read a bit more about RabbitMQ connections and detecting disrupted connections at https://www.rabbitmq.com/heartbeats.html
Technically, any producer (in this case our application) doesn't push messages to the queue; rather, it pushes them to the exchange. RabbitMQ allows you to find exchanges with the rabbitmqctl list_exchanges command (rather than list_queues). Here, we're using an empty exchange, which is totally valid. The distinction between a queue and an exchange is non-trivial; the latter is responsible for having defined the rules surrounding a message, en route to a queue or queues.
Inside our RegisterPOST(), let's send a JSON-encoded message when a successful registration takes place. We'll want a very simple struct to maintain the data we'll need:
type RegistrationData struct {
  Email   string `json:"email"`
  Message string `json:"message"`
}
Now we'll create a new RegistrationData struct if, and only if, the registration process succeeds:
  res, err := database.Exec("INSERT INTO users SET user_name=?, user_guid=?, user_email=?, user_password=?", name, guid, email, password)

  if err != nil {
    fmt.Fprintln(w, err.Error)
  } else {
    Email := RegistrationData{Email: email, Message: ""}
    message, err := template.New("email").Parse(WelcomeEmail)
    var mbuf bytes.Buffer
    message.Execute(&mbuf, Email)
    MQPublish(json.Marshal(mbuf.String()))
    http.Redirect(w, r, "/page/"+pageGUID, 301)
  }
And finally, we'll need the function that actually sends our data, MQPublish():
func MQPublish(message []byte) {
  err = channel.Publish(
    "email", // exchange
    "",      // routing key
    false,   // mandatory
    false,   // immediate
    amqp.Publishing{
      ContentType: "text/plain",
      Body:        []byte(message),
    })
}Now that we've sent a message to our message queue in our app, let's use another microservice to pluck that from the queue on the other end.
To demonstrate the flexibility of a microservice design, our secondary service will be a Python script that connects to the MQ and listens for messages on the e-mail queue, when it finds one. It will parse the message and send an e-mail. Optionally, it could publish a status message back on the queue or log it, but we won't go down that road for now:
import pika
import json
import smtplib
from email.mime.text import MIMEText

connection = pika.BlockingConnection(pika.ConnectionParameters( host='localhost'))
channel = connection.channel()
channel.queue_declare(queue='email')

print ' [*] Waiting for messages. To exit press CTRL+C'

def callback(ch, method, properties, body):
    print " [x] Received %r" % (body,)
    parsed = json.loads(body)
    msg = MIMEText()
    msg['From'] = 'Me'
    msg['To'] = parsed['email']
    msg['Subject'] = parsed['message']
    s = smtplib.SMTP('localhost')
    s.sendmail('Me', parsed['email'], msg.as_string())
    s.quit()

channel.basic_consume(callback,
                      queue='email',
                      no_ack=True)

channel.start_consuming()In this chapter, we looked at experimenting with utilizing microservices as a way to dissect your app into separate domains of responsibility. In this example, we delegated the e-mail aspect of our application to another service written in Python.
We did this to utilize the concept of microservices or interconnected smaller applications as callable networked functions. This ethos is driving a large part of the Web of late and has myriad benefits and drawbacks.
In doing this, we implemented a message queue, which operates as the backbone of our communications system, allowing each component to speak to the other in a reliable and repeatable way. In this case, we used a Python application to read messages sent from our Go application across RabbitMQ and take that e-mail data and process it.
In Chapter 8, Logging and Testing, we'll focus on logging and testing, which we can use to extend the microservices concept so that we can recover from errors and understand where things might go awry in the process.