Book Image

DotNetNuke Skinning Tutorial

By : Darren Neese
Book Image

DotNetNuke Skinning Tutorial

By: Darren Neese

Overview of this book

<p>DotNetNuke is an open-source web application framework written in VB.NET for the ASP.NET framework. The application's content management system is extensible and customizable through the use of skins and modules, and it can be used to create, deploy, and manage intranet, extranet, and websites.<br /><br />DotNetNuke has a skinning architecture, which provides a clear separation between design and content, enabling a web designer to develop skins without requiring any specialist knowledge of development in ASP.NET; only knowledge of HTML and an understanding of how to prepare and package the skins themselves are required.<br /><br />If you want to create great-looking skins for your DotNetNuke websites, this book is for you. If you're new to DotNetNuke skinning, this book is the ideal introduction. It will give you clear, concise and practical guidance to take you from the basics of DotNetNuke skinning right through to developing the skills to make you a DotNetNuke skinner to be reckoned with!<br /><br />This book gives you step-by-step instructions to the fundamentals of skinning so that you will be in control of the look and feel of your DotNetNuke site, and dreaming of new ideas for creating more interactive user interfaces.</p>
Table of Contents (15 chapters)
DotNetNuke Skinning Tutorial
Credits
About the Author
About the Reviewers
Preface

Adding to the Container


Now that we know what can be added, let's add them to our new container. We'll start off with the HTM file and then move on to the CSS file.

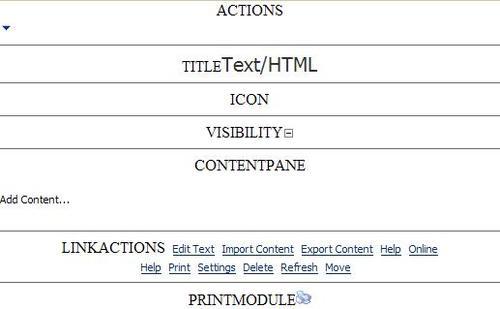
In our HTM file, add the following code. This will utilize all of the container tokens with the exception of the action buttons, which we'll add soon.

<div style="background-color:White;">
ACTIONS[ACTIONS]
<hr />
TITLE[TITLE]
<hr />
ICON[ICON]
<hr />
VISIBILITY[VISIBILITY]
<hr />
CONTENTPANE[CONTENTPANE]
<hr />
LINKACTIONS[LINKACTIONS]
<hr />
PRINTMODULE[PRINTMODULE]
</div>

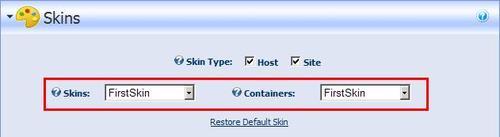
Go to the skin admin page (Admin | Skins on the menu). Now that we have a container in the folder called FirstSkin, we'll now get a little added benefit: When you select FirstSkin as the skin to deal with, the container will be selected as well, so you can work with them as a unit or as a Skin Package.

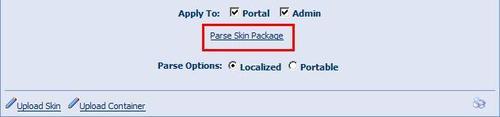
Go ahead, parse the skin package and apply our FirstSkin container. Go to the Home page.

It may not be pretty...