

To follow the examples provided throughout this book, you need to have a few pieces of software installed and working properly, so that you have the following servers up and running in your system:
Oracle database server
Web/PHP server
To achieve this, you have to install the following software components:
Oracle Database Server software
Oracle database
SQL command-line tool to interact with the database
Oracle Client libraries
Web server with activated support for PHP
While Chapter 1 briefly discusses the above software components, this appendix provides a quick-and-dirty guide to obtaining, installing, and configuring them to work together.
As discussed in Chapter 1 Getting Started with PHP and Oracle in the Obtaining Oracle Database Software section, although most of the Oracle products are available on a commercial basis, you can download them from Oracle Technology Network at http://www.oracle.com/technology/software/index.html for free. Then, you can use the downloaded software for free while developing and prototyping your applications, and buy the license only for those Oracle products that will be used in your final product.
Note
The Oracle Technology Network Developer License can be found at http://www.oracle.com/technology/software/htdocs/devlic.html.
As you learned in Chapter 1 in the section Choosing Between Oracle Database Editions, Oracle Database is available in several editions. An important thing to consider when choosing between Oracle Database editions is what edition best suits your needs and budget.
Once you have decided which edition of Oracle Database to use, it's time to download the appropriate installation archive file and then walk through the installation process. The following section describes the basic installation steps for Oracle Database 10g Enterprise/Standard editions on both Windows and Unix systems. It is followed by a section that describes the basic installation steps for Oracle Database 10g Express Edition.
Note
For detailed information on how to install Oracle Database software, see Oracle documentation: Oracle Database Installation Guide for your operating system platform. Oracle documentation is available from the documentation section of the OTN website at: http://www.oracle.com/technology/documentation/index.html.
Once you have downloaded the installation archive file, you can extract it on your hard disk and then start the installation.
Most installation steps are common to all operating system platforms and involve running the Oracle Universal Installer, a Java-based graphical user interface tool that is used to install and remove Oracle software.
Here are the basic installation steps for Oracle Database 10g Enterprise/Standard Editions. By following these steps, you will not only install Oracle Database Server software but also an Oracle database, Oracle Client libraries, and SQL*Plus—an SQL command-line tool to interact with the database.
Log on to the computer as a user with the administrative privileges so that you can install Oracle Database software and run the database.
Navigate to the directory where you downloaded the installation archive file, extract it, and then execute
setup.exeto start Oracle Universal Installer on Windows. On Linux, run the following command:$ ./runInstaller
The following figure shows what the first screen of the Oracle Universal Installer looks like on Windows.
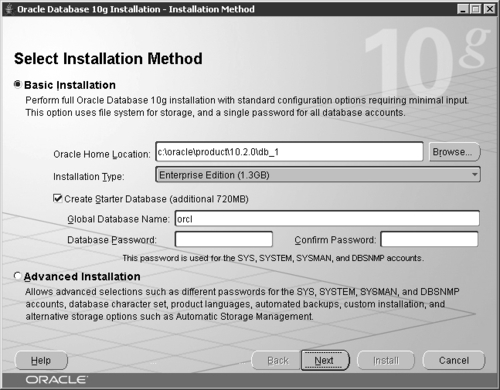
On the first screen of the Oracle Universal Installer, select either Basic Installation to quickly install Oracle Database software or Advanced Installation to have advanced installation choices.
Note
Selecting the Advanced Installation option allows you to customize your installation. For information about advanced installation choices, see Oracle Database Installation Guide for your platform.
From now on, it is assumed that you have chosen the Basic Installation option.
On the same screen, specify the full path to the directory where you want to install the database.
On the same screen, choose what database product you want to install: Enterprise Edition, Standard Edition, Personal Edition, or Custom Installation.
On the same screen, check the Create Starter Database box to create a database during installation. This option is available on this screen when you select Basic Installation. Having checked the Create Starter Database box, you have to specify the Global Database Name and the password for the SYS, SYSTEM, SYSMAN, and DBSNMP administrator accounts.
Note
A global database name consists of the database name and database domain, and must be unique within the same network. So, you may find it convenient to use the network domain name as the database domain, but generally speaking you don't have to follow this rule. For simple cases, you need not specify a database domain at all—you may use only the database name.
On the same screen, click Next to continue.
(For Unix and Linux only) On the Specify Inventory Directory and Credentials screen, specify the full path to a directory for installation files and make sure to specify an operating system group that has "write" permission to this directory.
On the Product-Specific Prerequisite Checks screen, make sure that your system meets the minimum requirements for installing the chosen products. Once all the checks have been successfully completed, click Next to continue.
Note
You can proceed with the installation only if the status of each check performed in this stage is Succeeded or Warning.
On the summary screen, review the installation information and click the Install button to start the installation. This opens the Install screen that shows installation progress.
On the Configuration Assistants screen, review the status information for the configuration assistants that are started automatically and used to configure the software and create a database.
(For Unix and Linux only) On the Execute Configuration Scripts screen, read the instructions and then run the scripts mentioned on this screen as the root user.
On the End screen, note the information and exit the Installer.
That is it. Your database is up and ready for use now.
If you want to use an Oracle database for free even in the final product, consider Oracle Database Express Edition—a lightweight Oracle database that is free to develop, deploy, and distribute. This section describes the basic installation steps for this Oracle Database edition.
Note
One word of warning before you proceed with Oracle Database Express Edition. Note that some Oracle Database features are not available in this lightweight edition of Oracle Database. For example, the XQuery feature discussed in Chapter 8 in the Querying Data with Oracle XQuery section is not available in Oracle Database XE. Also, the Oracle Virtual Private Database (VPD) feature discussed in Chapter 6 in the Row-Level Security Using VPD section is available only in Enterprise Edition of Oracle Database.
Once you have completed the following installation steps, you will have an Oracle Database XE Server (including an Oracle database), Oracle Database XE Client, and SQL*Plus installed on your computer.
Here are the installation steps for Oracle Database 10g Express Edition on Windows:
Log in to Windows as a user of the Administrators group.
Make sure that the
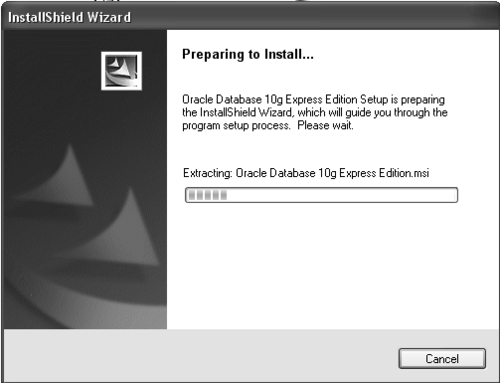
ORACLE_HOMEenvironment variable is not set in your system. Otherwise delete it. This can be done from theSystem Propertiesdialog, which can be invoked from Control Panel|System.Double-click the Oracle Database XE installation executable downloaded from OTN to run Oracle Database XE Server installer.
The following figure shows what the screen of the Oracle Database XE Server installer looks like after you run it.
In the Welcome window of the Wizard, click Next.
In the License Agreement window, click I accept and then click Next.
In the Choose Destination Location window, choose the directory for installation and click Next.
If at least one of the following port numbers: 1521, 2030, 8080 is already in use in your system, you will be prompted to enter an available port number. Otherwise, the above numbers will be used automatically.
In the Specify Database Passwords window, enter the passwords for the SYS and SYSTEM database accounts and click Next.
In the Summary window, click Install to proceed to installation, or Back to turn back and modify the settings.
After the installation is complete, click Finish.
That is it. Your database is up and ready for use now.
Here are the installation steps for Oracle Database 10g Express Edition on Linux:
Log in to your computer as root.
Change directory to the one in which you downloaded the Oracle Database XE oracle-xe-10.2.0.1-1.0.i386.rpm installation executable and install the RPM:
$ rpm -ivh oracle-xe-10.2.0.1-1.0.i386.rpmWhen prompted, run the following command to configure the database:
$ /etc/init.d/oracle-xe configureWhen entering configuration information, accept the default port numbers for the Oracle Database XE graphical user interface and Oracle database listener: 8080 and 1521 respectively. Also, enter and confirm the passwords for the SYS and SYSTEM default user accounts.
Before you can install PHP, you must have a web server installed and working in your system. Although PHP has support for most of the web servers worth mentioning, Apache/PHP remains the most popular combination among developers.
The Apache HTTP server is distributed under the Apache License, a free software/open-source license whose current version can be found on the licenses page of the Apache website at: http://www.apache.org/licenses/.
You can download the Apache HTTP server from the download page of the Apache website at: http://httpd.apache.org/download.cgi.
As mentioned in Chapter 1 in the Apache HTTP Server section, Oracle recommends that you install a web server on another machine but on the same network as the database server. However, for simplicity you can have both the Oracle database server and web server on the same machine.
In fact, installing Apache is a very easy process: On Windows, if you have downloaded the version of Apache for Windows with the .msi extension (the recommended way), you just run the Apache .msi file and then follow the wizard. On Unix-like systems, once you have downloaded a source version of the Apache HTTP server, you perform standard operations that you normally deal with when it comes to installing new software from sources: extract, configure, compile, and install.
Once you have Apache installed and configured, you can start it. On Windows, Apache is normally run as a service. You can configure service startup by choosing Automatic, Manual, or Disabled. On Unix-like systems, Apache, the httpd program, is run as a demon. It is recommended that you use the apachectl control script to invoke the httpd executable:
# /usr/local/apache2/bin/apachectl start
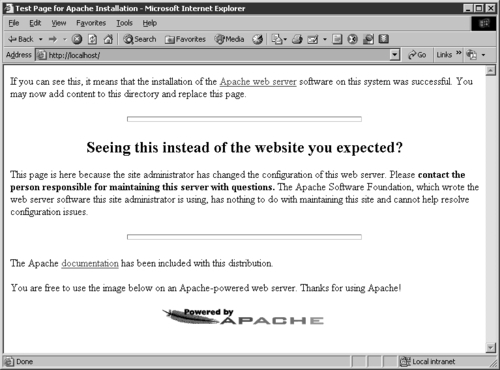
To make sure that your web server is up and running on your machine, open your web browser to the URL http://localhost/.
The following figure shows what the default page of Apache web server looks like.
Now that you have your web server up and running, you can move on to the next step, obtaining and installing PHP.