
What we want to do now is take a look at the question to see how it looks, and to give it one final review, which includes making sure that the answer is correct.
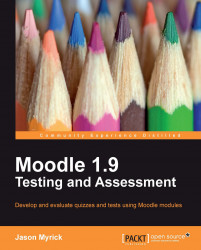
We can click on the Preview icon in the Questions in this Quiz pane to see the question. This action will create a pop-up window, as shown in the following screenshot:
In the preview, we can see several pieces of information related to the question.
The question is displayed next. It includes the number of the question, the question text, the possible responses, and the point value assigned to the question.
This button allows the student to submit each answer as he/she finishes the question. It allows the student to immediately know if he/she got the answer correct or not. This feedback can be a useful feature, especially in tests that are completed over a period of time. However, in longer or timed tests, these buttons may be a problem because students might spend valuable test time reviewing their choices and not moving forward in the quiz. These buttons can be removed by going to the Attempts section in Update Quiz and selecting No in Adaptive mode.
If you have multiple questions, and you have decided to use the Show Page Breaks option, this button will allow you to complete the questions and see the results for the page you are working on.
This function will mark all the correct answer choices in the quiz. This is a useful function for teachers, because it helps make sure that the answers are correct without having to work through, or read, the items.
This feature will allow you to begin again. It will erase all selections made and move you to the beginning of the test.
This option will close the Preview panel and you will return to the Edit page for the Quiz.
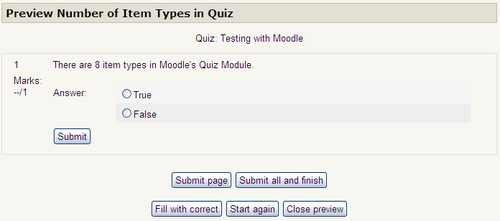
Now, let's attempt the question in Preview mode. I'll move my mouse over the checkboxes and choose the correct answer by clicking on them. How much do you remember about the Quiz? Look at the question, There are 8 item types in Moodle's Quiz Module. Is the Answer True or False?
I'll make my selection, and let's see the results.
Now, we can see here that we have selected True, which is the wrong answer. The answer choice is highlighted, and there is a red X next to it. The correct answer has a green check beside it. This is what the students will see if the Adaptive mode is enabled.
Under the True and False radio buttons, , you can see that the feedback entered for an incorrect response has appeared. There button is another Submit button. This allows the student to change his/her answer if multiple attempts with a True/False test is allowed. This means that they only have to click on the other choice to get a correct response.
You can also see under the Submit button a message telling me the response was incorrect and the marks I received for this remained zero. The penalties applied note simply means that I will lose one point from the total possible in the test.
You also notice a new function has appeared at the bottom of the page, a button called Previous state. This functions as a Back button, allowing you to move back one step. This is useful if you are working through a set of questions and want to see how feedback is displayed, based on the response. This button is obviously only available in the teacher-preview mode.
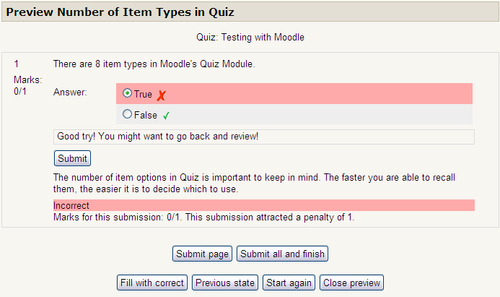
Now, I'm going to select the correct response, so you can see how it would look.
As you can see, I received both the correct answer and general feedback, and I was given one point for the answer. Note that the Marks in the preview under the question number didn't change. This is because we are in our second attempt. If we wanted the mark to be shown correctly, we would need to click on the Previous state button, which would mark this question correctly.
Now that we have confirmed that the question is correct, we repeat the process. You can add as many questions as you like to the test, but for now, we're going to make four more. Here is how the entire test looks from the Editing tab with the new questions added.
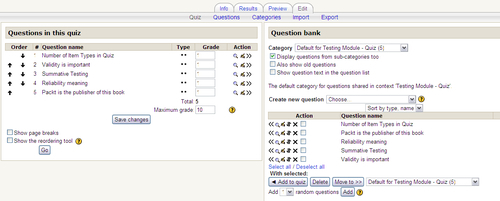
Take a quick look at Order in the Questions in this Quiz section. See the Up and Down arrows? These are the Move icons mentioned earlier.
Now that we have all the questions we want in place, we are ready to move on.
Now, I know that we have already gone through each question, but just to make sure everything is just the way we want it to look, it is a good idea to sit down and take the test. Here you might find one or two hopefully minor errors that you overlooked earlier. We need to click on the Preview tab at the top of the page and we will see how the test looks from a student's point of view.
I have decided that I want to get rid of the small Submit buttons next to the questions. I'm going to go back to Update this Quiz button and find the Attempts section. Then, I'm going to turn off Adaptive mode by moving the choice to No. This means that whoever takes this test will need to answer all the questions and they will get their results at the end when they click on Submit all and finish.
We are only offering a single attempt at this quiz, but leaving on the Adaptive mode would allow the student to answer each question multiple times, even in a quiz with single attempt. This setting would also apply a penalty, if one were set, to the marks for each question incorrectly answered. Our updated test is shown in the following screenshot:
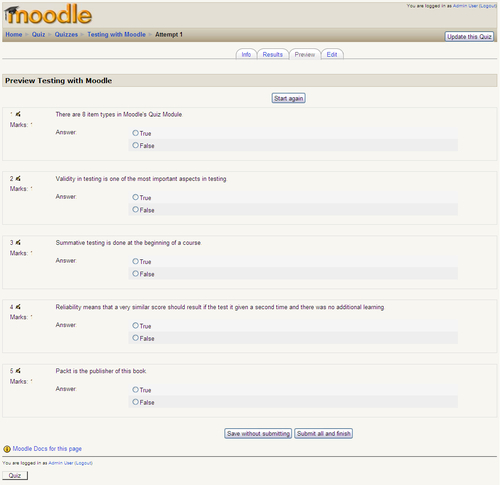
As you can see, changing the Adaptive mode option to No got rid of the Submit buttons and made the test look a little less cluttered compared to the earlier screenshot.
Tip
Careful with Arrow Keys
Arrow keys are really useful in navigating, but when you are taking a test in Quiz, they can move your selection. If you have selected an answer and it is still highlighted, and you click on the Down Arrow key for example, your answer will be changed. Make sure your students are aware of this!
Everything looks good, but now we need to check the answers. We will select True/False for each of the items and instead of clicking on the Submit button next to each of the items, we will go to the bottom of the page and click on the Save all and finish button. This will close the test for us, and show us the results. This is the page we get after clicking on the button.
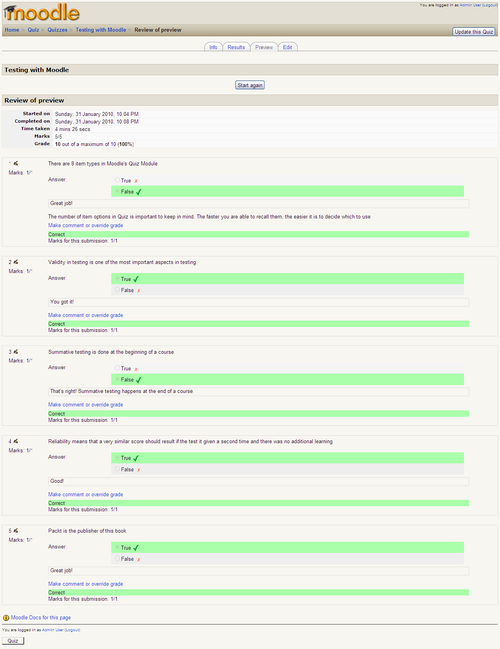
As you can see, all the answers are correct, and each received the proper number of points and feedback.
Tip
Teachers, Groups, and Quizzes
As a teacher, your marks will not be recorded when you are previewing the quiz. However, if you have added yourself as a teacher to a group, your results will be stored, even though you are a teacher. This action will prevent further testing of the quiz.
Also, look at the top left-hand side of the page. There is a small information section called Review of preview. This is a lot of very useful information. The information here tells us when the quiz was started, when it was completed, and the total time the person was taking the quiz. As the test developer, you are able to look at the time taken and possibly make decisions about how to time the test in the future. If the quiz time is simply too long, you might be able to cut some questions. If it is too short, you can create more. In addition, students will see this section once they finish the quiz.
You are also shown the number of points scored and the grade. These numbers are probably some of the most important pieces of information for most teachers, since we need this to ensure that all the correct responses are given the correct point value.
That is all there is to making a simple True/False test in Moodle Quiz. Now all that needs to be done is to make sure your students know where the test is and have them take it.