Sign In Start Free Trial
Account

Add to playlist

Create a Playlist

Modal Close icon
You need to login to use this feature.
  • Book Overview & Buying PHP Ajax Cookbook
  • Table Of Contents Toc
PHP Ajax Cookbook

PHP Ajax Cookbook

By : Milan Sedliak
4 (5)
close
close
PHP Ajax Cookbook

PHP Ajax Cookbook

4 (5)
By: Milan Sedliak

Overview of this book

This book contains a collection of recipes with step-by-step directions to build SEO-friendly websites using standard Ajax tools. Each recipe contains behind-the-scene explanations to PHP Ajax questions. This book is an ideal resource for people who like to add Ajax features to websites and who prefer standards and best practices for building SEO-friendly websites. As the book covers advanced topics, readers need to be aware of basic PHP, JavaScript and XML features.
Table of Contents (16 chapters)
close
close
PHP Ajax Cookbook
Credits
About the Authors
About the Reviewers
www.PacktPub.com
Preface
1
Index

Creating an AJAX shopping cart using MooTools

This task will show us how to use Ajax with MooTools JavaScript framework. We will build a shopping cart with a drag-and-drop functionality. After each UI interpretation to add a new item to the shopping cart, we will send an HTTP POST request to the server.

Getting ready

MooTools is available for download at https://mootools.net/download or in Google's CDN. For communication between the server and client we will create a new file in our ajax folder, for example, addItem.php:

<?php 
if($_POST['type']=='Item'){
	echo 'New Item was added successfuly.';
}
?>

After creating this dummy PHP file, we are ready to proceed to the programming part of this task.

How to do it...

  1. We will begin, as we usually do, with HTML layout to include MooTools library:
    <!doctype html>
    <html>
    <head>
      <title>Ajax Using MooTools</title>
    </head>
    <body>
      <div id="items">
        <div class="item">
        <span>Shirt 1</span>
        </div>
        <div class="item">
        <span>Shirt 2</span>
        </div>
        <div class="item">
        <span>Shirt 3</span>
        </div>
        <div class="item">
        <span>Shirt 4</span>
        </div>
        <div class="item">
        <span>Shirt 5</span>
        </div>
        <div class="item">
        <span>Shirt 6</span>
        </div>
      </div>
      
      <div id="cart">
        <div class="info">Drag Items Here</div>
      </div>
    
      <h3 id="result"></h3>
    
      <script src="js/mootools-core-1.3-full.js"></script> 
      <script src="js/mootools-more-1.3-full.js"></script> 
      <script src="js/mootools-art-0.87.js"></script> 
    </body>
    </html>
  2. In this task we have to provide our own CSS styles:
    <style>
    #items  {
      float: left; border: 1px solid #F9F9F9; width: 525px;
    }
      item {
        background-color: #DDD;
        float: left;
        height: 100px;	
      margin: 10px;
        width: 100px;
        position: relative;
      }
      item span {
        bottom: 0;
        left: 0;
        position: absolute;
        width: 100%;
      }
    #cart {
      border: 1px solid #F9F9F9;
      float: right;
      padding-bottom: 50px;
      width: 195px;
    }
    #cart .info {
        text-align: center;
    }
    #cart .item {
      background-color: green;
        border-width: 1px;
        cursor: default;
      height: 85px;
        margin: 5px;
        width: 85px;
    }
    </style>
  3. When the look of our UI fits our expectations, we can start JavaScript:
    <script>
    window.addEvent('domready', function(){
        $('.item').addEvent('mousedown', function(event){
            event.stop();
            var shirt = this;
            var clone = shirt.clone()
          .setStyles(shirt.getCoordinates())
          .setStyles({
                opacity: 0.6,
                position: 'absolute'
             })
          .inject(document.body);
    
            var drag = new Drag.Move(clone, {
                droppables: $('cart'),
                onDrop: function(dragging, cart){
                    dragging.destroy();
    
            new Request.HTML({
              url: 'ajax/addItem.php',
              onRequest: function(){
              $('result').set('text', 'loading...');
                console.log('loading...');
              },
              onComplete: function(response){
                $('result').empty().adopt(response);
                console.log(response);
              }a
            }).post('type=shirt');
    
                   if (cart != null){
                        shirt.clone().inject(cart);
                        cart.highlight('#7389AE', '#FFF');
                    }
                },
                onCancel: function(dragging){
                    dragging.destroy();
                }
            });
            drag.start(event);
        });
    });
    </script>
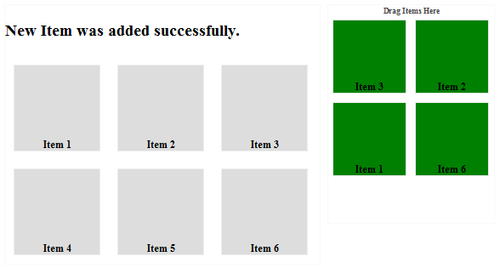
  4. Once we save our code, our shopping cart is ready. The result is as follows:
How to do it...

How it works...

The $(document).ready function is performed by binding a domready event to the window object. For each item, we are add a mousedown event, which contains the whole procedure of adding each item in the cart, using the Drag object and clone() function.

To communicate with the server we use the Request.HTML method and send it with the HTTP post method with post variable type. If the variable type is equal to the string shirt, it means a new item was added to the cart and the information box result was updated to 'New Item was added successfully'.

There's more...

Class Request represents the main class, which deals with an XMLHttpRequest:

var myRequest = new Request([options]);

An example of the preceding template is as follows:

var  request = new Request({
  url: 'sample.php', data: { sample: 'sample1'},
    onComplete: function(text, xml){
      $('result').set('text ', text);
}

In the core of the MooTools library, the Request class was extended to Request.HTML and Request.JSON.

Request.HTML is an extended Request class specially made for receiving HTML data:

new Request.HTML({
  url: 'sample.php',
  onRequest: function(){
    console.log('loading...');
  },
  onComplete: function(response){
    $('result').empty().adopt(response);
  }
}).post('id=242');

We can use the post or get method:

new Request.HTML([options]).get({'id': 242});

As the most effective practice of communication between client and server, we can use Request.JSON to receive and transmit JavaScript objects in JSON format.

var jsonRequest = new Request.JSON({
url: 'sample.php', onSuccess: function(author){
  alert(author.firstname);   // "Milan".
  alert(author.lastname);   // "Sedliak"
    alert(author.company);     // "Skype"
}}).get({bookTitle: 'PHP Ajax CookBook', 'bookID': 654});
CONTINUE READING
83
Tech Concepts
36
Programming languages
73
Tech Tools
Icon Unlimited access to the largest independent learning library in tech of over 8,000 expert-authored tech books and videos.
Icon Innovative learning tools, including AI book assistants, code context explainers, and text-to-speech.
Icon 50+ new titles added per month and exclusive early access to books as they are being written.
PHP Ajax Cookbook
notes
bookmark Notes and Bookmarks search Search in title playlist Add to playlist font-size Font size

Change the font size

margin-width Margin width

Change margin width

day-mode Day/Sepia/Night Modes

Change background colour

Close icon Search
Country selected

Close icon Your notes and bookmarks

Confirmation

Modal Close icon
claim successful

Buy this book with your credits?

Modal Close icon
Are you sure you want to buy this book with one of your credits?
Close
YES, BUY

Submit Your Feedback

Modal Close icon
Modal Close icon
Modal Close icon