

We wrote some JavaScript for our website. While the browsers let us know if the code is written incorrectly, there is no way to tell if the code works as intended. Perhaps there are edge cases that we failed to account for. The code should be as robust as possible and works around all expected use cases and is capable of handling most error conditions. You can ensure this is possible by writing tests to test every function your code calls.
A unit can be considered as the smallest testable part of your code. When you write unit tests, you ensure every section of the code behaves correctly. The easiest way to get started with unit tests is to use a test suite.
QUnit.js
is a popular browser-based test suite that tests your code in the browser. Let us use this on our code that we wrote for the Sun and Sand Festival website.
Let us create a tests folder within our project.
Then, we download QUnit.js from code.jquery.com/qunit/qunit-1.9.0.js and the associated CSS file qunit.css from code.jquery.com/qunit/qunit-1.9.0.css. The latest versions of these files can be found at github.com/jquery/qunit.
We now create a testing environment by creating a tests.html page within the tests folder, and have the following code:
<!DOCTYPE html>
<html>
<head>
<meta charset="utf-8">
<title>Tests for Sun n' Sand Festival Code</title>
<link rel="stylesheet" href="qunit-1.9.0.css">
</head>
<body>
<div id="qunit"></div>
<div id="qunit-fixture"></div>
<script src="//ajax.googleapis.com/ajax/libs/jquery/1.7.2/jquery.min.js"></script>
<script>window.jQuery || document.write('<script src="js/vendor/jquery-1.7.2.min.js"><\/script>')</script>
<script src="qunit-1.9.0.js"></script>
<script src="../js/main.js"></script>
<script src="test.js"></script>
</body>
</html>
In this code, we have included our main.js, file that we are using on our website. We will be testing the code we wrote for the tabs used to display the line up.
Now, we will create the test.js file, where we will write all our tests for our code.
As our test depends on the markup that is used for the tabs, let us copy the markup without the content from index.html to tests.html.
If we execute this test as it is, we will get an error claiming global failure. If you open up the console of your browser's developer tools, you should see the following error:
Uncaught TypeError: Object [object Object] has no method 'smoothScroll'
This is because we invoke the plugins from main.js but we have not included those plugins here because we are not testing them. We can corral all of our plugin-dependent code and invoke them only if QUnit is not used, by testing for the existence of QUnit first before invoking plugins and frameworks like in the following snippet of code:
if(window.QUnit == undefined) {
  $('.js-scrollitem').smoothScroll();
  if(Modernizr.svg === false) {
    $('img[src$=".svg"]').each(function() {
      this.src = /(.*)\.svg$/.exec(this.src)[1] + '.png';
    });
  }

  if (Modernizr.generatedcontent === false && window.onbeforeprint !== undefined) {
    window.onbeforeprint = printLinkURLs;
    window.onafterprint = hideLinkURLs;
  }

  Modernizr.load({
    test: Modernizr.audio,
    nope: {
      'mediaelementjs': 'js/vendor/mediaelement/mediaelement-and-player.min.js'
},
    callback: {
    'mediaelementjs': function() {
      $('audio').mediaelementplayer();
    }
  }
 });
}
Make sure you remove the condition—if(window.QUnit == undefined)—in the production code.
Now, let us write a test to confirm that when a navigation tab is clicked the correct class is applied to itself by using the following code snippet:
$('.js-tabitem').each(function() {
  var $this = $(this);
  $this.trigger('click');
  test( "navigation tabs", function() {
    ok($this.hasClass('t-tab__navitem--active'),
   'The clicked navigation item has the correct active class applied');
  });
});
The test() function is a function available from the QUnit test suite. The first argument is the title of the text, and the second is the actual test function you want to execute.
We also use ok(), which is one of the assertions from the QUnit test suite to confirm the class does apply. An assertion is an essential element of unit testing, where you test if the result of the execution of your code returns the expected value. QUnit has different kinds of assertions that are all documented at api.qunitjs.com/category/assert/.
In ok(), the first argument we pass to this function is an expression that evaluates to true or false. The second argument is the message you want to display when the assertion is executed.
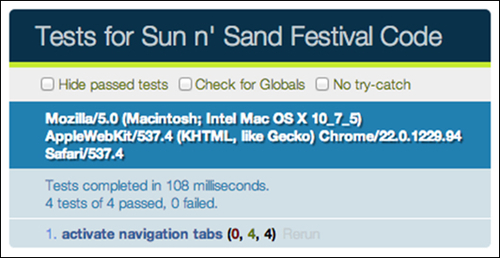
Now, let us test that the inactive navigation items do not contain the class name that makes a navigation item appear active, by using the following code snippet:
$('.js-tabitem').not(this).each(function() {
  ok(!$(this).hasClass('t-tab__navitem--active'),
    'Inactive item does not have active class');
});
Let us now execute these tests! Open the tests.html page in your browser. You should see something like the following screenshot:
You can execute more complicated tests too! Learn more about QUnit from their online cookbook at qunitjs.com/cookbook/.
The meta element represents any metadata information for the page. Setting <meta charset="utf-8"> in the <head> element will ensure browsers parse the page with UTF-8 encoding in the absence of any other information about the encoding of the page.
The interesting thing to note is that most browsers look for character encoding metadata only within the first 512 bytes of the page. Hence, you need to ensure that if you have a lot of data in your <head> element, this meta element occurs before everything else.
In the absence of charset encoding information, browsers have to guess which charset encoding to apply. The HTML5 spec outlines the sniffing algorithm that all browsers must implement at www.whatwg.org/specs/web-apps/current-work/multipage/parsing.html#encoding-sniffing-algorithm. Unfortunately, older browsers had their own mechanisms for guessing character encoding.
In the case of Internet Explorer 7 and below, the default character encoding preference is typically set to Auto Select. This means the browser scans the content of the page to detect what character encoding would best apply. In case of Internet Explorer, if it finds a UTF-7 string within 4096 characters of the page, it would assume the page uses UTF-7 encoding and your page will become vulnerable to cross-site scripting attacks using UTF-7 encoding. Hence, the meta element declaration and right on top of the page in the index.html page.
Note that if your server sends an HTTP header that is of a different encoding, then that would take precedence. Make sure your server is set up to serve the right charset encoding as an HTTP header.
Before the standardization of HTML and CSS, most markup and styles did not render consistently in any browser. But when we had standards about how markup should be written and more and more developers started adopting these standards, browsers then had to face the problem of detecting which of the pages on the Internet conformed to these standards and which weren't.
The Doctype was invented so that developers could inform the browser to render the page using the newer standards mode. Without a Doctype declaration, browsers would render the page in what is known as Quirks Mode (the way browsers used to render the pages before standards became an acceptable practice). In IE6, having a comment or an XML namespace declaration above the Doctype would render the page in Quirks Mode too. In the early 2000s when using the XHTML Doctype with an XML namespace declaration was recommended, this would be the cause of significant issues in Internet Explorer.
Not all Doctype declarations render in standards mode. The easiest way to use standards mode is to use the smallest recommended Doctype, <!doctype html>. You can use any mix of upper or lowercases in the Doctype declaration (for example, <!DoCtYpE hTmL>).
The
clearfix CSS class is used to make sure floated elements fit in their parent container. The very first exploration of this idea occurred in 2002, and is elaborated further in the article at www.positioniseverything.net/easyclearing.html.
The clearfix selector works in the following manner:
.clearfix:after {
  content: ".";
  display: block;
  height: 0;
  clear: both;
  visibility: hidden;
}
.clearfix { zoom: 1; } /* IE 5.5/6/7 */
The biggest problem with this method is that margins do not collapse consistently across all browsers. Thierry Koblentz writes more about it at www.tjkdesign.com/lab/clearfix/new-clearfix.html.
Thierry Koblentz updated this method in 2010 introducing the use of both :before and :after pseudo-elements in the post at www.yuiblog.com/blog/2010/09/27/clearfix-reloaded-overflowhidden-demystified/ to be so. Both the pseudo-elements are used in the following code snippet:
.clearfix:before,
.clearfix:after {
  content: ".";
  display: block;
  height: 0;
  overflow: hidden;
}
.clearfix:after {clear: both;}
.clearfix {zoom: 1;} /* IE < 8 */
Using both pseudo-elements prevents the problem of inconsistent margin collapsing while using the clearfix class.
Nicolas Gallagher, in 2011, found an alternative way that reduces the lines of code necessary for the clearfix class if our target browsers are IE6 and higher and other modern browsers, as he explains in his article at nicolasgallagher.com/micro-clearfix-hack/. Nicolas' code is given in the following code snippet:
.cf:before,
.cf:after {
    content: " ";
    display: table;
}

.cf:after {
    clear: both;
}

/**
 * For IE 6/7 only
 * Include this rule to trigger hasLayout and contain floats.
 */
.cf {
    *zoom: 1;
}
In this method, using display: table would create an anonymous table cell (more information on what this means is available in the specification at www.w3.org/TR/CSS2/tables.html#anonymous-boxes) within the pseudo-element, which prevents the collapsing of top margins. The content property does not require any content within to work, but this method uses a space character to overcome an Opera bug when used on elements that are editable.
This is how the clearfix class evolved! As you can see, a great deal of research and development went into crafting the best clearfix class possible that would work across dominant browser platforms.
The HTML5 Boilerplate stylesheet comes with a set of styles that are useful defaults when a user prints your page. Styling how a page would appear in print is something that most of us do not consider while designing a web page, and HTML5 Boilerplate gives you a set of good defaults, so you do not have to consider it most of the time (however, it would be good practice to do so).
We have inlined all our print styles within a CSS media query called "print". This media query is matched whenever a user selects a page for printing, and these style rules will be applied in that case. We declare all of our rules within the @media print query as shown in the following code snippet:
@media print {
  a, a:visited { text-decoration: underline; }
  /* More Styles below */
}We then make sure we optimize the page to appear most readable when printed and also ensure we are not wasting too much printing ink printing superfluous images, colors, and text. This means we make sure we remove all background images or images, which are just of a slightly different shade of white or transparent for all elements. We also make sure all of the colors are black as it means the printer does not have to mix any ink and hence can print faster. We also remove shadows, as that would make the text less readable.
The final rule we have for these updates is as follows:
* {
        background: transparent !important;
        color: #000 !important; /* Black prints faster: h5bp.com/s */
        box-shadow:none !important;
        text-shadow: none !important;
}Not many designers now use text-decoration: underline to style links on pages. Typically, people use colors to indicate something is a link. However, underlines are easier to discern in case of print, especially when you have no control over the printer and colors used to render them. Hence, we have all links (active or visited) to be styled with a line below the text by using the following code snippet:
    a,
    a:visited {
        text-decoration: underline;
    }
It would also be helpful to have a reference to the actual link in print as there is no way for the user to navigate to that link if they are reading from a printed page and would like to visit the link. We do this by using the attr() function in CSS. attr() returns the value of an attribute of the element that the current rule will be applied to. In this case, as we are applying it on links, we can use attr() to obtain the value of the href attribute of links and print them. A space character is used to concatenate strings together when they are used as a value in the content property. We also want to make sure that if a link has a title, we print that too as a title is only visible on hovering on a link. All of this expressed in CSS looks like the following code snippet:
    a[href]:after {
        content: " (" attr(href) ")";
    }

    abbr[title]:after {
        content: " (" attr(title) ")";
    }
But, this means even links that are just linking to another location in the same page or are used for JavaScript actions (with the javascript: prefix) would render the same way! So, we would need to make sure we do not do this for these links.
For this, we use the attribute selector that allows us to select elements that have properties that begin, end, or contain certain values. By using the selector a[href^="javascript:"]:after, we ensure we are only selecting the :after pseudo-elements of links that have the attribute href, whose value starts with the string javascript:.
Similarly, we also select all links which have the href attribute that begin with the # character, as that means such links are inline links linking to another location within the same page.
We then make sure we render no content for pseudo-elements within these links. The rule then looks like the following code snippet:
    .ir a:after,
    a[href^="javascript:"]:after,
    a[href^="#"]:after {
        content: "";
    }
Do note that these rules are not available for IE6 and if it is highly necessary to offer this functionality in IE6, you would like to use JavaScript that provides this.
It sometimes happens that your printed page would contain quotes or code, and as a reader, it is annoying to keep referring back to a previous page when the code (or the quote) could all have been within one page without any break. For this, we can use the CSS page-break-inside property that allows you to tell the browser if you prefer these elements to break over two pages or stay within the same page. The code for this is shown in the following code snippet:
pre,
    blockquote {
        border: 1px solid #999;
        page-break-inside: avoid;
    }
Do note that page-break-inside is not supported in Firefox, but is available in all other browsers.
By default, putting headings within the thead tag would ensure that the headings get repeated every time a table breaks across two pages. However, only Firefox and Opera have support for this at the moment. In IE, you can do this but you would have to explicitly state it, as stated in the following code snippet:
    thead {
        display: table-header-group; /* h5bp.com/t */
}Ideally, we want to prevent table rows and images from breaking across pages, so we use the now familiar page-break-inside property to tell the browser of our preference, as shown in the following code snippet:
    tr,
    img {
        page-break-inside: avoid;
    }
It also does not appear too well, when images run off beyond the page or print cropped while appearing in full on the website. Hence, we restrict the maximum width to be as wide as the page itself and no more, as shown in the following code snippet:
    img {
        max-width: 100% !important;
}The @page rule allows you to modify the properties of a page when printing. All browsers except Firefox support this rule. This rule sets the margins to be 0.5 cm per page, as shown in the following code snippet:
    @page {
        margin: 0.5cm;
}Orphans are the lines of text that appear at the bottom of the page. Widows are those that appear at the top of the page. We make sure that lines do not break in a manner that leaves fewer lines at the bottom or top than desired. This will create a more readable experience. The following code snippet is used for that purpose:
    p,
    h2,
    h3 {
        orphans: 3;
        widows: 3;
}In HTML5 Boilerplate, when we refer to jQuery, we refer to it as follows:
<script src="//ajax.googleapis.com/ajax/libs/jquery/1.8.1/jquery.min.js">
</script>
Note that we do not have either http or https in front of the URL; instead, it starts with //. These are called protocol-relative URLs and are useful when you want to use a protocol-agnostic resource in a HTTP or HTTPS environment.
When you serve pages using HTTPS, browsers will throw warnings and errors when the page loads assets and resources that use HTTP protocol. To prevent this, you need to ensure you use the HTTPS protocol for all the assets you are requesting. This is typically not a problem if you are using relative URLs to refer to assets within the parent folder of your page. However, if you are referring to external URLs like the CDN URL for jQuery (shown previously), then you need to ensure you use https when the page is being served with the HTTPS protocol and the http prefix when the page is being served with HTTP protocol.
Instead of using JavaScript to do that determination, simply omitting the protocol ensures browsers use the currently used protocol when requesting that external URL. In this case, if this page gets served on HTTPS as https://example.com, then the URL requested will be https://ajax.googleapis.com/ajax/libs/jquery/1.8.1/jquery.min.js.
You can learn more about this at paulirish.com/2010/the-protocol-relative-url/.
Historically, IE6, IE7, and IE8 have been browsers with the most bugs and inconsistent rendering of styles. There are many ways to serve styles to IE versions 8 and below, here are a few.
The most prevalent technique is to use hacks in CSS style rules that target only one browser.
For IE6 and below, use the following code snippet:
* html #uno { color: red }For IE7, use the following code snippet:
*:first-child+html #dos { color: red }For IE8, use the following code snippet:
@media \0screen {
   #tres { color: red }
}
There are more hacks that target two or more browsers (or exclude two or more browsers) all listed in the post at paulirish.com/2009/browser-specific-css-hacks/.
The problem with these hacks is that first they exploit holes in the browser's parsing technology. If browsers fix these parsing errors then they may not work. Luckily, we do not have to fear about this for older browsers such as IE6 and IE7.
These hacks are also not readable and without comments it is impossible to understand which browsers they target.
The advantage of these methods is that you can keep your style rules together, and you do not have to serve a separate stylesheet for the browsers requiring hacks.
When they make a request to a web server, browsers send a User Agent String along with the request. Servers can serve different resources based on their interpretation of the User Agent String. For example, if a browser identifies itself as IE6 with the following User Agent String:
Mozilla/4.0 (compatible; MSIE 6.0; Windows XP)
Then, the server can send back a different stylesheet to IE6. While this may seem like a simple, easy solution, the problem occurs when browsers lie. Historically, browsers have never exactly claimed to be which browser they are, and hence, it is likely that you may send the wrong stylesheet to a browser.
It also involves a little overhead server-side to process the request according to the browser's User Agent setting, and hence is not an ideal way to serve different stylesheets to IE8 and below.
Conditional comments are HTML comments with special syntax that are understood by IE9 and below. The following is a sample conditional comment:
<!--[if lt IE 9]>
<p>HTML Markup here</p>
<!--<![endif]-->
All browsers except Internet Explorer 9 and below ignore content within these conditional comments. IE9 and below try to interpret the if condition within these comments and selectively render the content if the version number of the IE browser matches the one within the if condition.
The previous example will render the p tag on all 8, 7, 6, and below versions of IE.
Conditional comments are perfect to target older versions of IE and this is what HTML5 Boilerplate uses. There are two ways of using them. The first is to output a separate stylesheet based on matching a conditional comment, as shown in the following code snippet:
<!--[if lt IE 9]>
<link rel="stylesheet" href="/css/legacy.css">
<![endif]-->
This will make IE8 and below use legacy.css and other browsers will ignore this snippet of code.
The problem with a standalone stylesheet is that while you develop your styles you have two different stylesheets to target, and occasionally IE-specific stylesheets could be forgotten.
Some people provide only a very basic experience for IE8 and below, as shown in the following code snippet:
<!--[if ! lte IE 6]><!-->
/* Stylesheets for browsers other than Internet Explorer 6 */
<!--<![endif]-->
<!--[if lte IE 6]>
<link rel="stylesheet" href="http://universal-ie6-css.googlecode.com/files/ie6.1.1.css" media="screen, projection">
<![endif]-->
But HTML5 Boilerplate prefers a more readable and targeted approach that provides the best possible styles to all browsers using class names, which we will look at next.
An iteration of the previous conditional comments method would be to append class names on the root element based on conditional comments, as shown in the following code snippet:
<!--[if IE 8]>
<html class="no-js lt-ie9">
<![endif]-->
Then in your stylesheet, you can use it to set styles in IE8 and below as follows:
.lt-ie9 h1 { color: red }You can read more about this solution at paulirish.com/2008/conditional-stylesheets-vs-css-hacks-answer-neither/.
This solution does not require separate stylesheets, but allows you to write readable class names that indicate why that style rule exists in the stylesheet. This is the solution we have adopted in HTML5 Boilerplate, and recommend.
x-ua-compatible is a header that defines how Internet Explorer renders your pages. It declares which mode Internet Explorer should use to render your page. This is primarily targeted towards older websites that break in Internet Explorer 9 onwards because of better support for standards. It can be set in two ways.
In this case, we merely add a meta tag between the <head></head> tag in your HTML pages as follows:
<head>
<meta http-equiv="X-UA-Compatible" content="IE=EmulateIE7" >
</head>
In Apache, in the .htaccess file, writing the following would make the server send the X-UA-Compatible HTTP header as a response to any request on that parent folder:
LoadModule headers_module modules/mod_headers.so
Header set X-UA-Compatible "IE=EmulateIE7"
We recommend this method of setting its value because HTTP header values override any value set via the meta tag. Moreover, using the meta tag with IE conditional comments on the html element causes this meta tag to be ignored. The X-UA-Compatible header can have the following values.
This would use the latest mode of rendering available. For example, within Internet Explorer 10, it would be IE10. We would want to always use the latest rendering mode available, as this means we have access to the latest and most standards-compliant version of the browser. This is why it is our default option in HTML5 Boilerplate.
This would use only IE9 mode to render the page. For example, when you use this mode and this page is viewed in Internet Explorer 10, it would use the IE9 mode to render the page.
This mode renders content, as it would display if Internet Explorer 7 rendered it in standards mode.
This mode tells Internet Explorer to use the <!DOCTYPE> directive to determine how to render content. Standards mode directives are displayed in IE9 mode and quirks mode directives are displayed in IE5 mode. All Emulate modes, unlike the previous modes, respect the <!DOCTYPE> directive.
This mode tells Internet Explorer to use the <!DOCTYPE> directive to determine how to render content. Standards mode directives are displayed in IE8 mode and quirks mode directives are displayed in IE5 mode. Unlike IE8 mode, Emulate IE8 mode respects the <!DOCTYPE> directive.
This mode tells Internet Explorer to use the <!DOCTYPE> directive to determine how to render content. Standards mode directives are displayed in Internet Explorer 7 standards mode and quirks mode directives are displayed in IE5 mode. Unlike IE7 mode, Emulate IE7 mode respects the <!DOCTYPE> directive. For many websites, this is the preferred compatibility mode.