Let's look at another alternative now. How to deal with numerical tables? When dealing with responsive design it is strongly recommended that you develop your application from the bottom up, that is the smallest to the largest 320px to 1024px or 1280px to 1360px. This way of development is known as mobile first.
It is hard to imagine how to show a table with over 10 columns on such a small screen. Let's see a pretty interesting alternative. Using another trick with a jQuery Plugin called: Footable.js.
First let's take a look in our table:

Full width table of 1024px
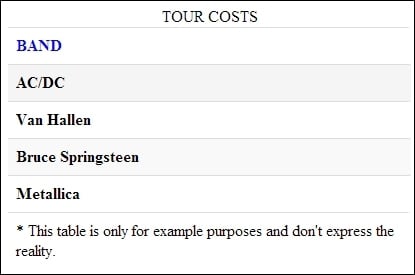
Now on resizing, we have something like an accordion:

Browser resized at 320px
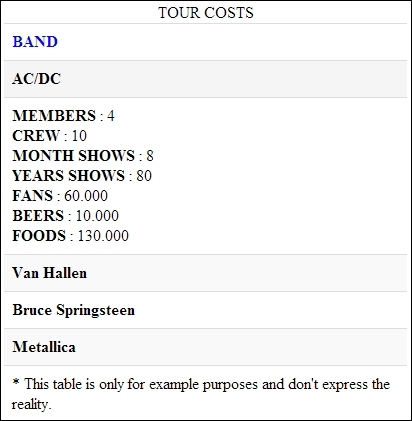
When we click on the table header, we see the other rows, as shown in the following screenshot:

Accordion behavior when the header is clicked
The following are steps required to complete this task, you can use the code examples (Chapter04_Codes_1):
Add some extra CSS lines to our markup.
Include the stylesheet plugin to the head of page.
Insert the JavaScript plugin to the bottom of our page.
And finally, initiate the plugin with a jQuery function.
Now we going into the magic, let's see our changes on css:
     .table tbody tr:nth-child(odd) td,
    .table tbody tr:nth-child(odd) th {
      background-color: #f9f9f9;
    }
    .table tbody tr:hover td,
    .table tbody tr:hover th {
      background-color: whitesmoke;
    }
In the head of our page, include a stylesheet link to the plugin's CSS:
<link rel="stylesheet" type="text/css" media="all" href="https://raw.github.com/bradvin/FooTable/master/css/footable-0.1.css" />
Add the plugin's link to the bottom of the page right after the jQuery:
<script src="https://raw.github.com/bradvin/FooTable/master/js/footable-0.1.js"></script>
Finally, invoke the jQuery function to make the magic happen:
<script type="text/javascript">
    $(function() {
      $('.table').footable();
    });
  </script>
We will see a way to load the data from your table through a JSON file and a few lines of JavaScript and jQuery.
You can even use this snippet of code into their applications, code example Chapter04_Codes_2.
Note
Here we need to publish our HTML file on a web server, otherwise you might not been able to see the result when you load the JSON file in your browser due to Access-Control-Allow-Origin.
Here you can use the Mongoose Server included in the codes examples, or download it from the link provided on our Preface.
Just go to downloaded codes folder and execute the server with a double click, now open your browser and type http://localhost:8080. This is the default port for Mongoose but if you already have your port 8080 busy, just right-click on the Mongoose icon present at the bottom toolbar and choose Edit Config File and change the port.
Check out the JavaScript code:
        // Build the table from a Json file
        $.getJSON('table_content_2.json', function(data) {

              var table = $('#dynamicTable');

              var trthead = $('<tr/>');

              var head = $('<thead/>');

              trthead.appendTo(head);

            //Loop over the columns
                $.each(data.listColumns, function (index, value) {
                    var column = $('<th>' + value.Title + '</th>');
                    trthead.append(column);
                });

              var tbody = $('<tbody/>');

            //Loop over the rows;
              for (var i = 0; i < data.listRows.length; i++) {
                  var tr = $('<tr/>');
                      for (var t = 0; t < data.listRows[i].Value.length; t++) {

  if(t == 0){
    tr.append('<th>' + data.listRows[i].Value[t] + '</th>');
  }else{
    tr.append('<td>' + data.listRows[i].Value[t] + '</td>');
  }

                      }

                tbody.append(tr);
              }
                table.append(head);
                table.append(tbody);
        });
It is a simple yet functional code and can be applied to any type of table. Following this basic JSON structure, add the table markup on the document body:
<table id="dynamicTable" class="table"></table>
On the body of your document add the script on the bottom, after the jQuery script.
Here's our JSON file:
{
    "listColumns": [
        {"Title": "Column 01", "id": 1},
        {"Title": "Column 02", "id": 2},
        {"Title": "Column 03", "id": 3},
        {"Title": "Column 04", "id": 4},
        {"Title": "Column 05", "id": 5},
        {"Title": "Column 06", "id": 6}
    ],
    "listRows": [
        {"Value": ["0","0","0","0","0","0"]},
        {"Value": ["0","0","0","0","0","0"]},
        {"Value": ["0","0","0","0","0","0"]},
        {"Value": ["0","0","0","0","0","0"]},
        {"Value": ["0","0","0","0","0","0"]},
        {"Value": ["0","0","0","0","0","0"]}
    ]
}Now we introduce the JSON validate tool called jsonlint and you can find here:
Its operation is very simple, just copy and paste your code in the JSON address and click on Validate.
In addition to validating your code, this tool can still indents and makes the code more pleasing to our eyes.


