

In this section we will show you how to record a test using Selenium IDE. During the recording, we will add some additional commands to the test and run the recorded test. At the end of this section, we will show you how to export the recorded test to Selenium WebDriver.
A test is a basic building block in Selenium IDE. It contains commands for navigation, test steps, and checks for expected versus the actual state of the application. In this section we will show you how to create your first test and execute this test with Selenium IDE.
In this section we will show you how to record a test on a demo e-commerce application. We will test the product search feature of the application using the following steps:
Launch the Firefox browser.
Open the website for testing in the Firefox browser. For this example we will use http://demo.magentocommerce.com/.
Open Selenium IDE from the Tools menu.
-
Selenium IDE by default sets the recording mode on. If it's not pressed, you can start recording by pressing the
 (record) button in the top-right corner.
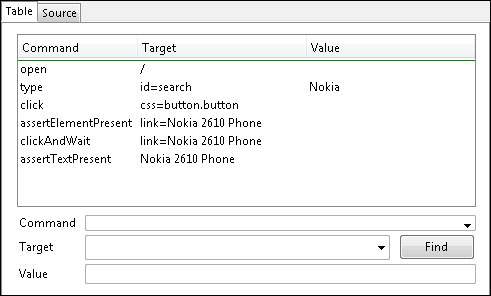
Now switch back to the Firefox browser window and type
Nokiain the search textbox and click on the Search button as shown:
Check if the link Nokia 2610 Phone is present in the search results. We can do that by selecting the link and opening the context menu (right-click) and selecting Show All Available Commands | assertElementPresent link=Nokia 2610 Phone.

Next, we will click on the Nokia 2610 Phone link to open the product page and check if the Nokia 2610 Phone text is displayed on the product page. To do this, select the Nokia 2610 Phone text and open the context menu (right-click) and select Show All Available Commands | assertTextPresent link=Nokia 2610 Phone:

Go back to Selenium IDE. All the previous steps are recorded by Selenium IDE in the Command-Target-Value format as shown in the following screenshot. Stop the recording session by clicking on the Recording button:
Before we play back the recorded test, let's save it in Selenium IDE:
Select File | Save Test Case from the Selenium IDE main menu:
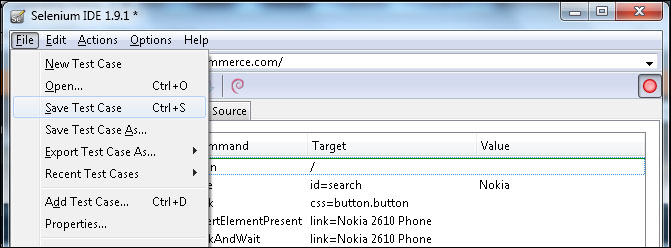
In the Save As dialog box, enter the test case name as
SearchTest.htmland click on the Save button. The test will be saved with the name SearchTest.
In Selenium IDE, we can group multiple tests in a test suite. Let's create a test suite and Selenium IDE will automatically add SearchTest to this suite:
Select File | Save Test Suite from the Selenium IDE main menu.
In the Save As dialog box, enter the test case name as
SearchFeatureTests.htmland click on the Save button.You can create and record more than one test case in a test suite.
Selenium IDE provides multiple ways to execute the tests:
Option 1 – running a single test case
-
Select the test which you want to execute from the test suite pane and click on the
 (play current test case) button.
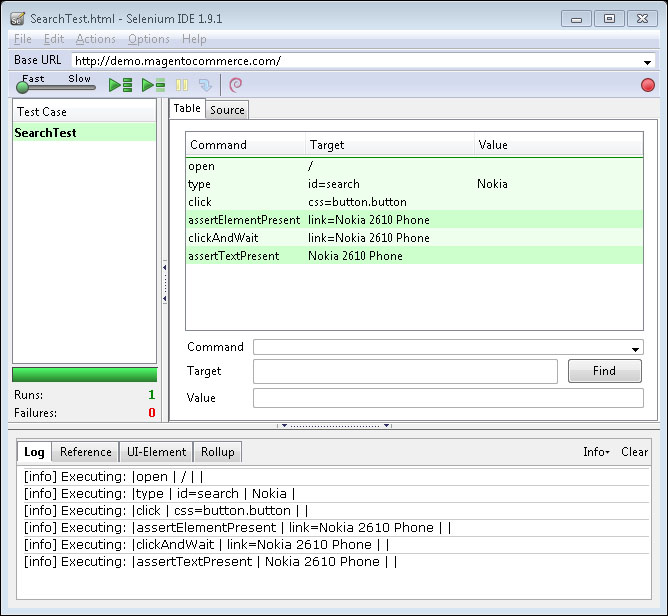
Selenium IDE will start the playback of the test and you can see the steps that we recorded earlier are being played automatically in the browser window. At end of execution, Selenium IDE will display results as per the following screenshot:
-
Select the test which you want to execute from the test suite pane and click on the
Option 2 – running all tests from a test suite
If you have multiple tests in a test suite, you can use the
 (play the entire test suite) button to play all the test cases.
After the test is executed in Selenium IDE, you can see the results in Log tab. All the steps which are successfully completed will be heighted in green and checks in dark green. If there are any failures in the test, those will be highlighted in red. This is how Selenium IDE helps you testing your web application.
Selenium IDE is great to start, however, you will need more to build a test automation framework. Complex tests, with conditional statements and logic, parameterization cannot be automated very well using Selenium IDE. In addition to this you might need features such as detailed logging and reporting, error handling particularly unexpected errors, database testing, and integration with other testing tools and frameworks that are not supported by Selenium IDE.
For building a flexible, maintainable, and robust framework, you will need to use Selenium WebDriver.
Selenium WebDriver is a simple API that helps you with browser automation. However, when using it for testing and building a test framework, there is much more needed. You will need to integrate Selenium WebDriver API with different libraries, tools, and so on, for test development. You will need an integrated development environment (IDE) to build your test project and inject other dependencies in to the framework.
We will show how to use Eclipse for developing tests with Selenium WebDriver. Eclipse is a very popular IDE in the Java world. Eclipse provides a feature-rich environment for Selenium WebDriver test development in Java. Along with Eclipse, Apache Maven also provides support for managing the entire lifecycle of a test project. Maven is used to define project structure, dependencies, build, and test management.
You can use Eclipse and Maven for building your Selenium WebDriver test framework from a single window. Another important benefit of using Maven is that you can get all the Selenium library files and their dependencies by configuring the pom.xml file. Maven automatically finds and downloads the dependencies to the project from the Maven central repository while building the project. In this section we will show you how to configure a new Maven project in Eclipse with the following steps:
Launch the Eclipse IDE.
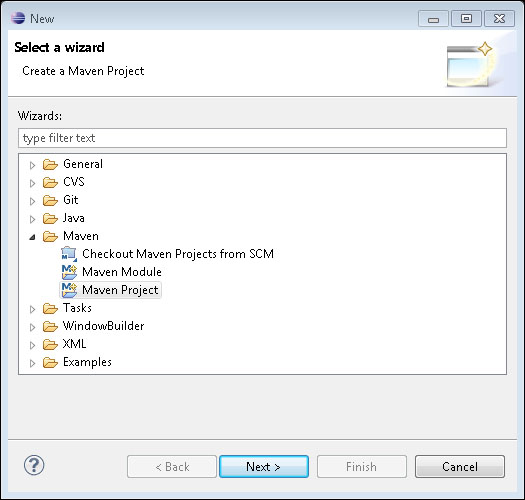
Create a new project by selecting File | New | Other from the Eclipse main menu.
On the New dialog, select Maven | Maven Project as shown in the following screenshot:
Next, the New Maven Project dialog box will be displayed; select the Create a simple project (skip archetype selection) checkbox and keep everything as default and click on the Next button:

On the New Maven Project dialog box, enter
com.demoapp.seleniumtestsin the Group Id: and Artifact Id: textboxes. You can also add a name and description. Keep everything as default and click on the Finish button, as shown in the following screenshot:
Eclipse will create the com.demoapp.seleniumtests project with a folder structure (in Package Explorer) similar to the one shown in the following screenshot:

Select pom.xml from Package Explorer. This will open the
pom.xmlfile in the editor area with the Overview tab open. Select the pom.xml tab instead.Add the WebDriver and JUnit dependencies highlighted in the following code to pom.xml in the
<project>node:<project xmlns="http://maven.apache.org/POM/4.0.0" xmlns:xsi="http://www.w3.org/2001/XMLSchema-instance" xsi:schemaLocation="http://maven.apache.org/POM/4.0.0 http://maven.apache.org/xsd/maven-4.0.0.xsd"> <modelVersion>4.0.0</modelVersion> <groupId>com.demoapp.seleniumtests</groupId> <artifactId>com.demoapp.seleniumtests</artifactId> <version>0.0.1-SNAPSHOT</version> <dependencies> <dependency> <groupId>org.seleniumhq.selenium</groupId> <artifactId>selenium-java</artifactId> <version>LATEST</version> </dependency> <dependency> <groupId>junit</groupId> <artifactId>junit</artifactId> <version>4.8.1</version> <scope>test</scope> </dependency> </dependencies> </project>You can get the latest dependency information for Selenium WebDriver and JUnit from
Add the com.example.tests package in the
src/test/javafolder.Create a new class
SearchTest.javain the com.example.tests package.Now let's go back to Selenium IDE and click on Options | Options from the main menu.
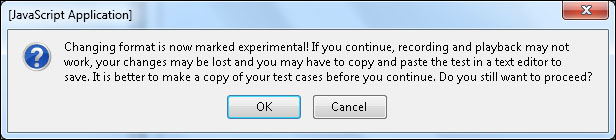
In the Selenium IDE Options dialog box, check the Enable experimental features checkbox and click on the OK button.
To view the test in Java, select Options | Format | Java / JUnit 4/ WebDriver from the main menu as shown in the following screenshot:

Click on the OK button in the [JavaScript Application] dialog box as shown:
The Source tab on the Selenium IDE window will now display the test in Java:
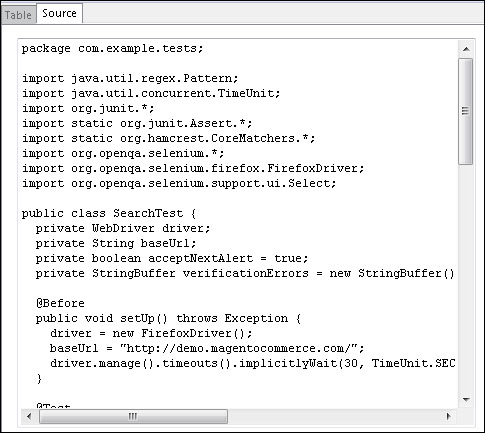
Copy the entire contents from the Source tab and add it to the
SearchTestclass:package com.example.tests; import java.util.regex.Pattern; import java.util.concurrent.TimeUnit; import org.junit.*; import static org.junit.Assert.*; import static org.hamcrest.CoreMatchers.*; import org.openqa.selenium.*; import org.openqa.selenium.firefox.FirefoxDriver; import org.openqa.selenium.support.ui.Select; public class SearchTest { private WebDriver driver; private String baseUrl; private boolean acceptNextAlert = true; private StringBuffer verificationErrors = new StringBuffer(); @Before public void setUp() throws Exception { driver = new FirefoxDriver(); baseUrl = "http://demo.magentocommerce.com/"; driver.manage().timeouts().implicitlyWait(30, TimeUnit.SECONDS); } @Test public void testSearch() throws Exception { driver.get(baseUrl + "/"); driver.findElement(By.id("search")).clear(); driver.findElement(By.id("search")).sendKeys("Nokia"); driver.findElement(By.cssSelector("button.button")).click(); assertTrue(isElementPresent(By.linkText("Nokia 2610 Phone"))); driver.findElement(By.linkText("Nokia 2610 Phone")).click(); // Warning: assertTextPresent may require manual changes assertTrue(driver.findElement(By.cssSelector("BODY")).getText().matches("^[\\s\\S]*Nokia 2610 Phone[\\s\\S]*$")); } @After public void tearDown() throws Exception { driver.quit(); String verificationErrorString = verificationErrors.toString(); if (!"".equals(verificationErrorString)) { fail(verificationErrorString); } } private boolean isElementPresent(By by) { try { driver.findElement(by); return true; } catch (NoSuchElementException e) { return false; } } private String closeAlertAndGetItsText() { try { Alert alert = driver.switchTo().alert(); if (acceptNextAlert) { alert.accept(); } else { alert.dismiss(); } return alert.getText(); } finally { acceptNextAlert = true; } } }To run the tests in the Maven lifecycle, select the com.demoapp.seleniumtests project in Package Explorer. Right-click on the project name and select Run As | Maven test. Maven will execute all the tests from the project using Selenium WebDriver with other language bindings.
Apart from Java, Selenium WebDriver bindings are available for a number of other programming languages:
Ruby language bindings
You can use Selenium with Ruby by installing the
selenium-webdrivergem with the following command:gem install selenium-webdriverFor more information on Ruby bindings, see http://code.google.com/p/selenium/wiki/RubyBindings.
Python language bindings
For using Selenium with Python, use the following command:
pip install seleniumFor more information on Python bindings, see http://code.google.com/p/selenium/wiki/PythonBindings.
.NET bindings
You can also use Selenium along with .NET by adding Selenium's NuGet package to the project in Visual Studio. For more information, refer to the bonus chapter Integration with other tools from Packt Publishing's Selenium Testing Tools Cookbook at http://www.packtpub.com/sites/default/files/downloads/Integration_with_Other_Tools.pdf.