

Now that we know a little bit about the technology, it's time to get everything installed. What follows is not an in-depth installation tutorial, but covers the necessary steps to get everything installed on Ubuntu. The installation process is very similar on other Linux distributions and Mac OS X. For Windows users, Node and MongoDB have installation packages you can run, and after that everything else is pretty much the same.
Node needs a couple of things installed to run properly, Python and a C compiler. So let's make sure those are installed and up-to-date with a terminal command. I use the Ubuntu Advanced Packaging Tool (APT) to install most software, as it makes it this easy:
$ sudo apt-get install python-software-properties python g++ make
Again we'll use APT to install Node.js. As Node is actively developed and frequently updated, APT doesn't always have the latest build. The latest version on APT is currently several versions behind, so we will add the repository of one of the Node.js developers. This is also the approach recommended on the Node website nodejs.org.
$ sudo add-apt-repository ppa:chris-lea/node.js
$ sudo apt-get update
$ sudo apt-get install nodejs
If everything has gone smoothly then you should be able to check the installed version displayed in terminal using the following command:
$ node --version
You should be greeted with a message back in the terminal along the lines of v0.10.0.
npm is a package manager for Node, although npm does not actually stand for Node Package Manager. As of Node Version 0.6.3, npm is actually automatically installed when you install Node.
You can quickly check that this has been done by checking the version number on the terminal.
$ npm --version
1.1.23
If it is not there for some reason, simply install it with APT with the following command:
$ sudo apt-get install npm
$ sudo apt-get install mongodb
In order to test MongoDB, we need to run it. You can do this by just typing mongodb into terminal, but I prefer to run it as a persistent service so that you don't have to restart it.
$ sudo service mongodb start
This should give you a confirmation message in terminal that the mongodb process is running.
Now to finally test that it has installed correctly we'll drop into the built-in MongoDB shell. In terminal, enter the following:
$ mongo
This should do three things:
Enter you into the MongoDB shell
Show you the version of the shell being used
Connect to the
testdatabase that comes with MongoDB
You should see something like the following screenshot:

Now we're starting to get into the Node-based applications. So those of you who are working on different operating systems can start paying attention again now. We are going to install Express using npm.
$ sudo npm install -g express
Note
See the -g flag there in the command line? This installs express globally, meaning that we can use it wherever we want.
Once again you can test the installation by checking the version number.
$ express --version
Finally we get round to installing Mongoose!
There are two ways of installing Mongoose, both using npm. I recommend using the latter one.
If you're creating a quick test app, or will never have to move or publish the project elsewhere, you can use npm to install Mongoose directly into your project. Navigate to the root folder of your site or project in terminal and run the following command:
$ sudo npm install mongoose
Any Node project can have a package.json file, and any packages you install via npm will have one. This file is normally in the root of your project, and can contain various metadata, such as project name, description, version number, and authors. It also helps manage the project's dependencies.
If you ever need to move, copy, or distribute your project you will find this invaluable. The dependency management means that you are not forced to remember which versions of which modules you added to each particular project. It becomes even more necessary if you distribute it widely, as it removes any doubt from the end-user's mind as to what the project needed.
Before we get into creating one, the following code snippet is an example of a package.json file following code snippet that you might expect to see when you create a new project using Express.
{
  "name": "application-name",
  "version": "0.0.1",
  "private": true,
  "scripts": {
    "start": "node app"
  },
 "dependencies": {
  "express": "3.0.0rc5",
  "jade": "*"
 }
}To install a specific version of Mongoose—which is the recommended approach, especially if you are going to distribute your project—you would update the dependencies section to look like the following code snippet:
"dependencies": {
  "express": "3.0.0rc5",
  "jade": "*",
  "mongoose": "3.6"
}
To install or update all of the dependencies listed in a package.json file, using terminal, you simply navigate to the folder containing the file and run the following command:
$ npm install
Now that we have the entire building blocks ready, let's set the foundations. Throughout this book, we are going to build a simple project management web app, called MongoosePM.
Let's start off by creating an Express project.
In terminal, navigate to a relevant folder, for example,
/MyWebsitesin Linux, orC:\Users\Your Username\Documents\My Web Sites\in Windows.Enter the following command:
$ express --sessions mongoosepm
This will create a new folder called mongoosepm. Inside this folder it will create a new Express project. By default an Express project doesn't support user sessions; an Express project is essentially stateless. By adding the --sessions parameter in the command line we add session support to our project, so that we can follow a user from page to page without having to constantly re-authenticate.
After Express has finished doing its thing you'll be able to see a whole load of new files and folders within your mongoosepm folder. The intricacies of Express are beyond the scope of this book, which is one of the reasons we have mainly stuck with the default settings.
The next step is normally to install the dependencies, but first let's add Mongoose and Connect to the dependency list. So open up the package.json file in the root of the project and add a couple of lines to the dependencies hash.
For example, if your dependencies section looks like the following code snippet:
"dependencies": {
  "express": "3.0.0rc5",
  "jade": "*"
}
Then you change it with this (see the following code):
"dependencies": {
  "express": "3.0.0rc5",
  "jade": "*",
  "connect": "2.7.x",
  "mongoose": "3.6.x"
}
It is recommended that you don't "wildcard" the version for most modules, as there is no guarantee that code based on older versions will work on newer versions. Putting a wildcard in for the patch version like we have for Connect and Mongoose, is recommended as they should only be patch updates and be backwards compatible.
To install these dependencies, go to the mongoosepm folder in terminal and run the following command:
$ npm install
Once this has finished working, we should have a fully functional Express website to play with. Let's test it to make sure!
Run the following command from terminal:
$ node app
You should see the following confirmation message directly in terminal:
Express server listening on port 3000
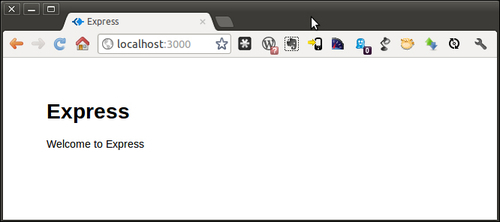
So open up a web browser, and point it to http://localhost:3000. All being well, you should be presented with the default Express project landing page, as shown in the following screenshot:
Tip
Downloading the example code
You can download the example code files for all Packt books you have purchased from your account at http://www.PacktPub.com. If you purchased this book elsewhere, you can visit http://www.PacktPub.com/support and register to have the files e-mailed directly to you.