

This section will present other CasperJS usages apart from testing.
Web scripting means to run a script that will use web pages as a backend service.
Of course, scripting a web page is quite a brutal way to obtain a service. Using a REST API (or any API) would be much more elegant. But in some cases there is no API. CasperJS is able to simulate user interaction on our web pages in order to test them.
But obviously, we can use its abilities to simulate user interaction on any web page in order to automate a process. That is why CasperJS is a very efficient web scripting tool.
Let's say we want a script to tell us how many unread messages we have in our Gmail inbox. We could use a script like the following (example12.js):
var casper = require('casper').create();

casper.userAgent('Mozilla/5.0 (Macintosh; Intel Mac OS X)');
casper.start("http://mail.google.com");

casper.waitForSelector("form#gaia_loginform", function() {
  this.sendKeys('form#gaia_loginform input[name="Email"]', "<my_account>@gmail.com");
  this.sendKeys('form#gaia_loginform input[name="Passwd"]', "<password>");
});

casper.then(function() {
    this.click("#signIn");
});

casper.then(function() {
    var inbox_link_text = this.fetchText('table.m a[accesskey="i"]');


    var search_unread = /\((\d+)\)/.exec(inbox_link_text );
    if(!search_unread) {
         this.echo("No new emails.", 'INFO');
    } else {
         this.echo("You have " + search_unread[1] + " new emails.", 'INFO');
    }
});

casper.run();
In this script, we log in and get the HTML code for the Inbox link (in the left menu) as it contains the number of unread e-mails, like the following:
Inbox (53)
To extract the number, we use a regular expression, /\((\d+)\)/, that will look for any number enclosed in brackets.
And the following is what we get:

Now let's try to get a local weather report (example13.js):
var casper = require('casper').create();

casper.start("http://weather.yahoo.com/");

casper.then(function() {
    var current_location = this.fetchText('#location-chooser .name');
    var current_temp = this.fetchText('.temp .f .num');
    this.echo("Current temperature in " + current_location + ": " + current_temp + "°F");
});
casper.run();
Here, we just load the Yahoo! Weather home page and then extract the information we want (the current temperature, our location, and the immediate forecast). After we have done this, we get the following:

Nice!
But be careful; if Yahoo! decides to change its weather page's layout, the selectors we have used might become invalid and our service would be down. This is the main weakness of the web scripting approach. And, in this very use case (getting Yahoo! Weather reports), we will build a much safer service by using the excellent Yahoo! Query Language REST API.
Nevertheless, web scripting might sometimes be a light and convenient solution when we are facing complex cross-platform integration issues.
CasperJS is able to produce an image from the current page using the following two methods:
this.capture(String filepath): This takes a screenshot of the entire pagethis.captureSelector(String filepath, String selector): This restricts the capture to a specific element
A simple example (example14.js) is as follows:
var casper = require('casper').create();

casper.start('http://en.wikipedia.org/wiki/Solar_System');

casper.then(function() {
    this.capture("screenshot1.png");
});

casper.run();
If we run it, it'll work just fine, but we will obtain a very large image because this Wikipedia page is very long and we have captured it entirely.
Being able to obtain a screenshot of a very long page is not always easy, so this feature can be helpful. If we want to reduce the captured area, we can set the viewport size and use captureSelector on the html element as follows:
var casper = require('casper').create();

casper.options.viewportSize = {width: 1300, height: 700};
casper.start('http://en.wikipedia.org/wiki/Solar_System');

casper.then(function() {
    this.captureSelector("screenshot1.png", "html");
});

casper.run();
And now we get a smaller image.
A typical usage of the capture methods is obviously debugging; when we do not know why our CasperJS is not working as expected, before spending time logging everything or inspecting all the elements, a simple screenshot might show us that we just forgot to perform a valid authentication due to which we are still blocked at the login page.
Another interesting usage is documentation. Writing a good user manual often involves inserting a lot of screenshots. Producing these screenshots can be quite long and painful, and it will be even more painful when we have to update them because the design may have changed since the last time we published the user manual.
So, how about using CasperJS to generate all the screenshots we need automatically from the current version of our web application? The principle is simple: we write a CasperJS script that reproduces the usage scenarios described in our documentation, we obtain a set of images, and we fuse them with our documentation text. Markdown, reStructuredText4, Textile, or similar formats are good candidates.
Resurrectio (see the Getting started with CasperJS (Simple) section) proposes to export any recorded sequence in two versions: a CasperJS version (which has our actual test scripts) and a reStructuredText version (which only contains comments and screenshots).
So we can run the test, obtain the screenshots, and compile our reStructuredText (with rst2html, rst2doc, rst2pdf, or so on) to get our document. Every time the design changes, we just re-run the test, recompile the text, and the document is updated automatically.
We can also use the capture methods from dynamically generated rendering to produce static contents.
For instance, if we use d3.js (http://d3js.org/) to draw gorgeous charts on our web page but would like to insert them in a newsletter or allow an old web browser to see them, we can turn them into images using CasperJS.
Let's take the following example from the d3js.org tutorial (example15.html):
<html>
<head>
<style>
body {
font: 10px sans-serif;
color: white;
}
.arc path {
stroke: #fff;
}
.arc text {
fill: #fff;
}
</style>
</head>
<body>
<script src="http://d3js.org/d3.v3.min.js"></script>
<script>
var width = 400,
height = 200,
radius = Math.min(width, height) / 2;
var color = d3.scale.ordinal()
.range(["#98abc5", "#8a89a6", "#7b6888", "#6b486b", "#a05d56", "#d0743c", "#ff8c00"]);
var arc = d3.svg.arc()
.outerRadius(radius - 10)
.innerRadius(radius - 70);
var pie = d3.layout.pie()
.sort(null)
.value(function(d) { return d.population; });
var svg = d3.select("body").append("svg")
.attr("width", width)
.attr("height", height)
.append("g")
.attr("transform", "translate(" + width / 2 + "," + height / 2 + ")");
d3.csv("data.csv", function(error, data) {
data.forEach(function(d) {
d.population = +d.population;
});
var g = svg.selectAll(".arc")
.data(pie(data))
.enter().append("g")
.attr("class", "arc");
g.append("path")
.attr("d", arc)
.style("fill", function(d) { return color(d.data.age); });
g.append("text")
.attr("transform", function(d) { return "translate(" + arc.centroid(d) + ")"; })
.attr("dy", ".35em")
.style("text-anchor", "middle")
.text(function(d) { return d.data.age; });
});
</script>
</body>
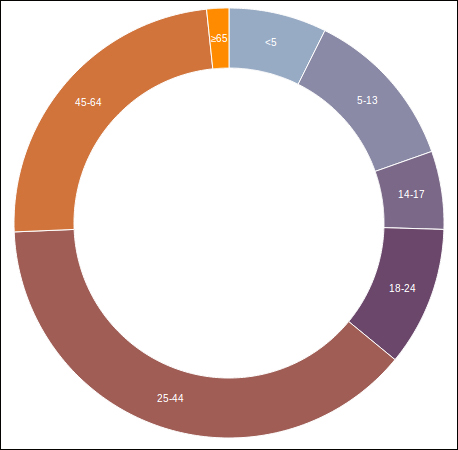
</html>It reads a CSV file that contains population by age group and draws a donut chart using SVG.
Let's provide the needed data (data.csv):
age,population
<5,2704659
5-13,4499890
14-17,2159981
18-24,3853788
25-44,14106543
45-64,8819342
≥65,612463
Now we can launch our simple HTTP server and have a look. It will work well if we are using Chrome, for instance, but won't work with Internet Explorer 8.
CasperJS can be used to capture this chart so we can serve an equivalent image to the web browser that is not able to render SVG (example15.js):
var casper = require('casper').create();

casper.start('http://localhost:8000/example15.html');

casper.then(function() {
    this.captureSelector("chart.png", 'svg');
});

casper.run();
And the following is what we get:
CasperJS can also be a smart way to provide a server-side printing service.
When we want our users to print our web pages, the most common and simple approach for them to use would be the web browser print feature. If we need to customize the rendering for printing (hide the navigation bar, change some colors or fonts, and so on), we can easily do so using a specific CSS for print (by mentioning media="print" inside the link tag). However, sometimes this is not enough.
Background images are a typical instance of where standard printing can be annoying; background images are hidden during printing, and it makes sense as we prefer to print text on a white background. But if we use them for a specific goal, such as filling the different bars of a bar chart, the printed result will be disappointing. (In our case, all the bars will be white, so we will not be able to distinguish between them.)
We will also have problems when we want to change the displayed information between screen and print. For instance, our page might contain a map with few markers. On the screen, we display a label when the mouse goes over a marker, but on print, we would prefer that all the labels are displayed.
In these problematic cases, a good solution is to use CasperJS as a backend printing service. The purpose is to highlight a service that takes as a parameter any URL, which returns an image capture of the corresponding page ready to be printed.
Our service will simply run a CasperJS script that will open the provided URL and then capture it:
var casper = require('casper').create();
var url = casper.cli.options['targeturl'];
var output = casper.cli.options['outputfile'];

casper.start(url);

casper.then(function() {
    this.capture(output);
});

casper.run();
As we cannot use the media="print" attribute to apply some print-specific CSS (as CasperJS will open the page in the screen mode), we can dynamically add a specific class on the body element before capturing so we can easily style the rendering:
casper.thenEvaluate(function () {
  var bodyclass = document.querySelector('body').getAttribute('class');
  bodyclass = bodyclass + " print-mode";
  document.querySelector('body').setAttribute('class', bodyclass);
});
And if we want to allow a specific process to be performed before capturing (such as displaying all the marker labels on a map as discussed before), we might wait for a specific selector to be available. The list of selectors is as follows:
In our target page, we add a JavaScript in charge of setting up the page for printing and adding a marker class on the
bodyelement as desired:if(location.search.indexOf("print") > -1) { set_up_as_expected(); document.querySelector('body').className += " ready-for-printing"; }In CasperJS, we wait for this marker class to appear before capturing the output:
casper.waitForSelector(".ready-for-printing", function() {
    capture(this, selector, output);
});
This service can be implemented with any web framework (we just need to be able to make a system call to run our CasperJS script).
Django Screamshot is a Django implementation and can be found at https://github.com/makinacorpus/django-screamshot.