
Before we proceed, we need to know more about the MEAN concept.
MEAN stands for:
MongoDB, the database
Express, the server-side web framework
AngularJS, the frontend framework
Node.js, the server
Node.js has the ability to run JavaScript on the server and use the power of the Express framework to build an HTTP proxy and routes.
MongoDB is an open source database document oriented for high performance and scalability and is also known as NoSQL database.
Tip
All you need to know about Express can be found at http://expressjs.com/.
To know more about MongoDB, check out http://www.mongodb.org/.
The Node.js community is growing each day and the stack will fast become more and more stable, and with the number of Node and Express boilerplates growing, we have good options in our hands.
Thus, we can consider MEAN as a great way for the development of SPAs.
The opinions are certainly much divided when it comes to SPA, but SPA is about dealing with a lot of frontend development.
Of course, we can use any kind of server-side technology such as .Net, PHP, Python, and Ruby on Rails.
Most likely, the solutions and examples presented in the next chapters are not intended to be the final word nor establish new standards or criticize any form of development that exists.
The solutions found here were adapted to our sample application and the book proposal to show some ways to develop SPAs.
Today, we have a variety of tools to help us in developing web applications. The correct choice of the best tool can save time and money.
We will now see some indispensable tools and editors for agile frontend development of SPAs. All the following tools mentioned are open source, except the Visual Studio and WebStorm IDEs. Here, we list the characteristics that we use in our sample project, with AngularJS and Node.js.
You can choose the editor of your choice; however, we recommend two of the most used editors in our community.
One is called WebStorm and provides a complete development environment; you can download the trial version at http://www.jetbrains.com/webstorm/. Webstorm has built-in tools, such as Terminal, RESTClient, Grunt.js support and Node Package Manager (NPM); they are at your fingertips for efficient development.
It also supports syntax highlight for languages such as HTML5, Node.js, Typescript, CoffeeScript, Dart, EJS, Handlebars, Mustache, Web Components, Stylus, Less, Sass, Jade, and JSLint/JSHint.
Until Version 7, it was possible to use an AngularJS plugin to facilitate the work. The plugin provides a number of advantages such as autocomplete, easy navigation between your modules, controllers, and directives.
The AngularJS plugin is very simple to use; just perform the following steps:
Remember that the preceding procedure applies to all versions until 8.0.2. From Version 8.0.4 the support is bundled with WebStorm. And to start using, you just need to include the AngularJS library in your project.
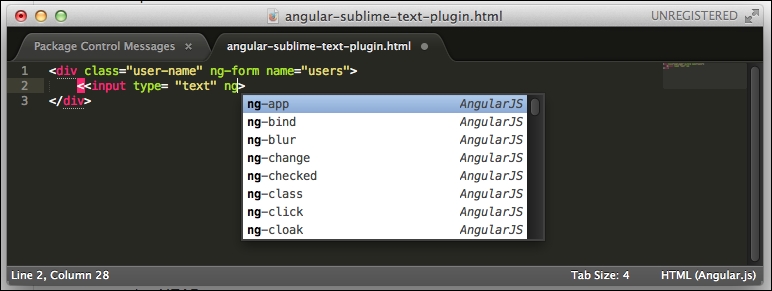
The other widely used text editor is Sublime Text; it is a very popular and powerful editor because it is lightweight and supports many languages. You can download it for free from http://www.sublimetext.com/2.
The Sublime Text editor has a great plugin to work with AngularJS, which is very similar to Webstorm.
You can find more information about the plugin at https://github.com/angular-ui/AngularJS-sublime-package/archive/master.zip.
Also, it can be installed directly from Sublime Package Control.
It provides autocompletion of core AngularJS directives, such as `ng-repeat`, `ng-click`, as well as any custom directives you create.
Note
You must have the Package Control plugin installed so as to be able to install any other plugins. You can find more details about Package Control at http://wbond.net/sublime_packages/package_control.
AngularJS is a client-side framework for MVC/MVVM done in JavaScript. The standard adopted is the closest to the MVVM pattern and is very robust and highly suitable for SPA. Later, we will discuss more thoroughly the basic features that we will use on the sample application.
You can find the whole documentation about AngularJS at http://docs.angularjs.org/tutorial.
AngularJS lets you write client-side web applications as if you have a smarter browser. It lets you use good old HTML (or Haml, Jade, and others) as your template language and lets you extend HTML's syntax to express your application's components clearly and succinctly. It automatically synchronizes data from your UI (view) with your JavaScript objects (model) through two-way data binding. Furthermore, it is possible to extend it by creating directives and customized elements.
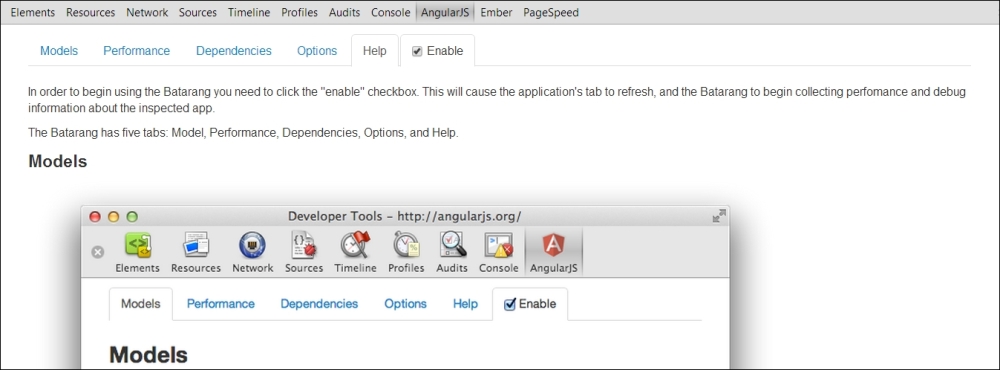
We also have an important tool to debug SPAs built with AngularJS, the Chrome extension called Angular Batarang, and it can be found for free at https://github.com/angular/angularjs-batarang.
Batarang provides us with a Chrome-like Web Inspector. After installing, you can activate it by pressing F12 or clicking the right mouse button on the screen and selecting the last link, Inspect element.
The Batarang extension has five tabs: Model, Performance, Dependencies, Options, and Help, thus providing a complete environment to debug your application.
The following is a screenshot of the Batarang panel:
There is an alternative to the Firefox browser known as AngScope. It is very useful to inspect $scope in your AngularJS project.
You can find it through the add-ons for Firefox or download it from https://addons.mozilla.org/pt-BR/firefox/addon/angscope-simple-angularjs-s/.
Nowadays, to start developing a web application is a very laborious task. For this, a lot of settings are required, a well-defined directories structure, some frameworks and boilerplates, a compiler for preprocessors, such as Less, Sass, CoffeScript, among other things.
You can lose a lot of time in the initial configurations of the project. You'll certainly need to repeat it all with every new project.
The following are some common steps to every new application:
After thinking about the solution of all these trivial tasks a tool emerged called Yeoman. This is a code generator, besides the Grunt task manager and Bower, and it promotes a new way of developing web applications.
These three tools have one thing in common: Node.js and the NPM.
Let's see more details about these tools.
Yeoman is an open source project that offers a program through the command line (yes, the console prompt/DOS on Windows and terminal on Linux/OSX), which is a platform for a web development environment for the Node.js world, including a set of libraries and generators.
In addition, there is a plethora of web generators for the main frameworks in the market such as Angular, Ember, and Backbone. It has an official repository that can be found at http://yeoman.io/generators/official.html, plus a repository of generators provided by the community too.
Yeoman is a tool that suggests an established workflow and can be incorporated into your projects. The installation is pretty simple, just open your terminal window and type the following command:
npm install -g yo
Bower is a manager dependency for the Web, but specifically for frontend packages. The idea is simple: you list the dependencies of the JavaScript example (AnglularJS, Pure CSS, Responsive boilerplate) in a file called bower.json at the root of your project, and with this, you can control the installation/upgrade of these packages through the command line.
Installing Bower globally on your system is very simple; just type the following command:
npm install -g bower
Do not forget to use the sudo command if you are not the system administrator and are using Linux or Mac OS X.
You can find more information about Bower at http://bower.io/
If you have already installed Yeoman, you don't need to install Bower or Grunt.
Another configuration setup is the .bowerrc file placed in the root directory. Here, we can set up the folder name and destiny to the Bower packages:
{
    "directory": "public/lib"
}
If you don't do this, Bower will install the dependencies in the bower_components folder, in the root project by default.
Grunt is a tool to automate build tasks done entirely in JavaScript. If you are following the best practices for performance, then you should worry about minifying CSS and JavaScript files to reduce the number of requests. You can also use a preprocessor to generate your CSS, like Less and Sass, or even make some CSS Sprites for your images.
A validation tool such as JSLint verifies errors on JavaScript files, CSSLint for consistence in CSS and many others actions, as mentioned before.
Using all this individually is insane if you want to automate this whole process. This is why Grunt.js is very useful and mandatory to any web project.
To install Grunt on your machine, just type the following command in your terminal window:
npm install grunt-cli
While these three tools represent the necessary triad for a fast web development environment, it is not obligatory. All tools can be installed one at a time as explained, or in general using Yeoman.