

Throughout the following recipes, we will install Magento 2 on a preconfigured SaaS platform hosted by DigitalOcean. Installing Magento 2 differs a lot from the current Magento 1 version. An important change is the use of Composer. We will use Composer to install all the third-party modules and manage the core of Magento 2. This recipe will show you how to do it.
Tip
Composer is a dependency management tool for PHP. It allows you to declare the software libraries for your project. It will help you install or update them.
For this recipe, you will need a preinstalled Apache or NGINX, PHP or HHVM and MySQL setup. No other prerequisites are required.
For the purpose of this recipe, let's assume that we need to create a Magento 2 hosting environment. The following steps will guide you through this:
First, we will start installing Magento 2 on Apache; later, we will do the same with NGINX. Throughout this recipe, you can use PHP-FPM or HHVM. For now, we will focus only on PHP-FPM.
Installing Composer is pretty straightforward. For the rest of the recipes, we will be installing Composer in the
/usr/local/bindirectory. This way, we can use it system-wide. Run the following command on the shell in the/usr/local/bindirectory:curl -sS https://getcomposer.org/installer | phpIf you have not installed curl yet, you may need to run the following command on the shell:
apt-get -y install curlTo check whether Composer is working fine, run the following command:
mv composer.phar composer
./composer
You will get the following output:

While we will be using a search-friendly URL in Magento, we need to enable the Apache mod_rewrite module before we can continue. Run the following code on the shell:
a2enmod rewriteRestart your Apache server to complete the new configuration. Run the following code on the shell:
service apache2 restartIf you see the following output on your screen, everything is correct:
root@mage2cookbook:/var/www/html# a2enmod rewrite
Enabling module rewrite.
To activate the new configuration, you need to run:
service apache2 restart
Note
Installing Magento 2 can be done in several ways. First, we will be showing you how to install it using the latest version from the GitHub release branch. Download the complete package and unzip or untar the files in your
/var/www/htmldirectory.The URL for the latest releases is https://github.com/magento/magento2/releases.
Make sure that your
/var/www/htmlhas no files in it anymore. (Use therm *command to clean up.)Execute either of the following commands:
wget https://github.com/magento/magento2/archive/2.0.0.zip
wget https://github.com/magento/magento2/archive/2.0.0.tar.gz
While extracting your files, make sure to move or copy them in to the
/var/www/htmldirectory.Now let's set the ownership and permissions:
chown -R www-data:www-data /var/www/html
find . -type d -exec chmod 770 {} \; && find . -type f -exec chmod 660 {} \; && chmod u+x bin/magento
Now we use Composer to resolve all of our dependencies. Run the following command on the shell:
cd /var/www/html/ && composer installTip
If your installation is set up correctly, the installation will continue, using the correct PHP modules. However, if, in some way, your PHP installing is not correct, you may get the following error messages. Update your system and try again:
Your requirements could not be resolved to an installable set of packages.
Problem 1
- The requested PHP extension ext-gd * is missing from your system.Problem 2
- The requested PHP extension ext-curl * is missing from your system.Problem 3
- The requested PHP extension ext-intl * is missing from your system.During the installation process, you will get a notice to create a GitHub OAuth token. The download rate limit is pretty small. Copy the URL from your shell window in your browser, log in at GitHub, or create an account and token:

Copy the generated token in the command prompt of your current shell window and the token will be saved for future reference in
/root/.composer/auth.json. You can continue the rest of the installation.Next, we will be using the setup wizard to continue the rest of the installation. In Chapter 2, Magento 2 System Tools, we will be using the shell installation method. Go to your favorite browser and run the following URL:
http://mage2cookbook.com/setupAs a result, we will get the following screen:

Now click on Agree and Setup Magento.
Let's start analyzing the readiness of your setup. Click on the Next button:
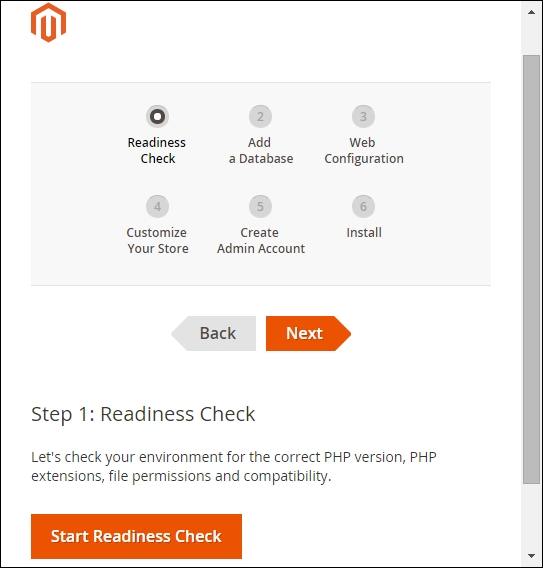
Magento 2 now will check your hosting setup for the correct PHP version, PHP modules, PHP settings, and file permissions, as shown in the following screenshot:

Continue the installation flow and commit your database credentials in the following screen:

In Step 3, we will set up our store address and administrator address. In Advanced Options, we are able to pick HTTPS, Apache rewrites, encryption key, and where to store the session key:

Step 4 gives you the opportunity to choose your time zone, currency, and language. In Magento 2, there is a brand new option to pick which modules need to be installed. You can easily select them by just clicking the checkbox, as shown in the following screenshot:

In Step 5, you can choose your username and password:

Now we are almost there; the final Step 6 will start installing our Magento 2 environment:
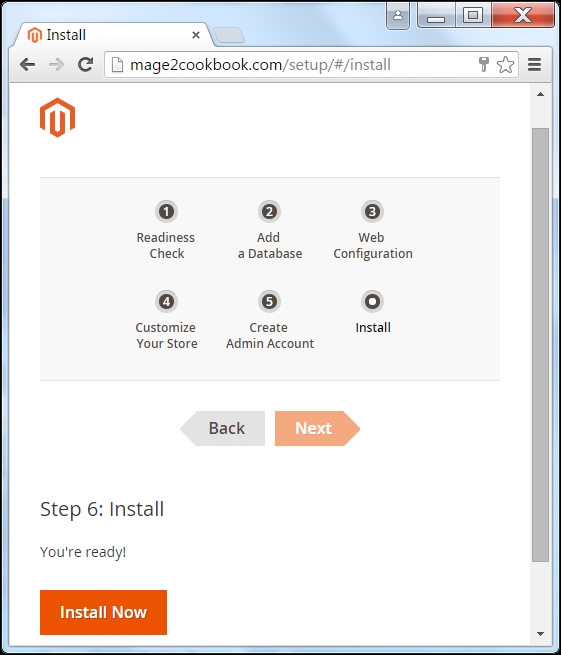
The installation step is really fast in Magento 2 and is done within a minute depending on your server. If you get an error in the console screen, such as a missing database, create one via the shell with the following command:
mysql –u root –p
create database magento;
Installation of Magento 2 can be seen in the following screenshot:

Congratulations, you have successfully installed Magento 2. You will be given administrative information on your login and store address.
For security reasons, you may want to alter the write permissions of your
/app/etcdirectory to only read permissions with the following command:chmod -R 440 /var/www/html/app/etcNow we will focus on the configuration of Magento 2 on NGINX. We don't need to reinstall Magento 2; we just need to alter the current NGINX setup with the appropriate setting.
Now, let's go to the NGINX configuration directory and update
default.confin/etc/nginx/conf.d.Open thedefault.conffile and change it with the following settings:upstream fastcgi_backend { server 127.0.0.1:9000; } server { listen 80; server_name yourdomain.com; set $MAGE_ROOT /var/www/html; set $MAGE_MODE developer; include /var/www/html/nginx.conf.sample; access_log /var/log/nginx/access.log; error_log /var/log/nginx/error.log; location ~ /\.ht { deny all; } }As you can see, we are now using an
upstreamandset $MAGEsetting and have removed thefastcgi_pass.However, the most important element is the Magento 2
nginx.conf.samplefile, which is in the root directory of your Magento 2 instance. For now, it is easy to include this directory but not advised on a production level. It's best that you copy this file to your NGINX configuration directory and store it there. Don't forget to change the following setting:include /var/www/html/nginx.conf.sample;
Save your configuration and run the following command to check whether your settings are correct. If not, change your configuration:
nginx -tIf your syntax is okay and the test is successful, then restart your NGINX server. Don't forget to stop your Apache server. Run the following command on the shell:
service apache2 stop && service nginx startTo check whether you are running NGINX, use the following command:
curl -I http://mage2cookbook.com/
root@mage2cookbook:~# curl -I http://mage2cookbook.com/HTTP/1.1 200 OKServer: nginx/1.9.6
Congratulations, you just finished the installation of Magento 2 on NGINX.
Let's recap and find out what we did throughout this recipe. In steps 1 and 2, we install Composer. Composer is our most important element before we can start installing Magento 2. As we are using Apache, we need to enable the mod_rewrite module, which is mandatory in Magento 2. Next, we download the latest Magento 2 version from GitHub and unzip the code in our directory.
In step 4, we check whether our setup is resolving all dependencies. Depending on the outcome, we need to install or enable the additional PHP modules.
In step 5, we create a GitHub token and store it in the auth.json file. We need this because the download rate limit is small when downloading additional software dependencies.
In step 6, we use the Magento 2 setup directory to install via the graphical user interface. All the remaining steps till 12 are self-explanatory.
In step 14, we switch from Apache to NGINX. The configuration file contains the following important elements: nginx.conf.sample, upstream fastcgi_backend, and $MAGE to finish our setup. The upstream parameter makes sure that all PHP requests are connected to PHP-FPM, the $MAGE variable connects the web directory, and include refers to the master configuration file.