Book Image

Service Worker Development Cookbook

By : Sean Amarasinghe
Book Image

Service Worker Development Cookbook

By: Sean Amarasinghe

Overview of this book

It would be nice to have web apps that work offline and send push notifications. This is now possible with Service Workers, which can add native-like functionality to your web apps without requiring a download. This book will get your mobile and web apps functioning without Internet connectivity, improve performance and network interaction in order to increase the level of availability, and show you how to build performant applications that seamlessly integrate with third-party APIs. We’ll show you how to add Service Worker functionality to web apps and sites, access offline content through basic and advanced techniques, and build powerful interactive system notifications. We’ll also teach you about cache functionality and assets to provide immediate load even over narrow connections. We conclude by giving you various tips to improve app performance, including the background sync technique. By the end of this book, you’ll know build high performing and faster web and mobile applications with Service Workers.
Table of Contents (17 chapters)
Service Worker Development Cookbook
Credits
About the Author
About the Reviewer
www.PacktPub.com
Preface
Index

Setting up SSL for Windows


Service workers are designed to run only across HTTPS, so in order for us to test our code, we need our web pages to be delivered across HTTPS. In this recipe, we will cover getting your site setup with SSL support for Windows.

Getting ready

This recipe assumes you run Windows 7 or higher with Internet Information Service (IIS) enabled.

How to do it...

Follow these instructions to enable SSL:

  1. First, open IIS; you can do this by running the following command inside the command line:

    Inetmgr
    
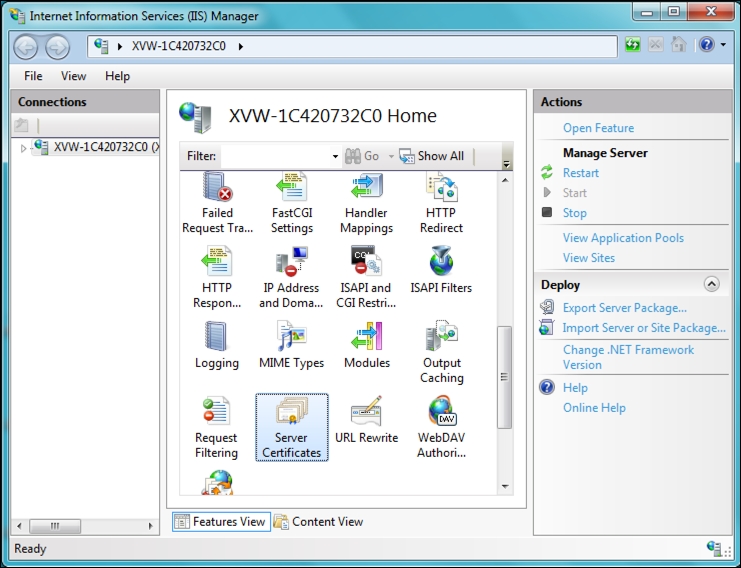
  2. Select the server node in the tree view and double-click the Server Certificates feature in the list view, as shown:
  3. Click on the Create Self-Signed Certificate... link in the Actions pane.

  4. Enter a meaningful name for the new certificate and click OK.

    This will generate a self-signed certificate, which is marked for Server Authentication use, meaning it uses a server-side certificate for authenticating the identity of the server and also for HTTP SSL encryption.

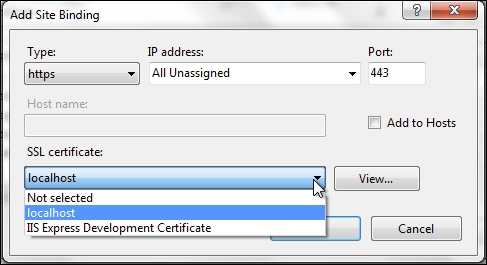
    In order to create an SSL binding, we have to select a site in the tree view and then, in the Actions pane, click Bindings.... This will bring up the bindings editor that manages bindings for your website, which include create, edit, and delete. Now, to add your new SSL binding to the site, click Add....

  5. Port 80 is the default setting for a new binding for HTTP. We can select https in the Type drop-down list. Select the self-signed certificate we created in the previous section from the SSL Certificate drop-down list, and then click OK.
  6. Now we have a new SSL binding on our site and all that remains is to make sure that it works.
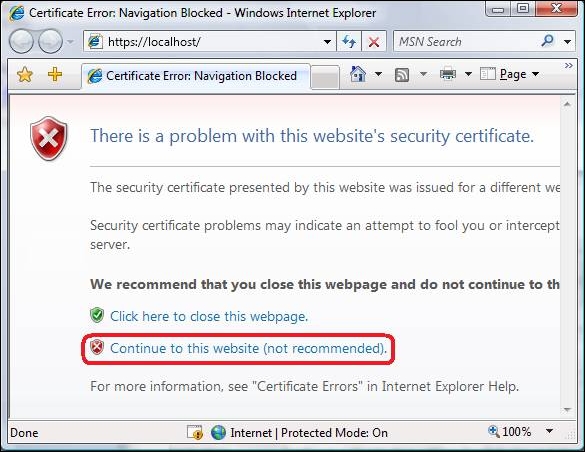
  7. Click Continue to this website to proceed.