

React is a JavaScript library, so we should be able to make a reference to it through a <script> tag in our HTML page and start writing our web application. However, this approach would prevent us from exploiting some features that are provided by a modern JavaScript development environment—features that make our lives easier. For example, we wouldn't be able to use recent features from ECMAScript 2015+, such as classes, modules, arrow functions, let and const statements, and so on. Or, we could use those features, but only recent browsers would support them.
Note
The relationship of ECMAScript with JavaScript Using the latest ECMAScript features requires a true development environment, allowing us to transpile our code into ECMAScript 5 version JavaScript code, so that even older browsers will be able to run our application. Setting up a modern JavaScript development environment requires the installation and configuration of a few tools: a transpiler, a syntax checker, a module bundler, a task runner, and so on. Learning to use these tools properly requires a lot of time, even before starting to write a single line of code.
Fortunately, we can use create-react-app, a command-line interface (CLI) tool that allows us to set up a React-based application without needing to configure any of the aforementioned tools. It is based on Node.js and provides commands to set up and modify a React application in an immediate way.
In order to install create-react-app, you need Node.js installed on your machine. You can install the CLI by typing the following command in a console window:
npm install -g create-react-appAfter installation, you can verify whether it is properly installed by typing the following command:
create-react-app --versionIf all is OK, the installed version of create-react-app will be shown.
Now that the development environment is installed, let's create our first React application. We can do this by typing the following command in a console window:
create-react-app hello-reactThis command tells create-react-app to set up all of the prerequisites for a React-based application named hello-react. The creation process may take several minutes, since it has to download the npm packages needed for the project.
Note
npm is the standard package manager of the Node.js environment. When the process ends, you will find a list of the available commands that you can run to manage the project on the screen. We will return to this later. The result of the project creation will be a folder named hello-react, inside of which you will find the items composing a dummy—but working—React-based application.
Scenario
We need to set up a development environment in order to create a product catalog application built with React.
Aim
The aim of the activity is to start becoming familiar with create-react-app and the content it creates.
Steps for Completion
- Use
create-react-appto create the development environment - Give the name
my-shopto the sample application
Solution
There is no formal solution. You should focus on the content created by create-react-app, as we are going to analyze it in the following sections.
Let's take a look at the files generated by create-react-app, so that we can get an understanding of the structure of a React-based application. We will find these files and folders inside of the HELLO-REACT folder as shown in the following screenshot:
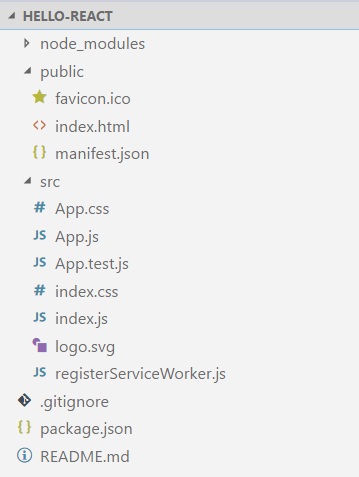
In the root folder, we can see a README.md file, the package.json file, and the .gitignore file.
The README document contains references to all you need to start building a React-based application. It is written in Markdown format, and you can integrate or overwrite it with your own documentation.
Note
Markdown is a simple markup language, often used to create technical documentation for software libraries. It requires a simple text editor, and it is possible to convert a Markdown document into HTML.
The package.json file contains information about the project, such as the name, the version, and so on, and references to all the npm packages used by the current project. This is a Node.js asset that allows you to download the required packages when copying the project to another machine. It also contains the definitions of scripts that allow us to manage the project itself.
The following is an example of package.json file content:
{
  "name": "hello-react",
  "version": "0.1.0",
  "private": true,
  "dependencies": {
    "react": "^16.0.0",
    "react-dom": "^16.0.0",
    "react-scripts": "1.0.14"
  },
  "scripts": {
    "start": "react-scripts start",
    "build": "react-scripts build",
    "test": "react-scripts test --env=jsdom",
    "eject": "react-scripts eject"
  }
}
As we can see, the file's content is a JSON object, with a few easy to recognize properties. In particular, we can identify the project's name, the version, and package dependencies. Apart from the name and version properties, usually, you don't need to manually change these settings.
The .gitignore file is a hidden file in Unix-based systems, and it allows us to track which file(s) to ignore when using Git as a version control system. The create-react-app tool added this file because nowadays, it is essential to have a project under version control. It suggests Git, since it is one of the most popular version control systems.
The public folder contains the static parts of our application:
favicon: This is the icon shown in the browser's address bar and is used for bookmarksindex.html: This is the HTML page containing the reference to our React code and providing a context to React renderingmanifest.json: This is a configuration file containing metadata according to the Progressive Web Apps (PWA) criteria
In particular, the index.html file is the starting point of our application. Let's take a look at it so that we can understand what's special about it:
<!doctype html>
<html lang="en">
  <head>
    <meta charset="utf-8">
    <meta name="viewport" content="width=device-width, initial-scale=1, shrink-to-fit=no">
    <meta name="theme-color" content="#000000">
    <link rel="manifest" href="%PUBLIC_URL%/manifest.json">
...
    <title>React App</title>
  </head>
  <body>
    <noscript>
      You need to enable JavaScript to run this app.
    </noscript>
  <div id="root"></div>
...
</html>
As we can see, it is a standard HTML page; however, a few things should be noted. First of all, we see a link to the manifest.json file:
<link rel="manifest" href="%PUBLIC_URL%/manifest.json">
This manifest contains metadata for configuring our app as a PWA.
Note
Progressive web apps are web applications that work for every browser and every platform, even offline. Their basic tenet is responsiveness and progressive enhancement.
The second thing we notice is the %PUBLIC_URL% placeholder in both link references:
<link rel="manifest" href="%PUBLIC_URL%/manifest.json">
<link rel="shortcut icon" href="%PUBLIC_URL%/favicon.ico">
This placeholder will be replaced with the actual URL of the public folder during the build process.
The body of the HTML page contains an empty div with a root identifier. This is an important item for the correct setup of our React application, as we will soon see. Apart from the <noscript> tag, we do not see any other element in the body. However, we need a binding between the HTML page and the JavaScript. The build process will be responsible for adding the required scripts to the body.
Note
We can add any other required items to the HTML page, such as meta tags, web fonts, and so on. However, remember that files referenced inside the HTML markup should be put in the public folder. The node_modules folder contains the npm packages used by the project. Usually, you don't need to directly manage these files.
The most important folder for developing our application is the src folder. It contains the basic files, with the code that we can modify for our purposes.
In particular, we will find the following files:
index.js: Contains the starting point of our applicationindex.css: Stores the base styling for our applicationApp.js: Contains the definition of the main component of the sample applicationApp.css: Contains the styling of theAppcomponentlogo.svg: This is the React logoApp.test.js: Stores the basic unit test involving theAppcomponentregisterServiceWorker.js: Contains the code to register the service worker in order to allow offline behavior, as per the PWA requirements
Let's analyze the content of a couple of these files, since their code is fundamental to understanding how the startup of a React application works.
Let's start with the index.js file. Its content is shown as follows:
import React from 'react';
import ReactDOM from 'react-dom';
import './index.css';
import App from './App';
import registerServiceWorker from './registerServiceWorker';

ReactDOM.render(<App />, document.getElementById('root'));
registerServiceWorker();
It is an ECMAScript 2015 module, importing other modules. In particular, it imports the React and ReactDOM objects from the react and react-dom modules, respectively. Both modules are part of the React library and are stored inside the node_modules folder.
The react module provides functionality for component creation and state management. The react-dom module is the glue between React components and the HTML DOM. The React library has been split into two modules in order to separate the component management from the actual rendering. This separation may be useful when we want to target a rendering platform that is not the web; for example, if we want to target native mobile rendering.
Other modules are imported from the same folder as the index.js file. In particular, we import the App component from the App module. The App component is used by the render() method of the ReactDOM object in order to bind it to the div element in the HTML page. This magic is performed by the following statement:
ReactDOM.render(<App />, document.getElementById('root'));For the moment, let's ignore the syntax used to render the App component. This will be covered in the next chapter. The meaning of this statement is to associate the React App component defined inside the App module with the HTML element identified by the root ID.
The registerServiceWorker() function import and invocation enables the support for offline behavior, in line with the PWA specification, while the import of index.css makes the CSS styling available to the application.
The App.js file contains the definition of the React component representing the application. Its content looks like the following:
import React, { Component } from 'react';
import logo from './logo.svg';
import './App.css';

class App extends Component {
  render() {
    return (
      <div className="App">
        <header className="App-header">
          <img src={logo} className="App-logo" alt="logo" />
          <h1 className="App-title">Welcome to React</h1>
        </header>
        <p className="App-intro">
...
export default App;
Let's take a quick look at the code, since it will be covered in detail in the next chapter. For the moment, we only want to get a very basic idea of how a React component is defined. Here, we see a module importing a few items from other modules, defining the App class by inheriting from the Component class and exporting the App class itself as a default export. That's all, for the moment. We will cover this code in depth in the next chapter, understanding its meaning in detail.
The create-react-app CLI provides a few commands to manage our React project. These commands appear in the form npm <command>, since they are based on the npm.
The first command we will cover is npm start. This command starts a development web server accepting requests at http://localhost:3000.
So, after launching this command, we can open a browser and see the following result:
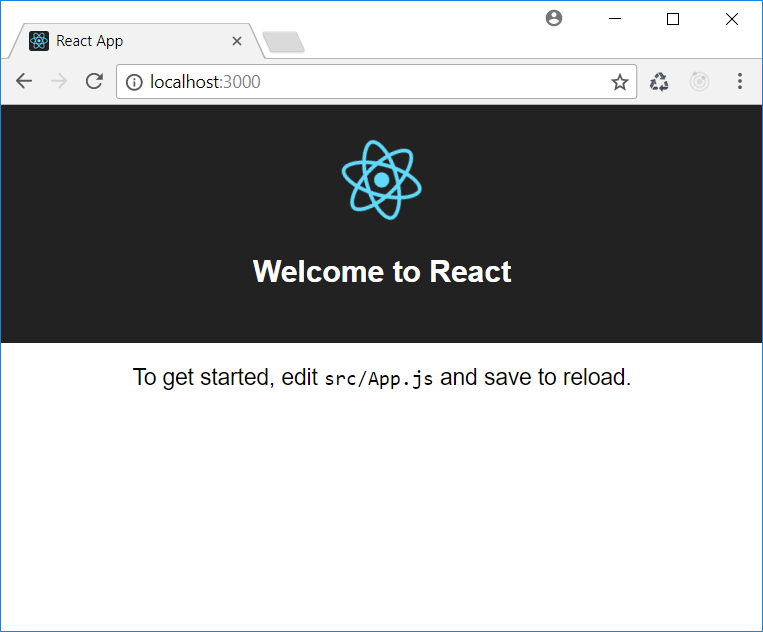
The development web server has a hot reloading system that allows us to change the code of our application and get the page refreshed in the browser after saving the file.
This following steps show how changing the content of a file causes the application to reload in the browser:
- Open a console window.
- Go to the
hello-reactfolder. - Run
npm start. - Launch a browser and go to
http://localhost:3000. - Launch a text editor and open the
App.jsfile. - Search for the following line of code:
To get started, edit <code>src/App.js</code> and save to reload.
- Replace the code mentioned in step 6 with the following line of code:
Hello React!
- Save the file.
- Check the browser content. Now it should display the new text.
Scenario
We want to change the title of the application that was created in the previous activity.
Aim
The aim of the activity is to become familiar with launching an application and appreciating the hot reloading feature.
Steps for Completion
- Start the application so that you can see it in a browser
- Edit the
App.jsfile and set the title toMy Shop
Solution
There is no formal solution. You should focus on getting the title correctly changed and the application running.
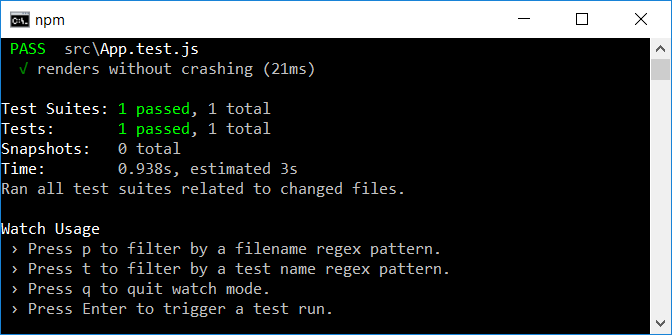
create-react-app promotes the use of unit tests by generating a sample unit test file, as we have already seen, and by providing a set of tools to run such tests.
These tools are based on Jest, and we can run the tests written within our application by running the following command:
npm testThis command will start running our test and will show the results, as shown in the following screenshot:
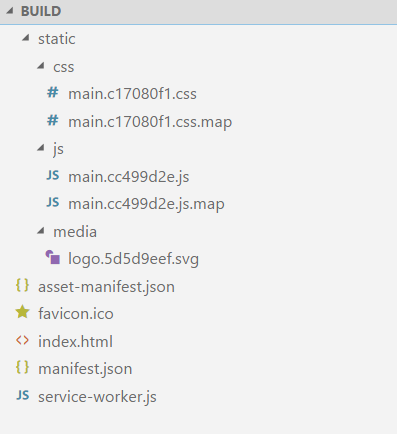
When we are ready to move our application into the production environment, we need the artifacts to publish. We can produce these artifacts by running the following command:
npm run buildThe result of running this command is a new BUILD folder where we will find all of the files that we need to move into a production environment. The command carries out some processing on the files of our development environment. Put simply, it translates all of the ES2015 code we wrote into ES5 compatible code, so that it is also available for older browsers. This process is called transpilation. In addition, it reduces the size of the code itself, allowing for faster downloading over the network. This process is called minification. Finally, it takes the files in our development environment and combines them into a few files, called bundles, in order to decrease network requests.
The following screenshot shows the content of the BUILD folder of the sample application:
To publish the production build of our application, we can just copy the content of the BUILD folder into the production server's folder.
Note
The result of the production build assumes that the artifact will be published into the web server root, that is, at a location where the application will be accessible through a URL such as http://www.myapplication.com.
If we need to publish the application in a root's subfolder, that is, at a location where the application will be accessible through a URL such as http://www.myapplication.com/app, we need to make a slight change to the package.json file.
In this case, we need to add a homepage key to the configuration JSON with the URL as its value, as shown here:"homepage": "http://www.myapplication.com/app".
The last command we will cover is the eject command:
npm run ejectWe can use this command when we are confident in using the tools underlying create-react-app and we need to customize the environment configuration. This command takes our application out of the CLI context and gives us the power and responsibility to manage it.